¶ 1. Model Management
Model Display
Enter the project interface, and click “Display” in the menu bar to set how the model is displayed.
• Zoom to Fit
Click to reset the zoom to its original position so the 3D model is fully visible on the screen.
• Default Position
Shows the 3D model from a viewpoint determined by the first few frames captured.
• Perspective View
The camera is positioned at a fixed point in space, so the model has a sense of depth and distance. This is the default view.
• Orthogonal View
All objects appear at the same scale, and all three dimensions (width, height, and depth) are projected onto a 2D plane to preserve their relative sizes and positions.
• Show Bounding Box
Displays or hides the bounding box around the current model. The bounding box is a rectangular box that is wrapped as tightly as possible around the object.
• Show Rotation Ball
Displays the XYZ rotation axis to show the model's orientation in 3D space.
• Show Grid
Displays or hides a virtual 3D grid in the editing interface. The grid is a structure of horizontal and vertical lines that help to position and align objects.
• Show Scanning Location
Displays location references for color scans captured in Single-shot mode. Use it to see if any color data needs to be reshot. Click on any reference to view a single frame captured at the current position; double-click on a reference to view the model image captured at the current position.
• Show Reverse Point
Shows or hides the surface across from the current one in another color (brownor transparent).
• Mesh Model Display
Solid: Turn the model’s surface on or off.
Wireframe: Shows the model’s wireframe.
Wireframe Overlay: Shows the model’s wireframe overlay.
• Model Properties
Click Model Properties to change the model’s color and surface properties.
• Enable Select Through
Enable it to select data right through the model.
• Screenshots
Full Screen: Capture the entire screen Model Only: Only captures an image of the 3D model.
• Light Source
Drag the icon to adjust the Light Source's position. Double-click the icon to reset to the default location. Click off the icon to close.
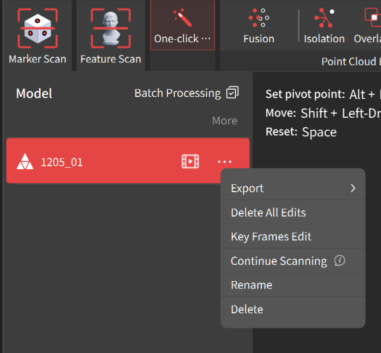
Batch Processing
If you’ve created a project with multiple scans, batch processing can perform the Fusion or Meshing
processes with the same settings on multiple models.
Click the batch process button. Select the models to be processed. Select a setting for Fusion or
Mesh and click Apply.
Delete All Edits
It deletes all the edits and resets the model to being unprocessed raw data.
Renaming/Deleting Models
Double-click the model on the project pane to rename it. Or click the  icon next to the model’s name and select Rename or Delete.
¶ 2. Project Management
 |
Creating New Projects There are three methods of creating new projects: • On the Homepage (connected scanner) > Click the New Project pane or Scanner Connection Status pane. • Click the • In the Project interface, go to Menu Bar and click File > New Project. Opening a Project There are two methods of opening a project: • On the Homepages’ Project list > Double-click a project. • In the project interface, go to Menu Bar, and click File > Open a Project or Open Recent Projects. Opening Folder In the project interface, go to the Menu Bar, and click File > Open Folder to open the folder where the current model is located. Saving Projects When a project is open, go to Menu Bar and click File > Save. Renaming Projects On the Homepages’ project list > Click the Deleting Projects • Deleting Individual Projects On the Homepages’ Project section > Click the • Deleting Multiple Projects On the Homepages’ Project section > Click the tick box next to one or more project thumbnails > Click Delete. |
 button between the Home and Open Project buttons in the Menu Bar.