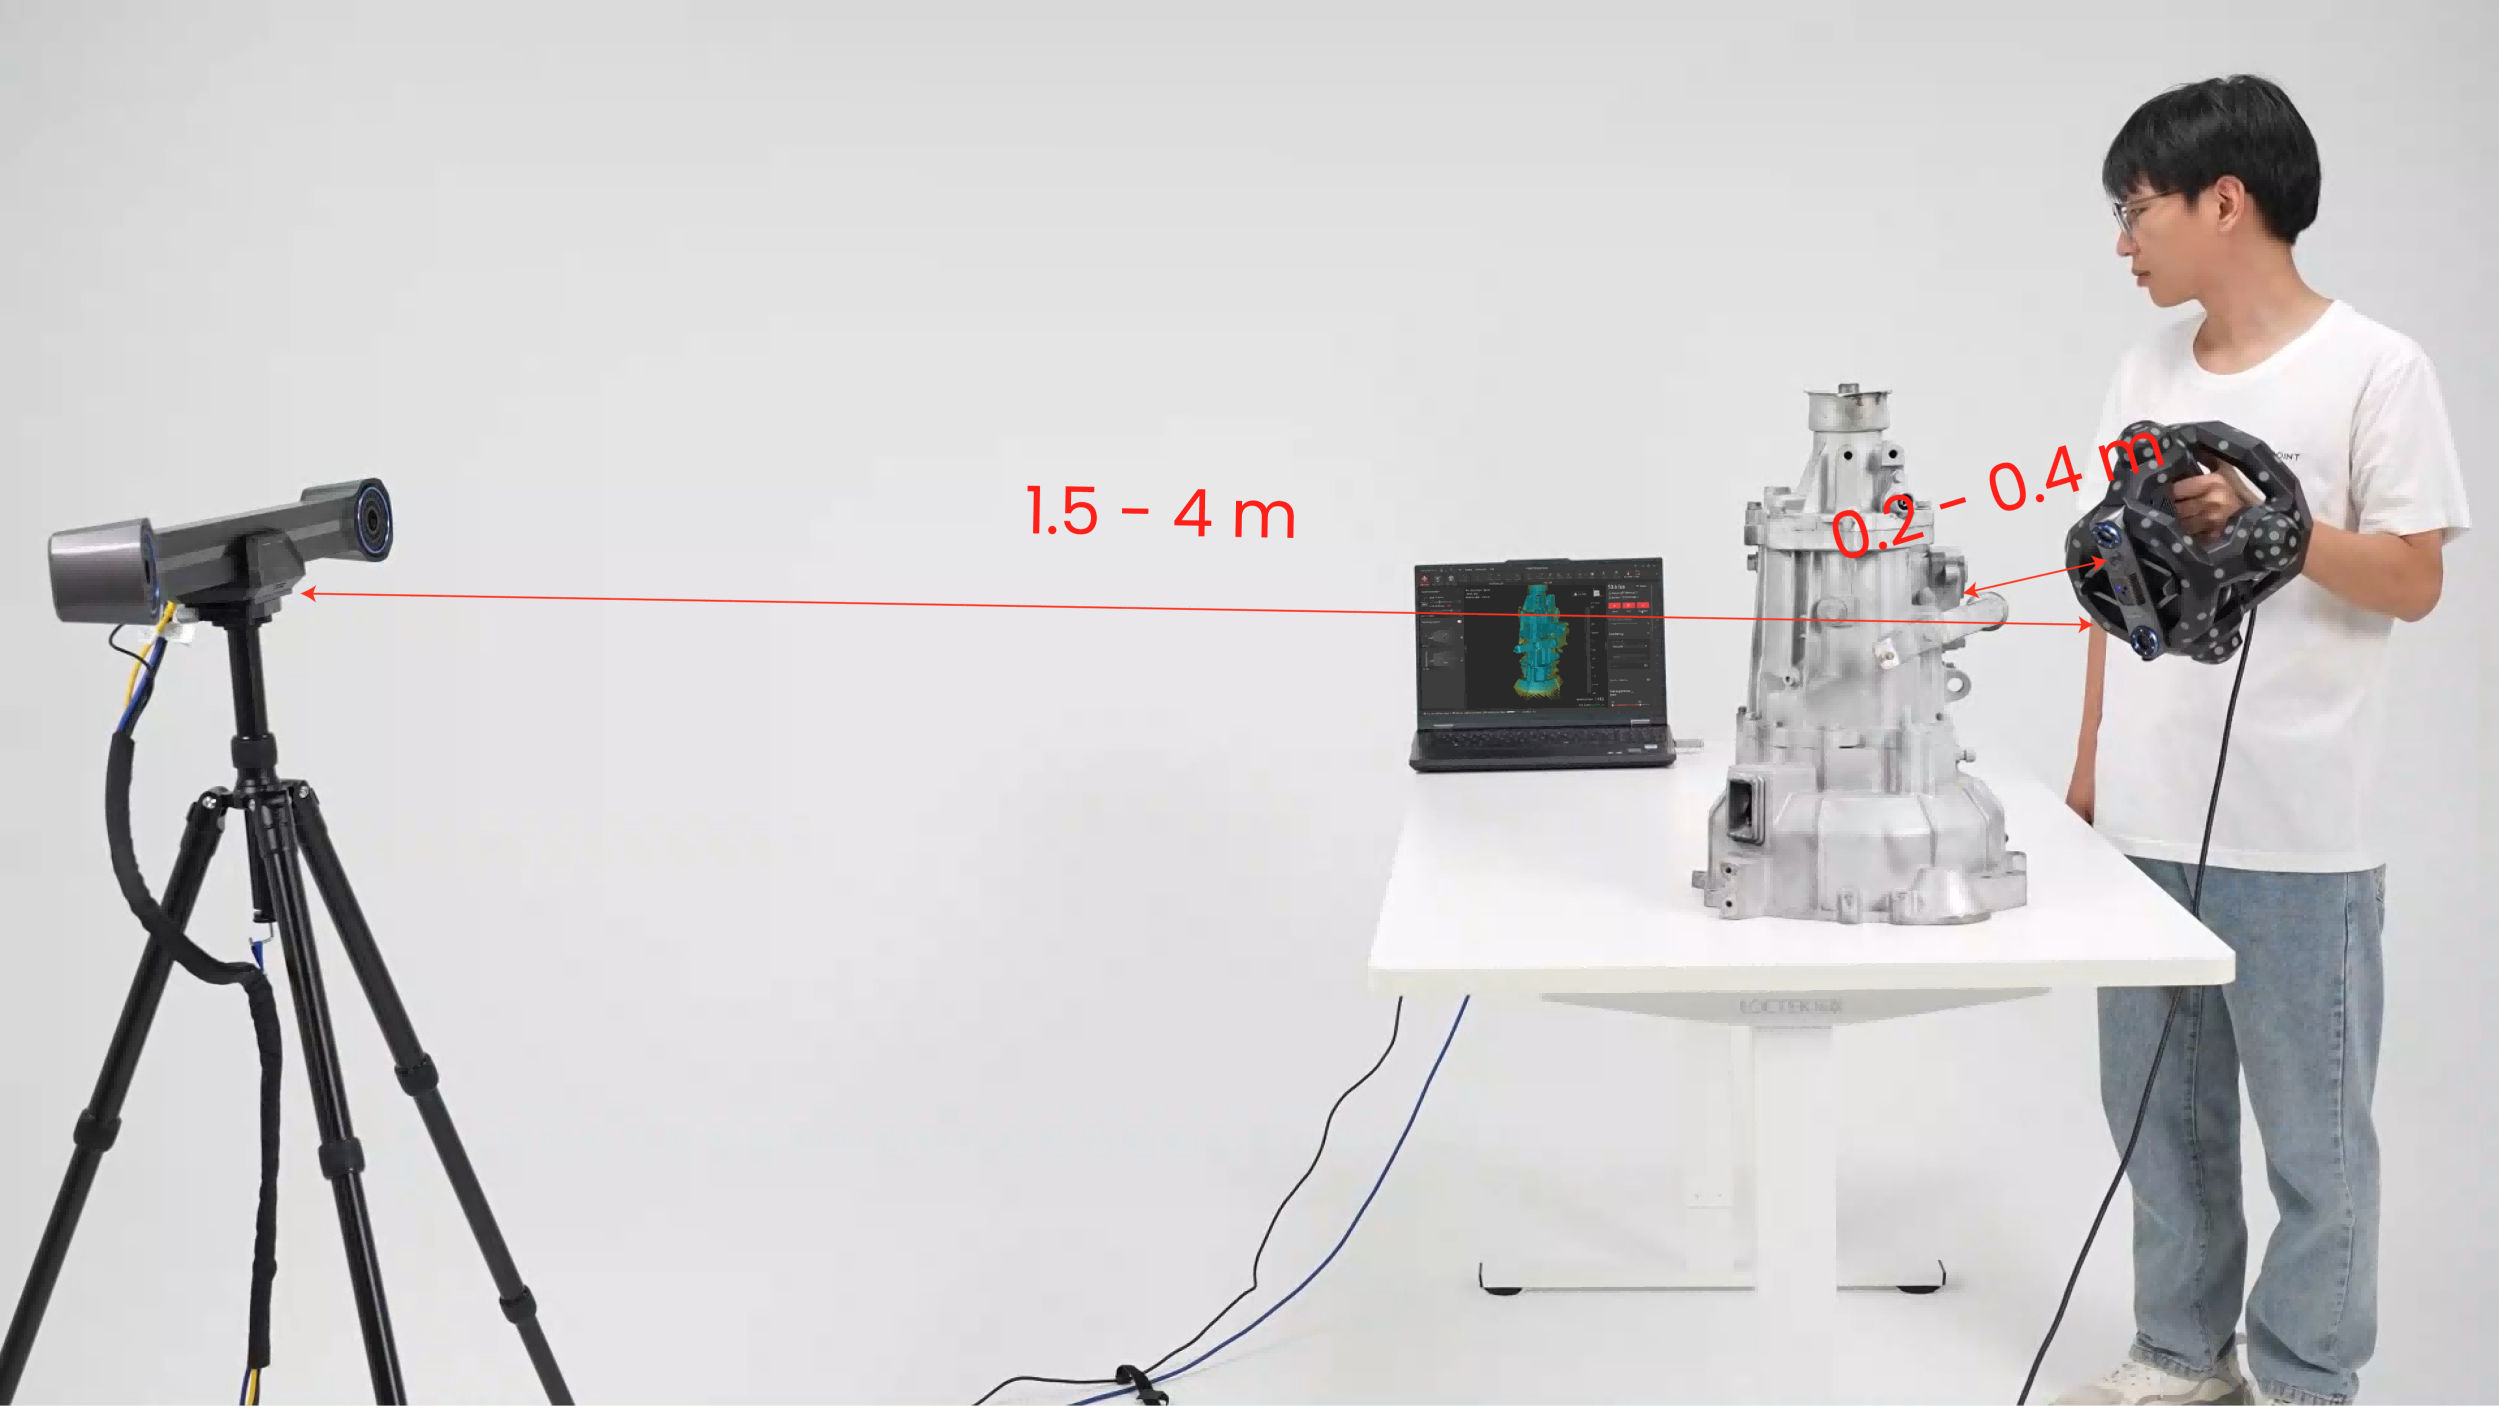
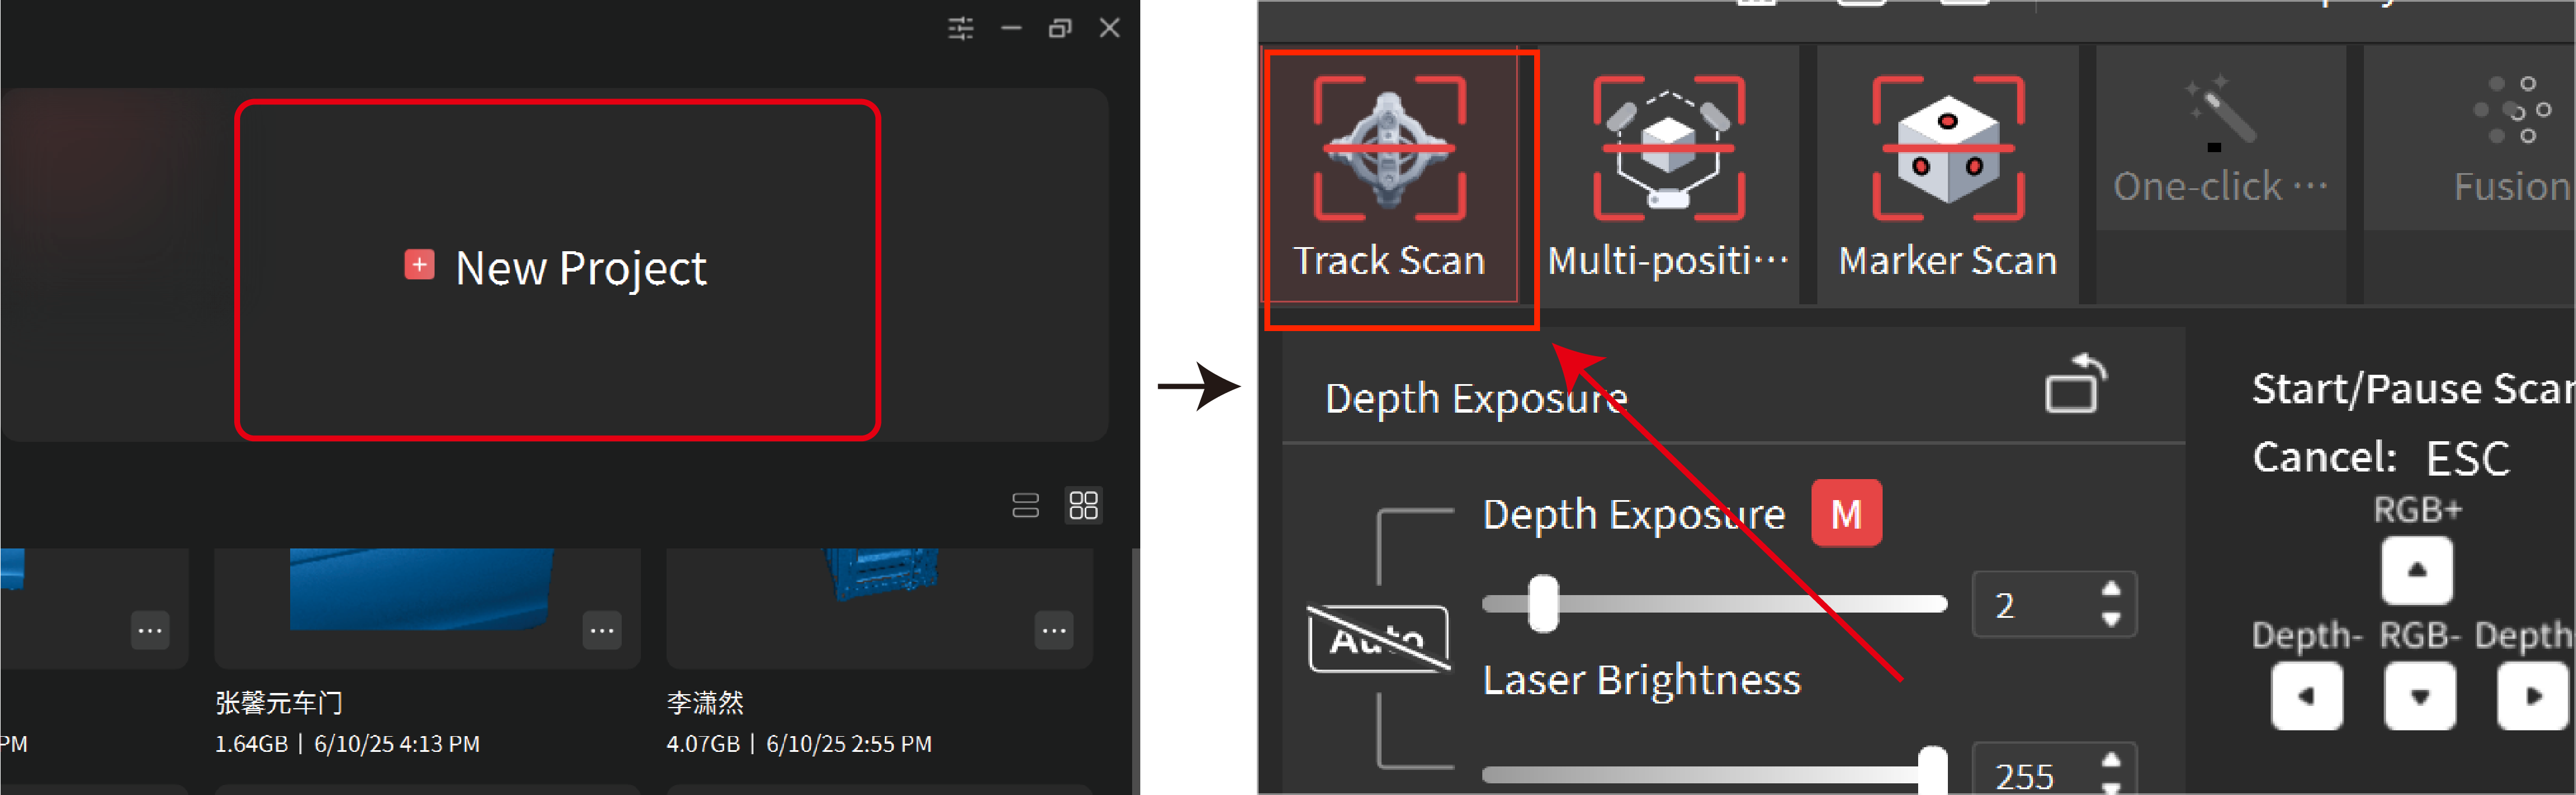
¶ 1. Track Scan
Scan without markers by tracking the Scanner's position and angle in real time. The Tracker and object must stay still during the scan, making it suitable for quickly scanning small and medium-sized objects.
After connecting the Scanner, click the New Project button on Revo Track’s Home page to enter the project interface. Select "Track Scan."
Follow the steps below to perform a Track Scan:
※ Please refer to the actual interface in Revo Track.
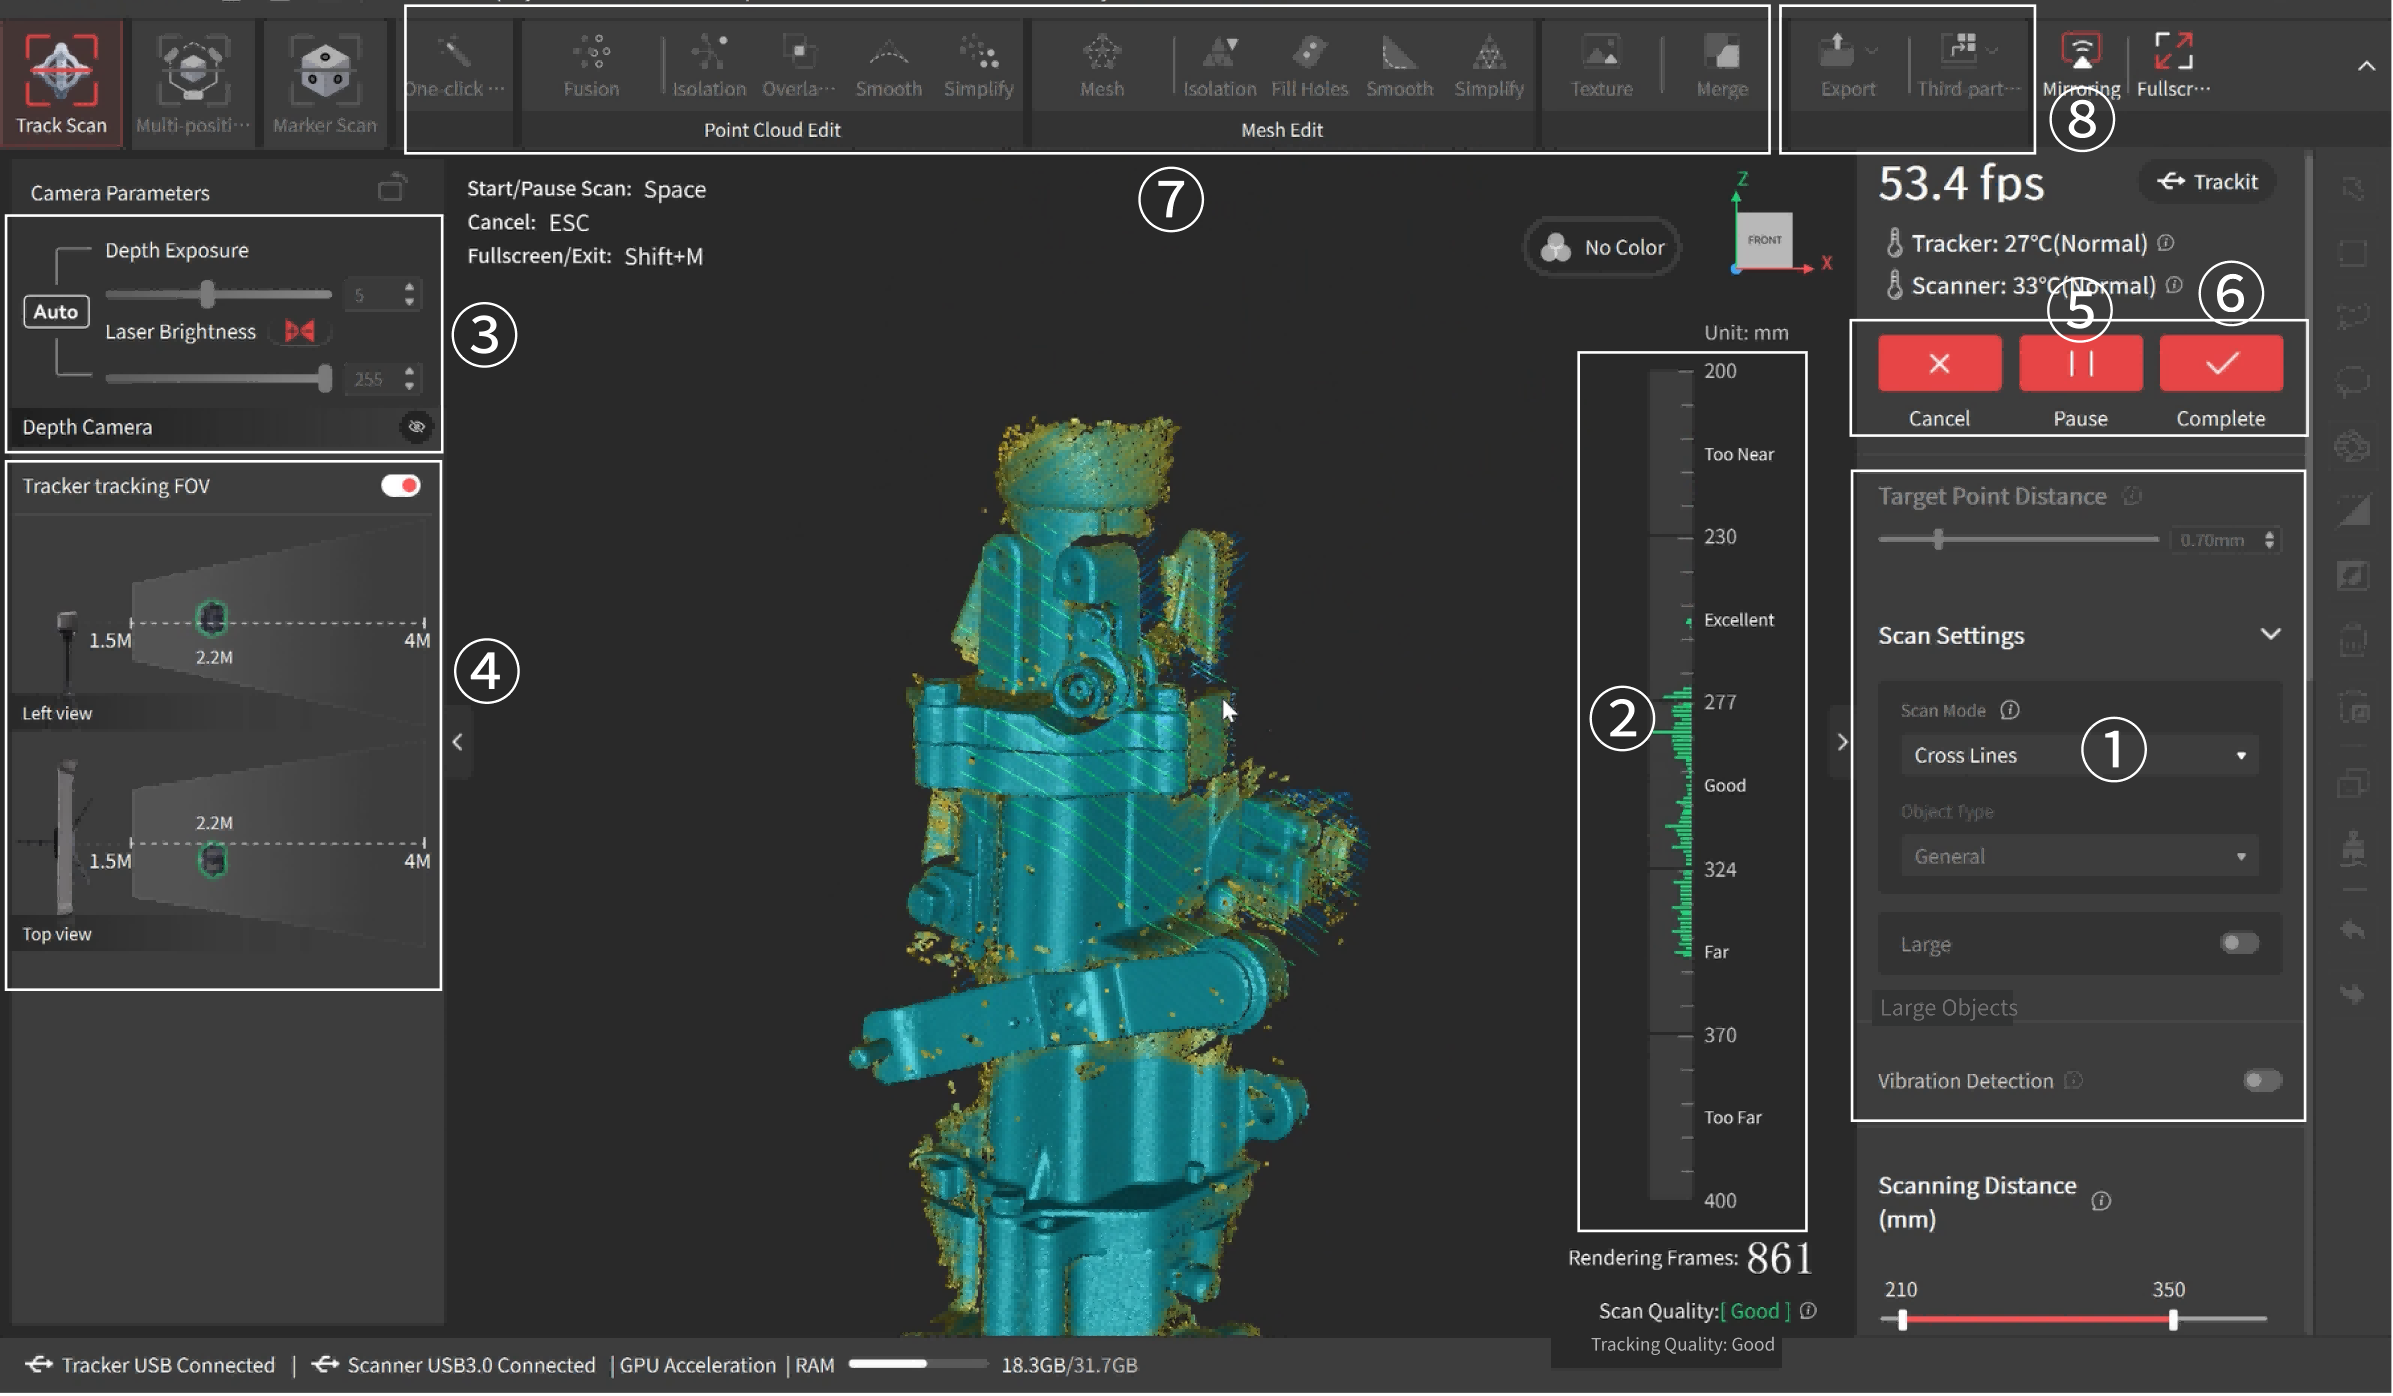
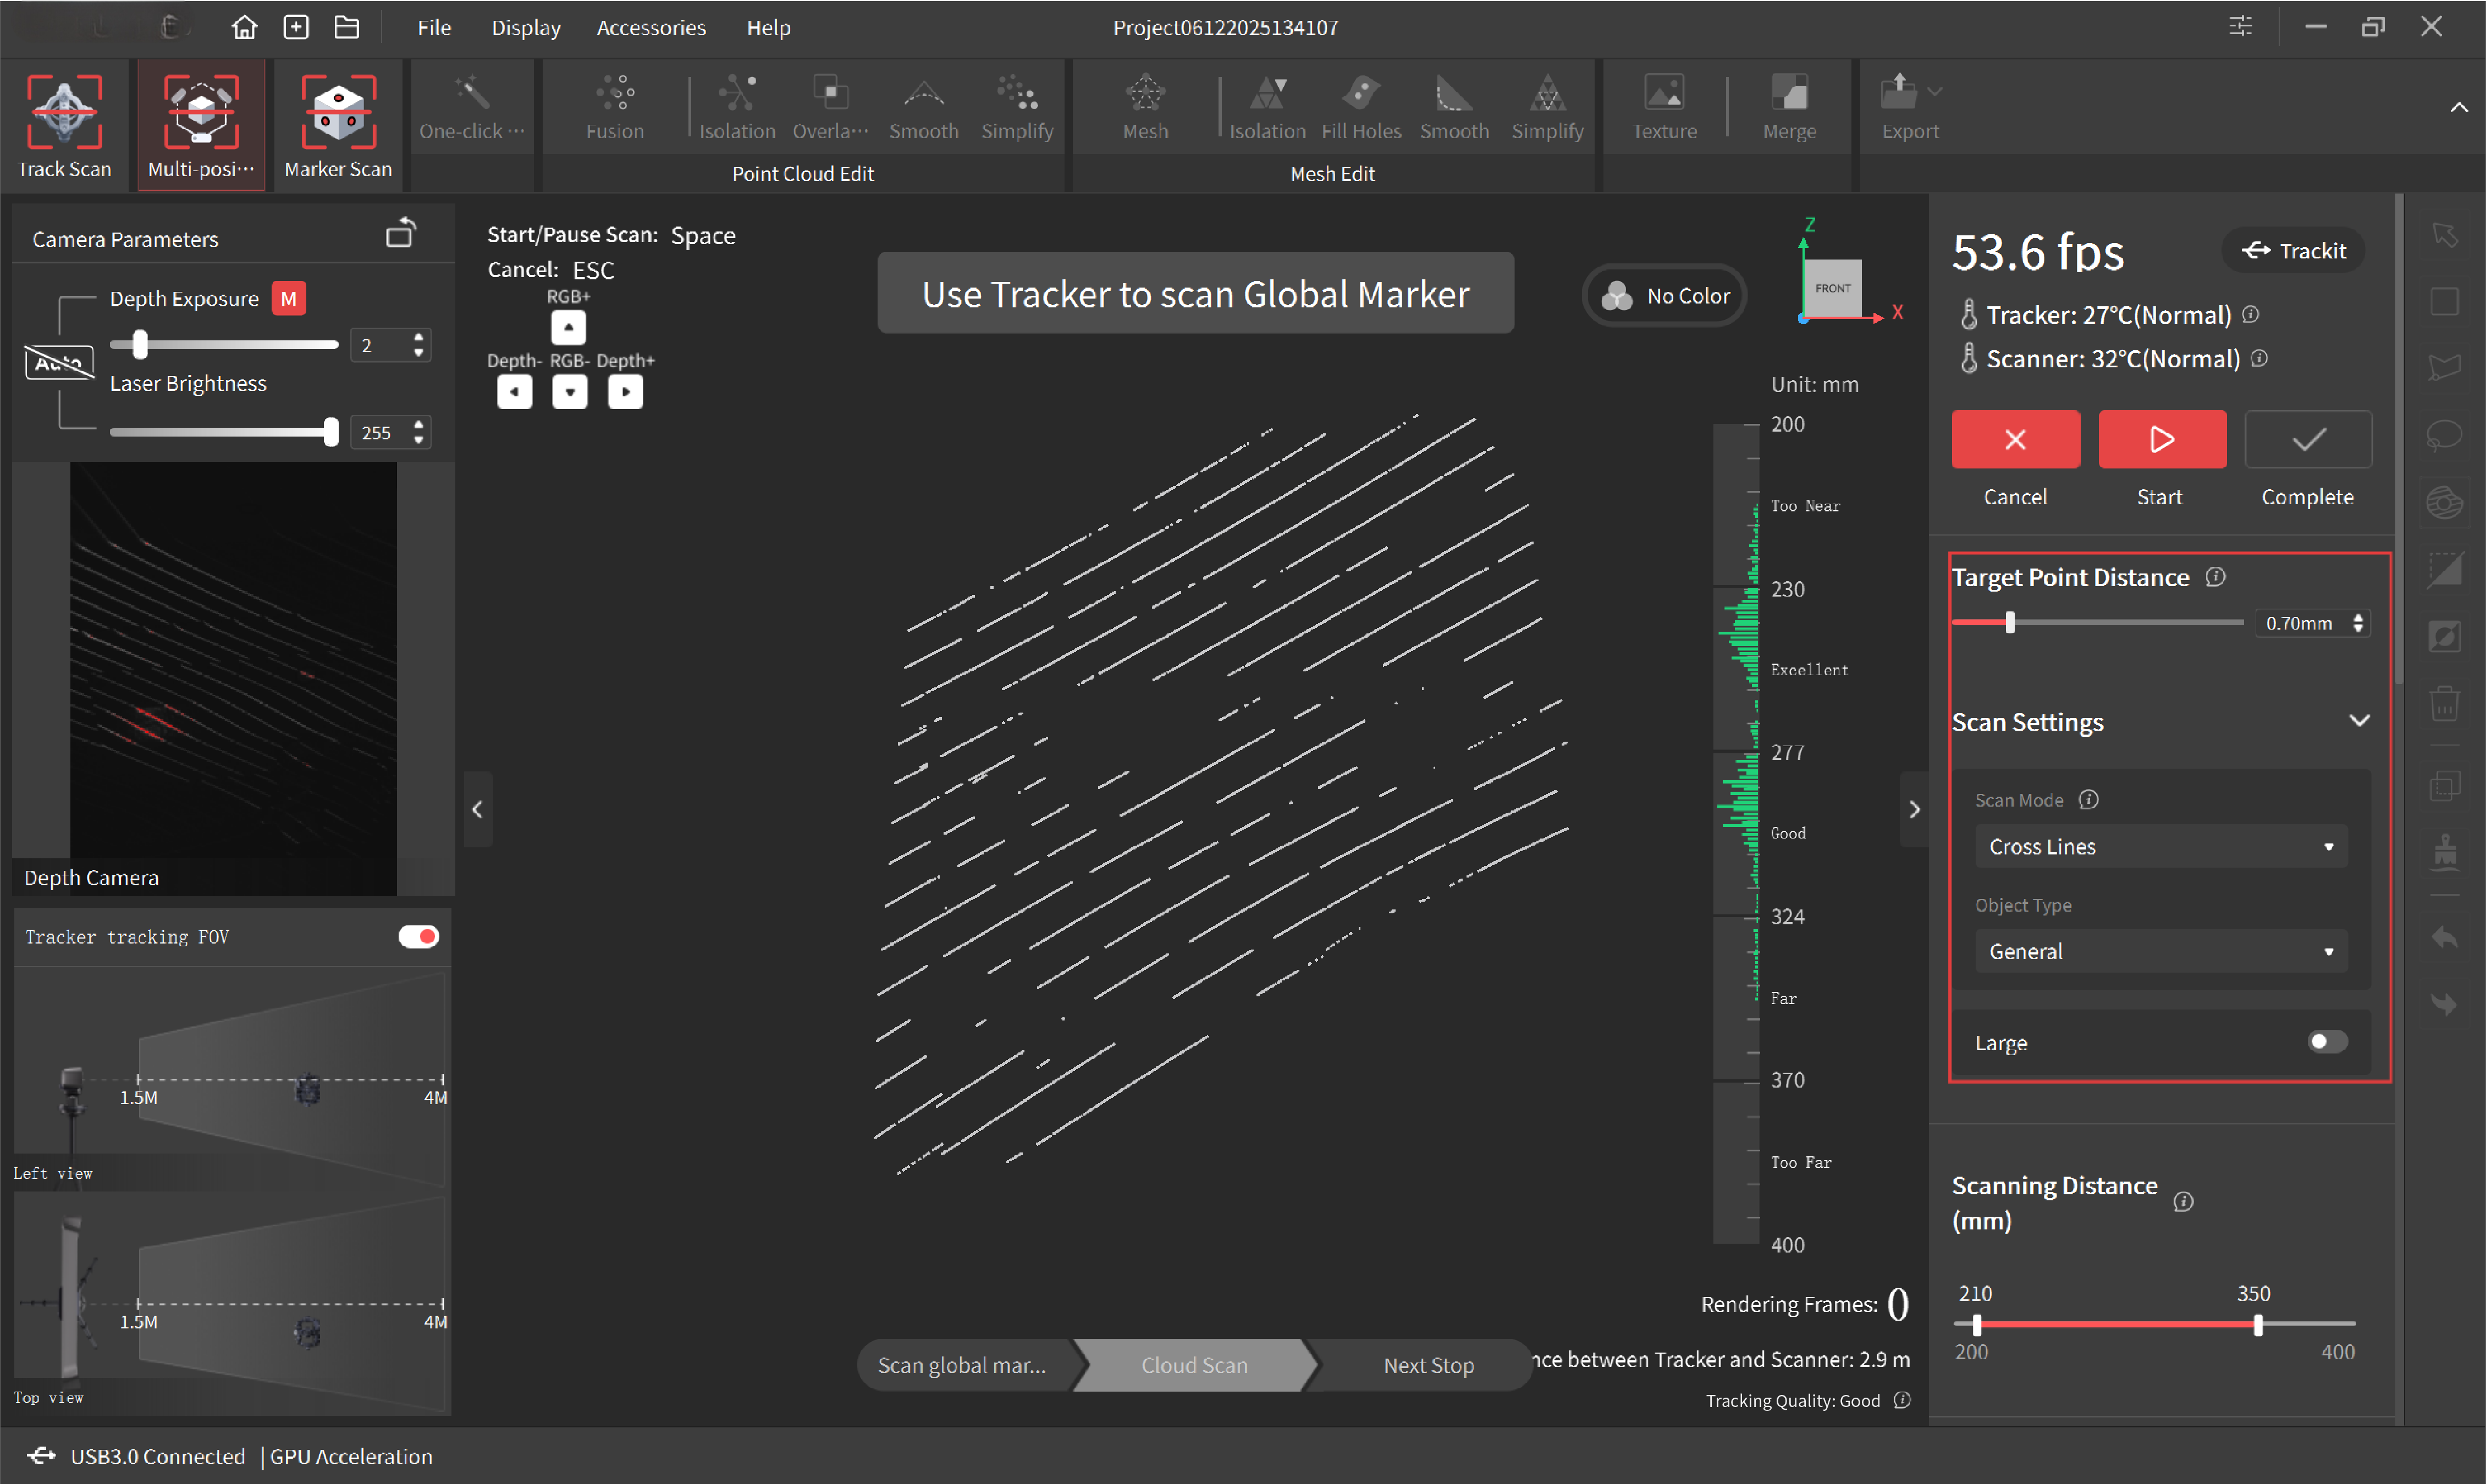
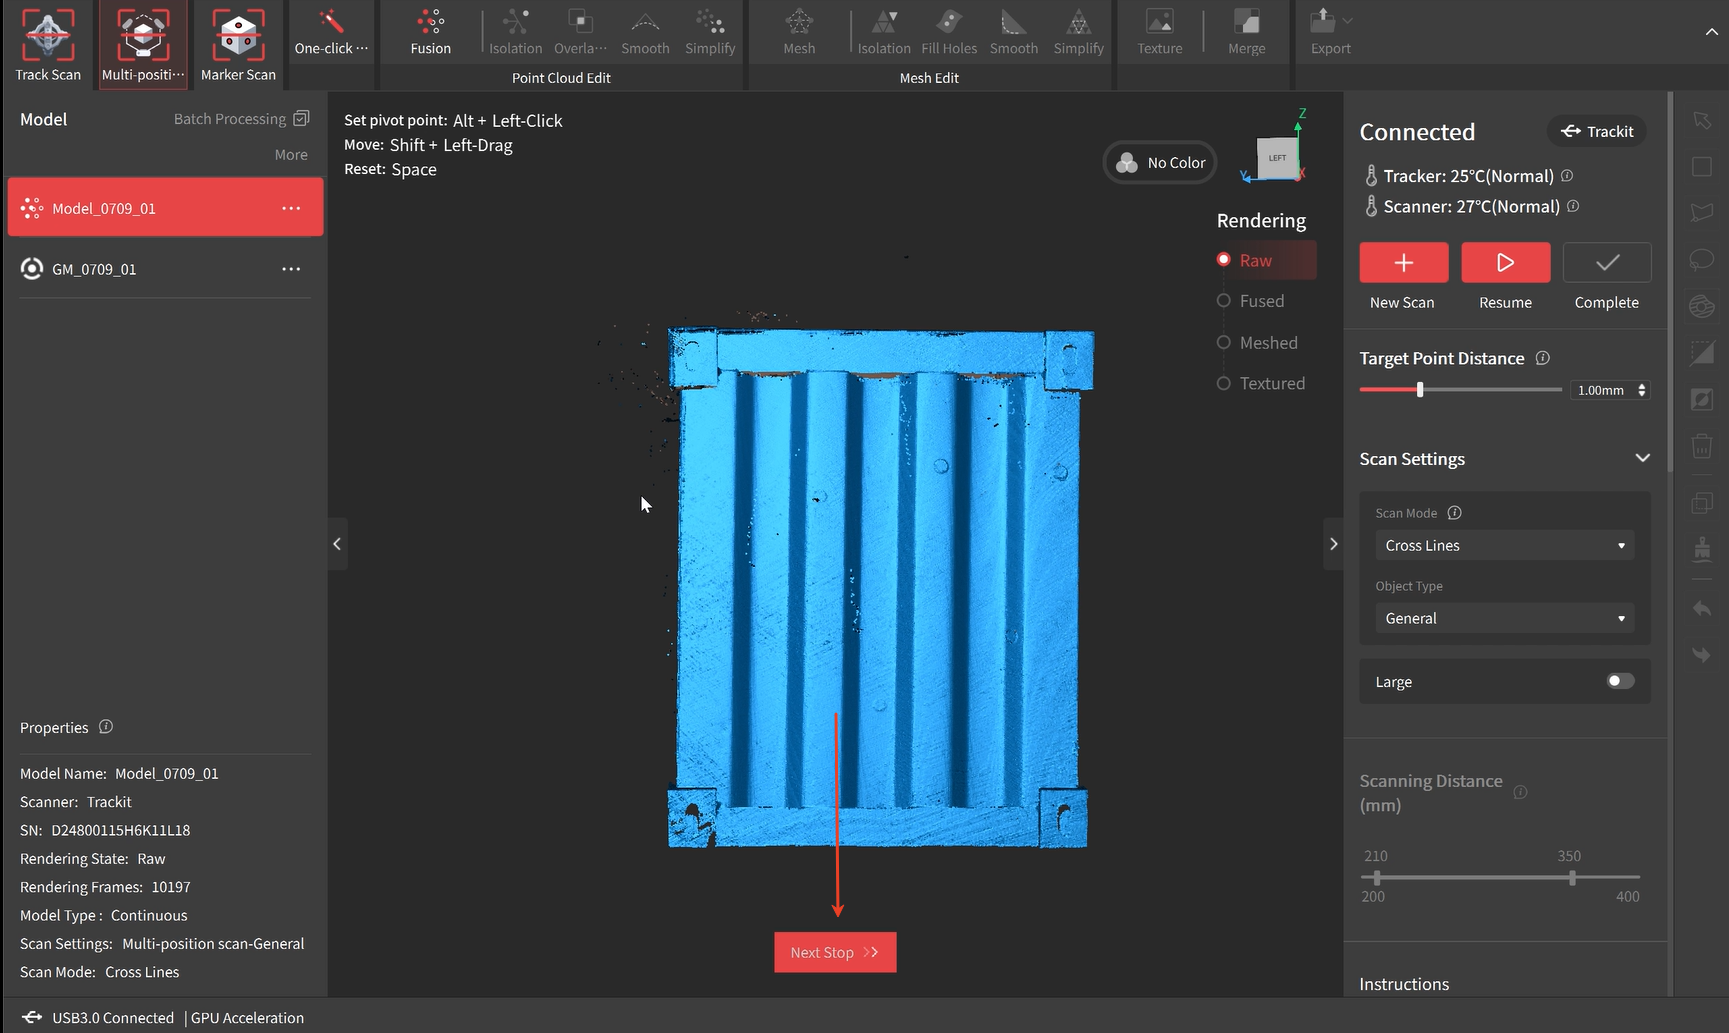
① In Scan Settings, select the Scan Modes, Object Type and set the target point distance as required.
② Move the Scanner closer or further away from the object until the scanning distance indicator bar shows Excellent or Good.
③ Click the Auto button to automatically set the Depth Cameras’ exposure. Or turn off the Auto exposure and adjust it by dragging the slider until the laser lines are clearly visible in the depth camera’s preview window.
Note: You can manually click the  button in the upper-right corner to make the preview window displayed.
④ Adjust the distance between the Scanner and the Tracker to ensure the Scanner stays within the Tracker's FOV.
⑤ Click the  button to start the scan. During the scan, aim the Scanner at the object. Refer to the distance indicator bar to ensure an excellent distance. Hold the Scanner steadily over one area for a few seconds until the model surface is entirely blue. Then, move to the next area slowly and steadily. Click the
  button to pause and check your model anytime during the scan. If the model is incomplete, click the button to continue your scan.
- Don’t block the Tracker's cameras during scanning, and ensure that the Tracker can clearly see the object and the markers on the Scanner.
- Try to ensure only the object is captured by the Scanner. The point cloud changes from yellow to blue during the scanning process as more data is captured. A totally blue point cloud indicates higher point cloud quality.
⑥ Click the  button to finish the scan when the model is complete.
⑦ Click One-click Edit to process the model automatically, or manually edit the model using the Fusion and Mesh settings, and other tools if you need a more detailed model. When manually processing for point cloud fusion, it's suggested to use the system's recommended point distance. Setting a very small point distance will result in a lengthy calculation time. For details, please refer to the Model Editing chapter.
⑧ After post-processing, export the model in formats such as PLY, OBJ, or STL.
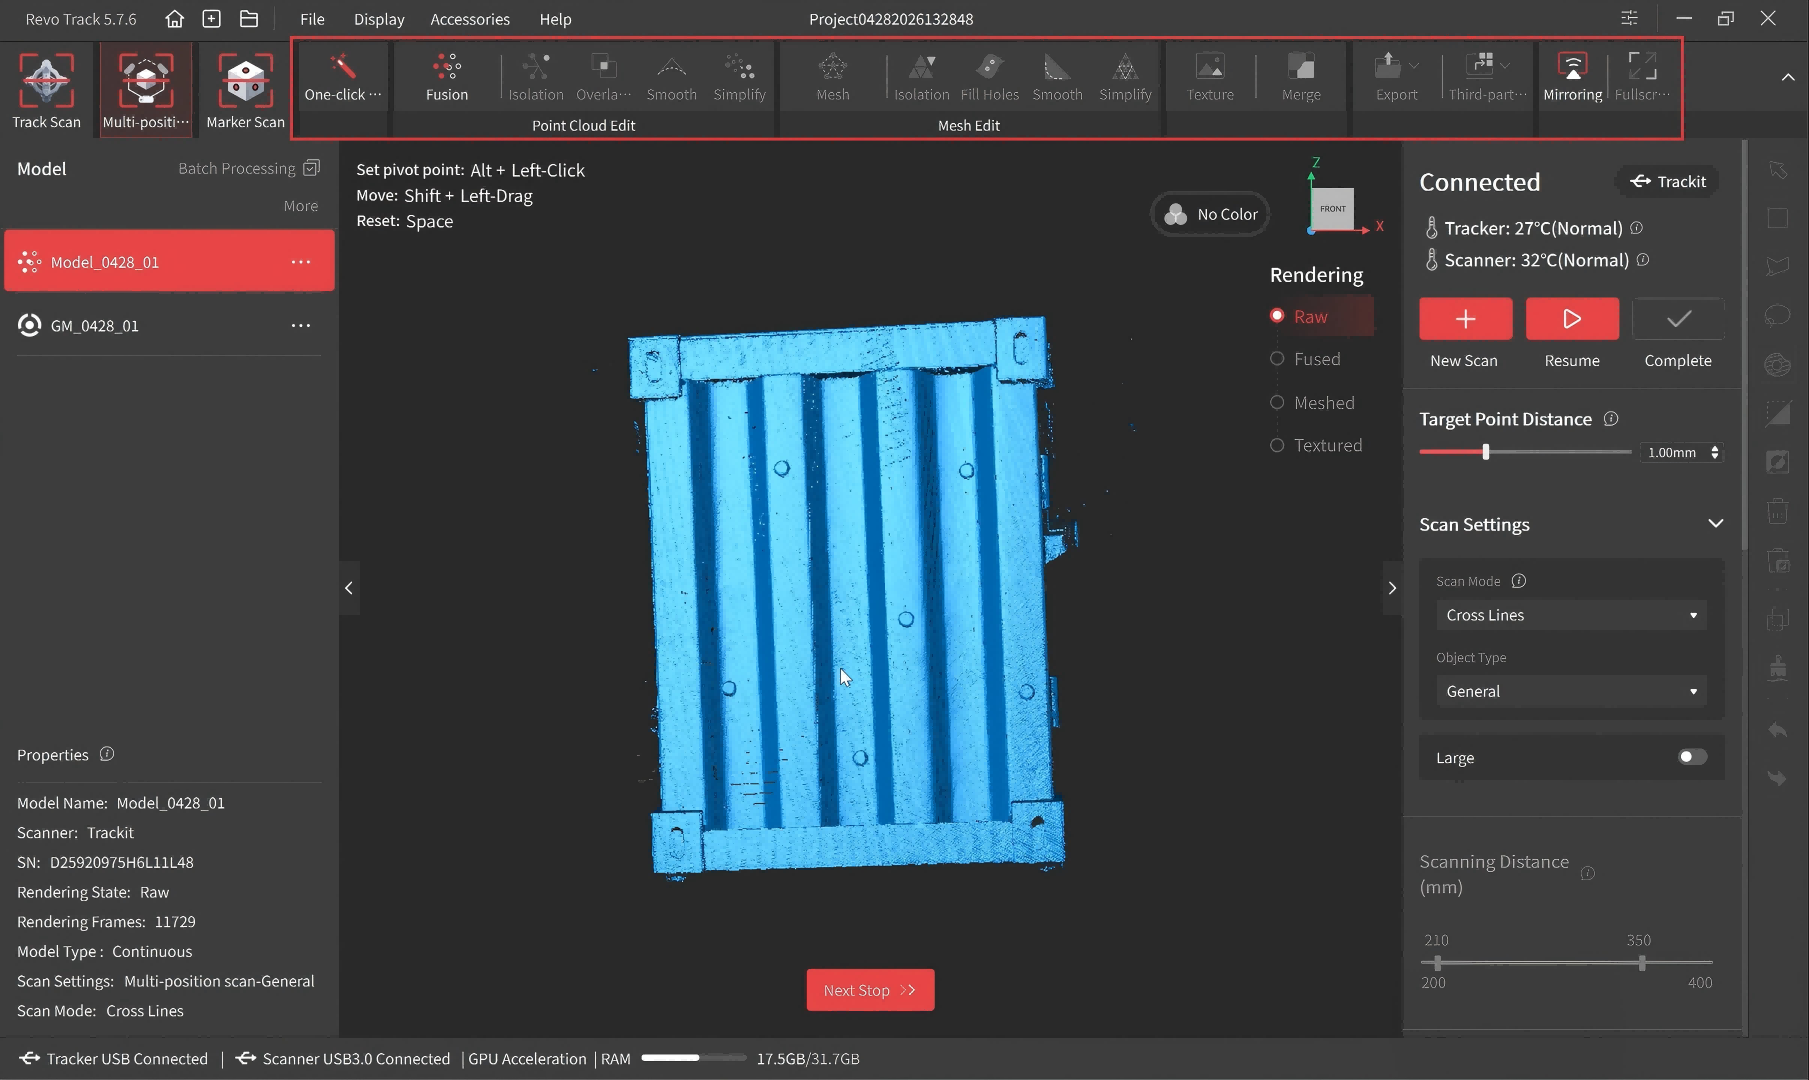
2. Multi-position Scan
Ideal for scanning large objects like cars and industrial parts. Before scanning, divide surfaces into distinct areas. During each area scan, capture global markers after moving the Tracker, then capture the point cloud.
Multi-position Scan Tutorial Video
After the Scanner is connected, click the New Project button on Revo Track's Home page to access the project interface. Select "Multi-position Scan" and follow the steps below to begin your scan:
1) Set up the Starting Area
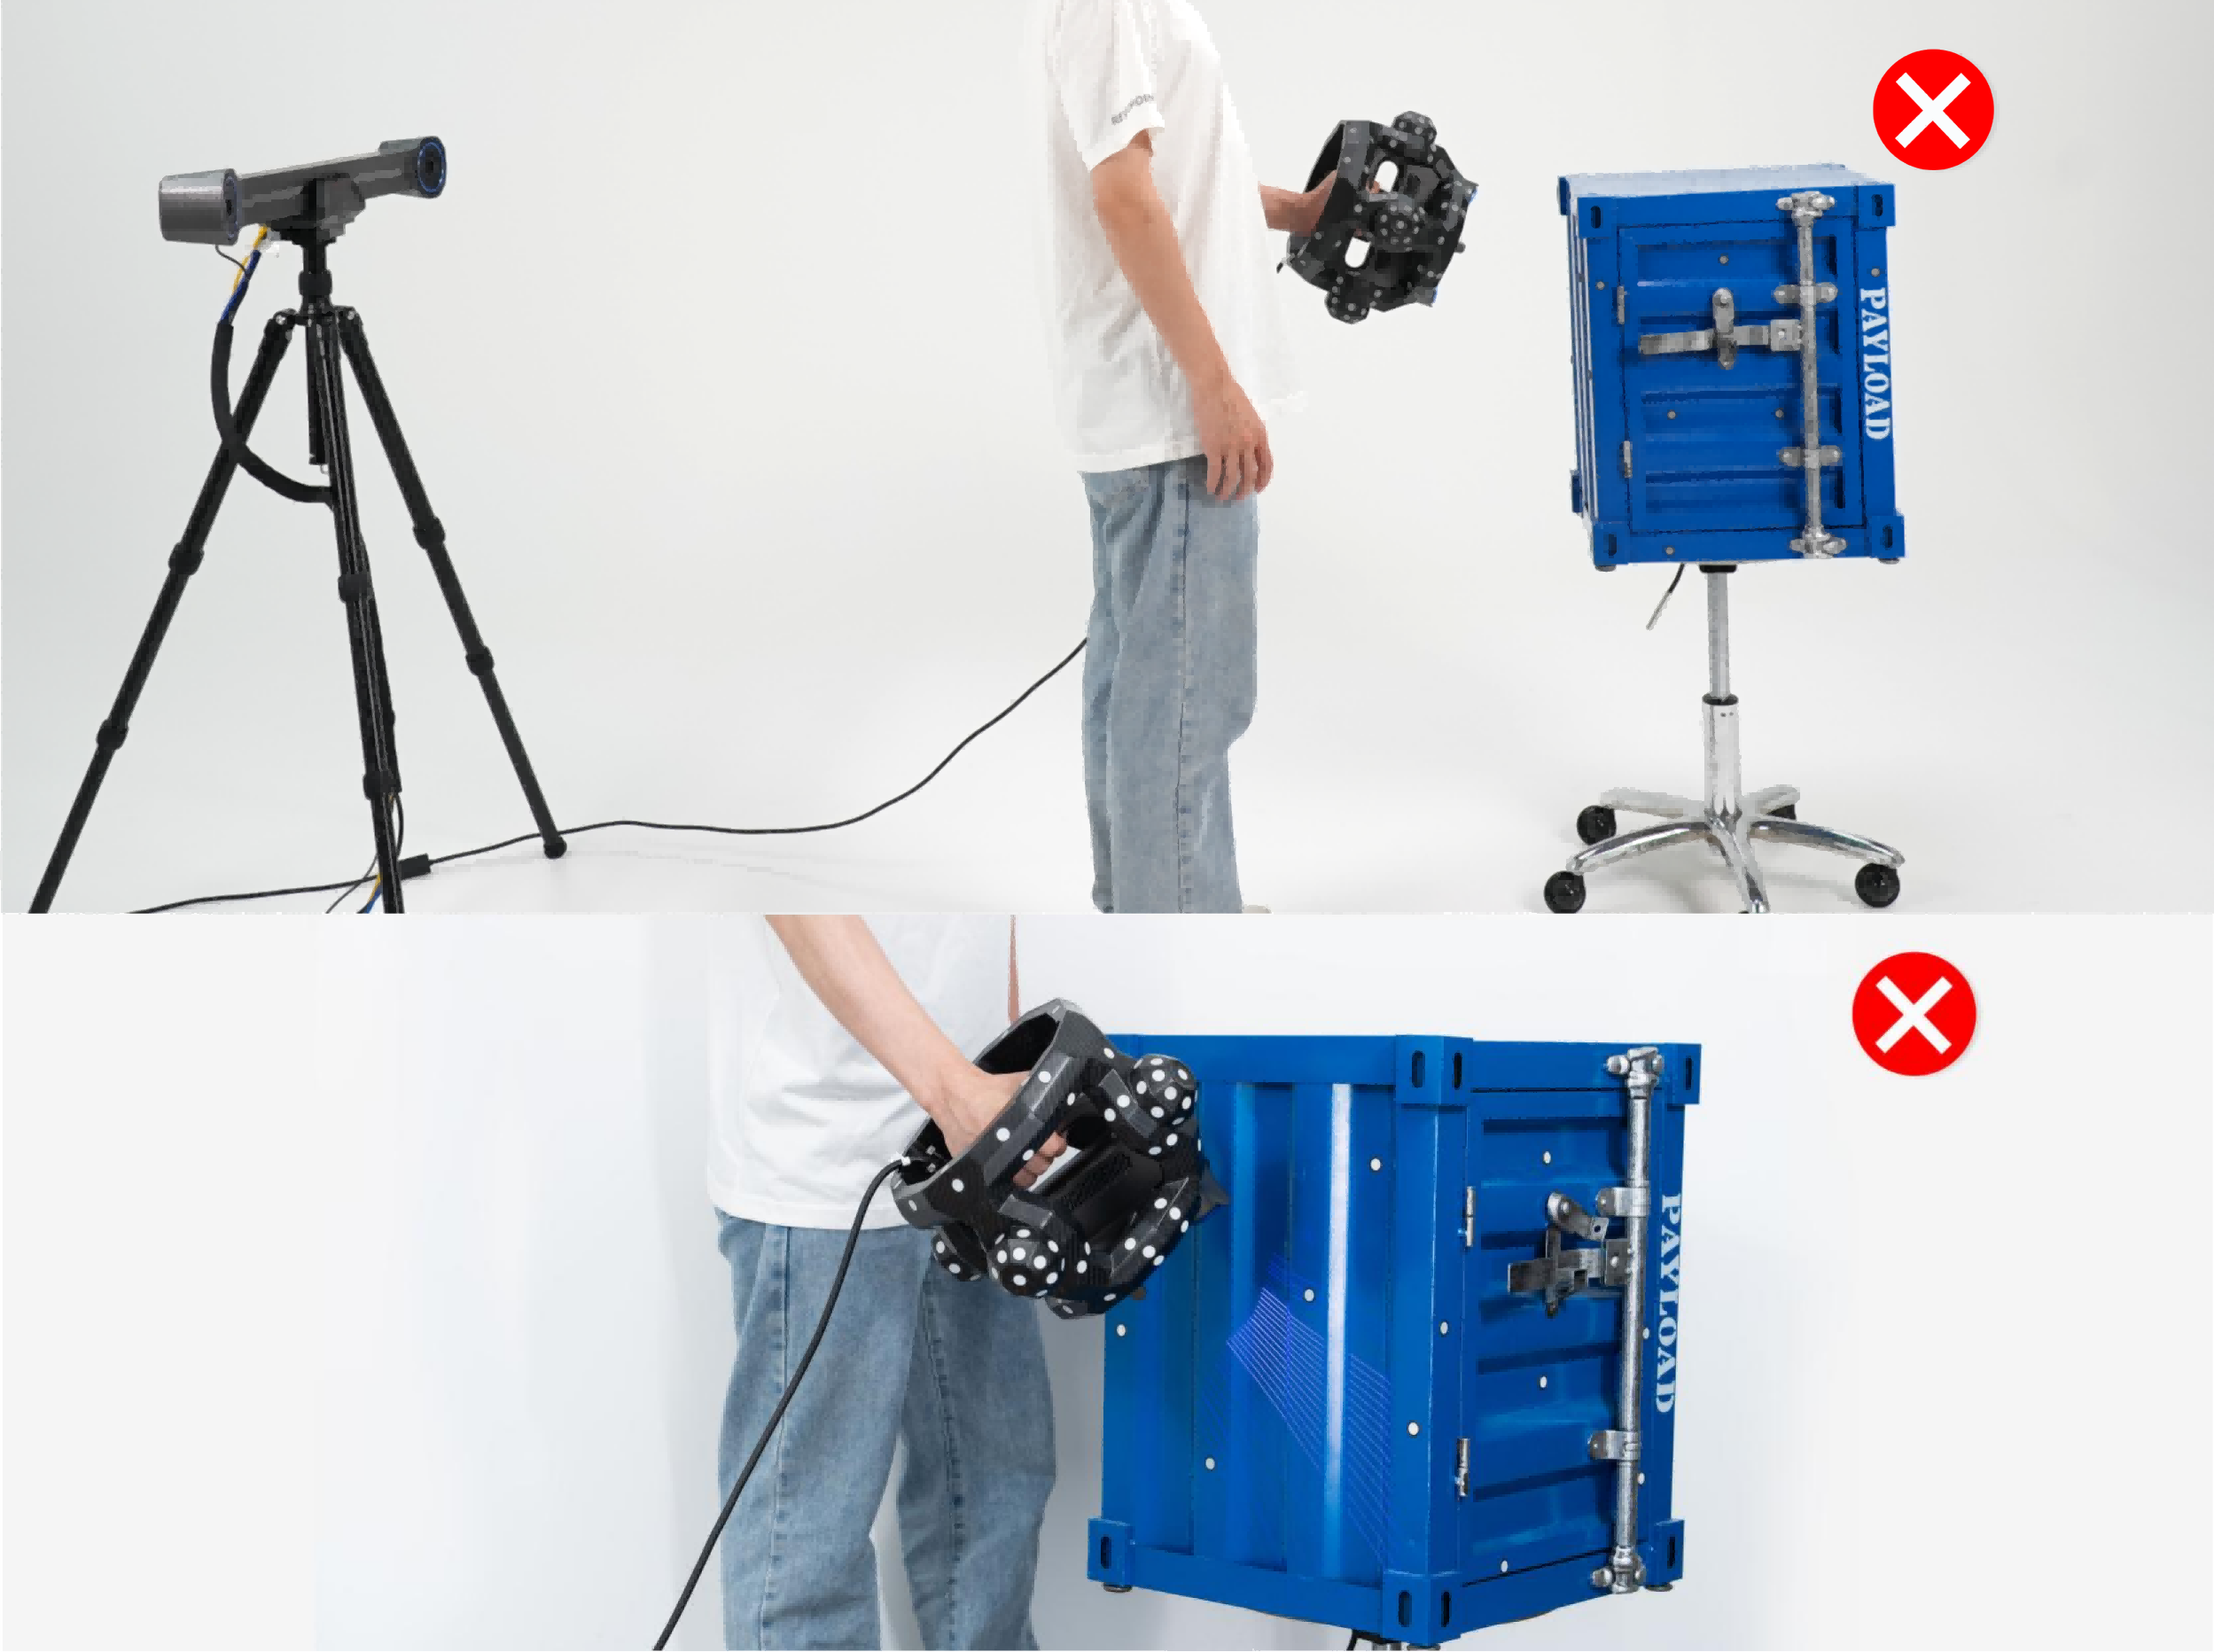
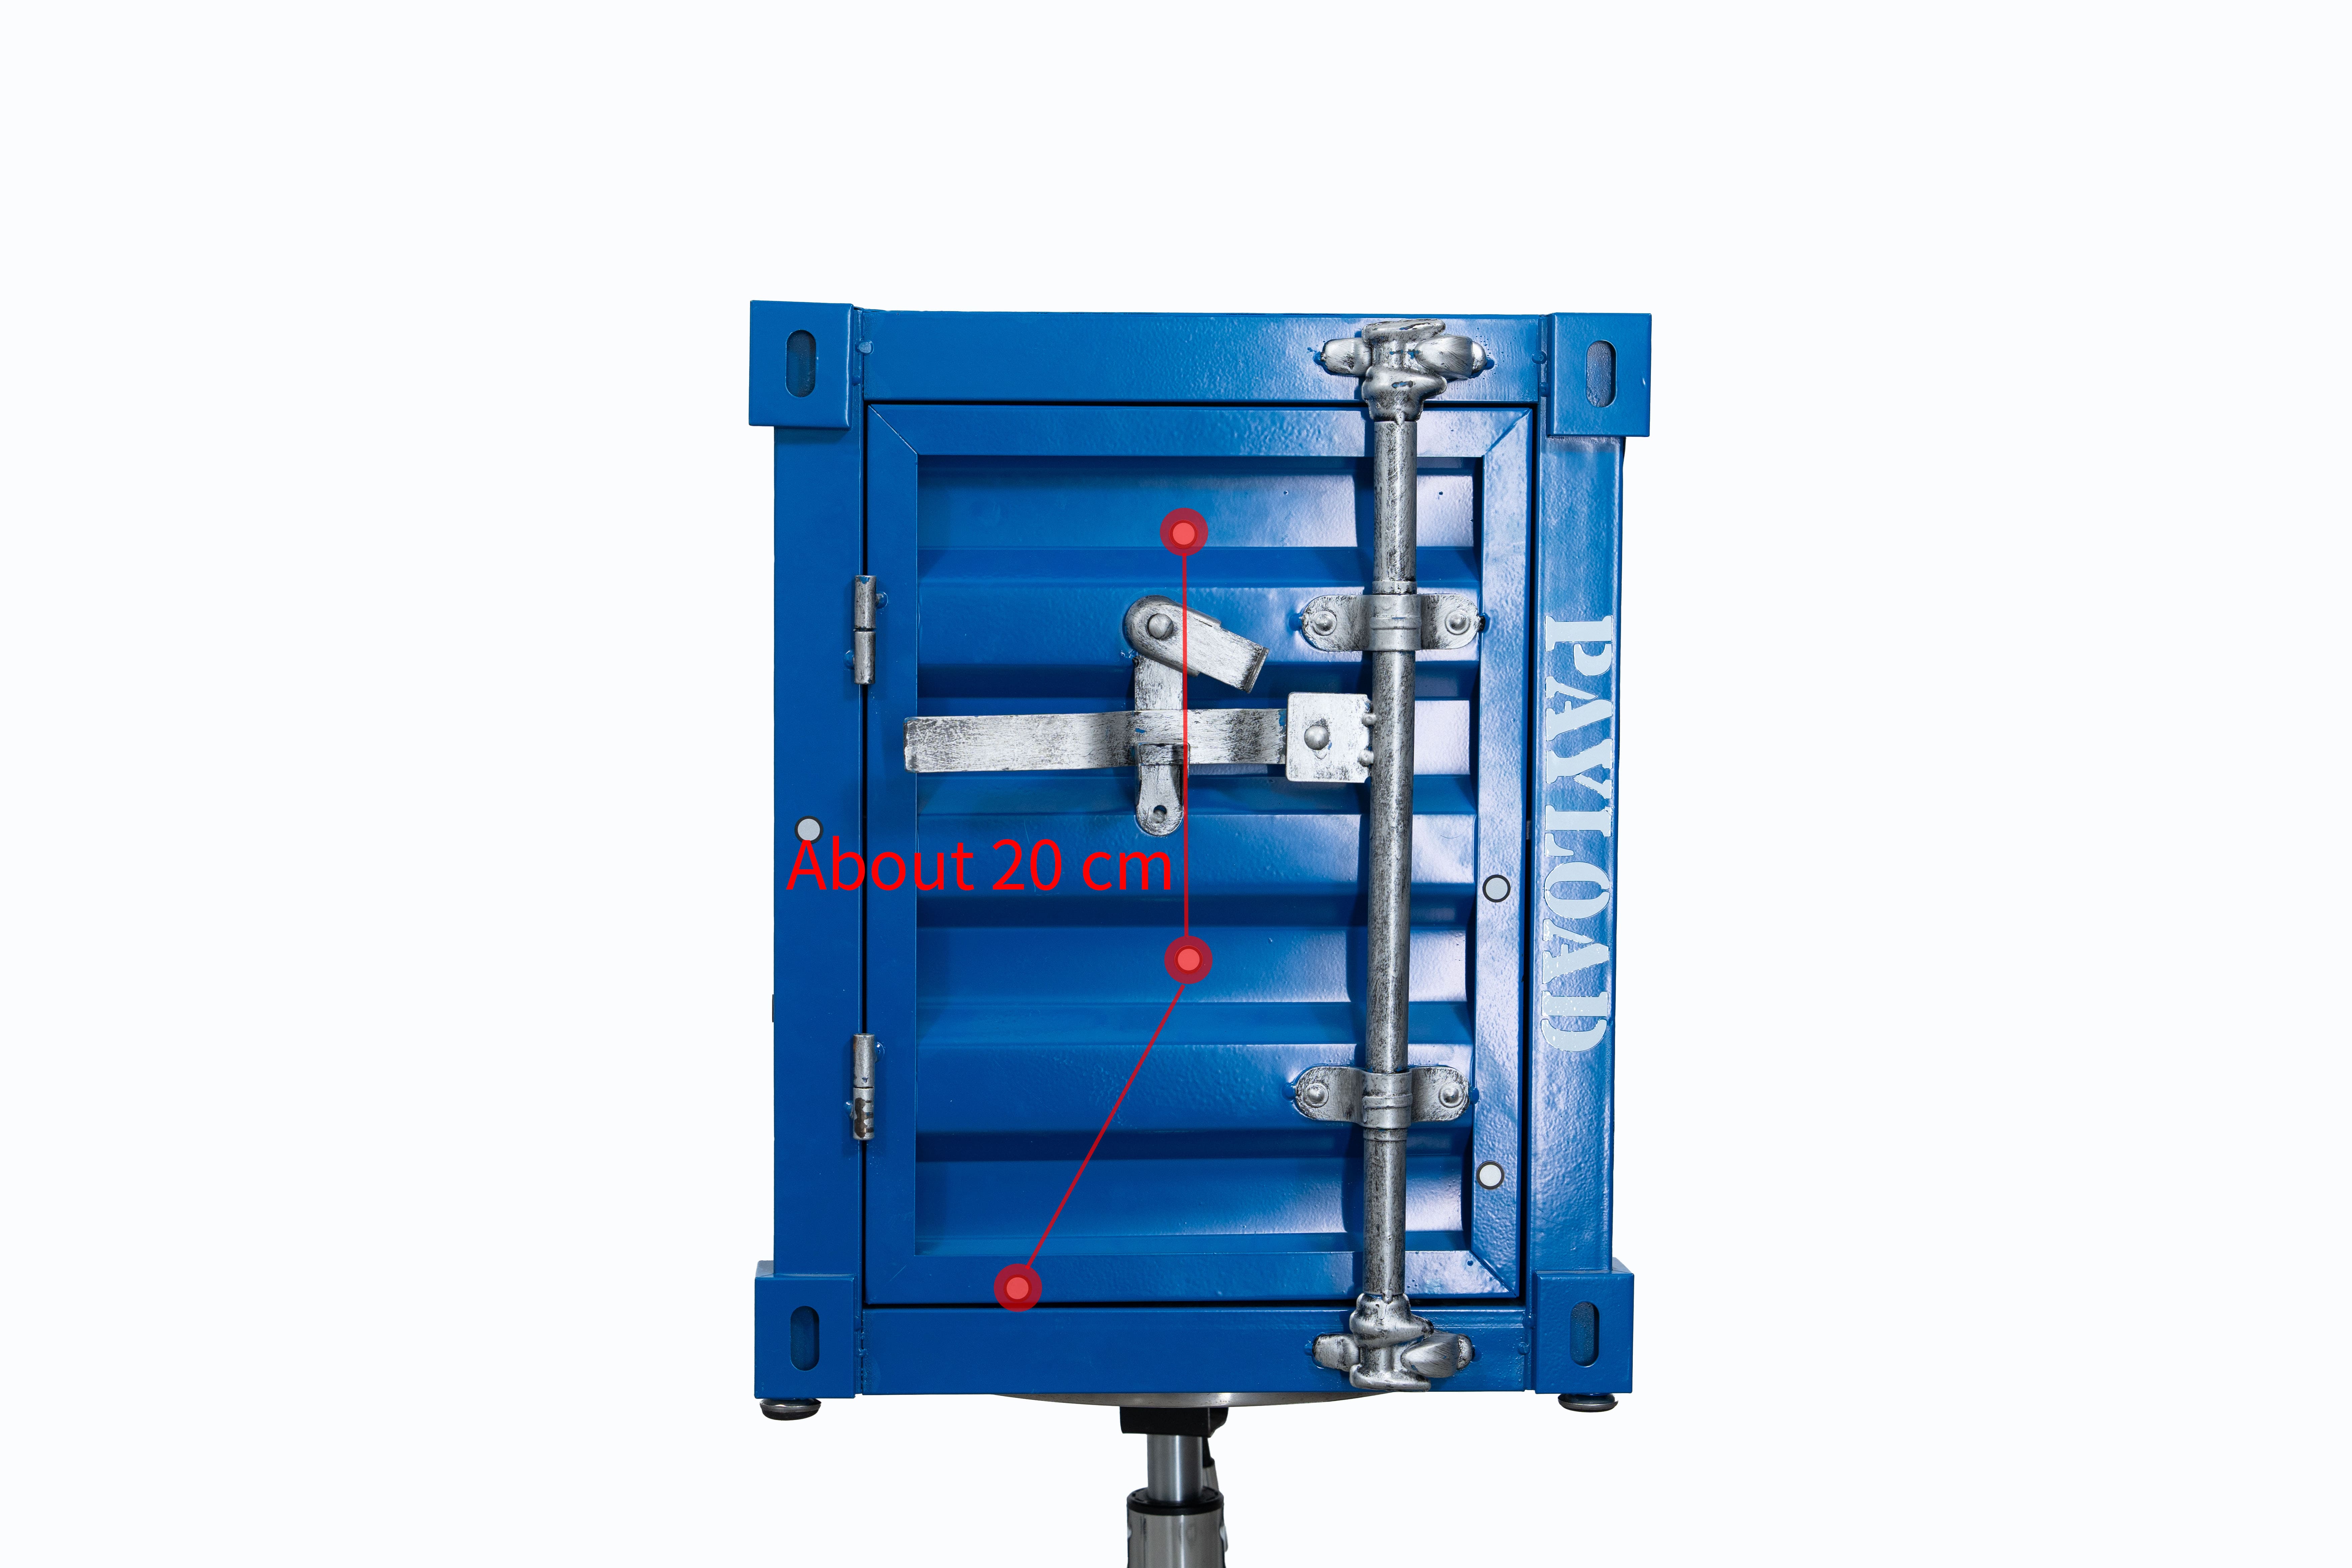
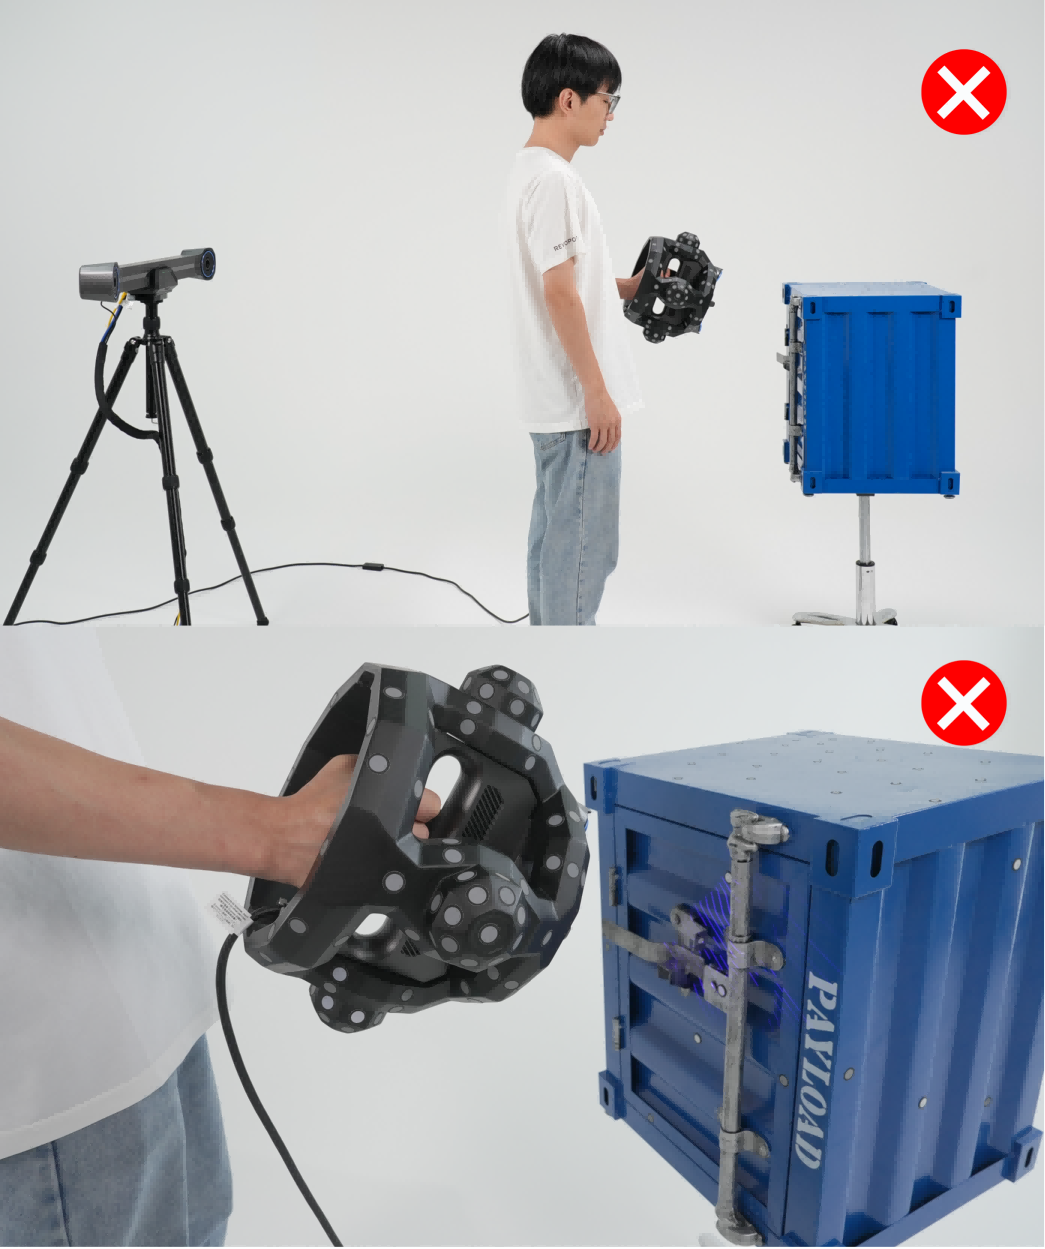
Select a starting area and place at least 5 anchor blocks or markers about 20 cm apart on the object's surface. Aim the Tracker at the starting point and adjust its distance and height so it can see the markers.
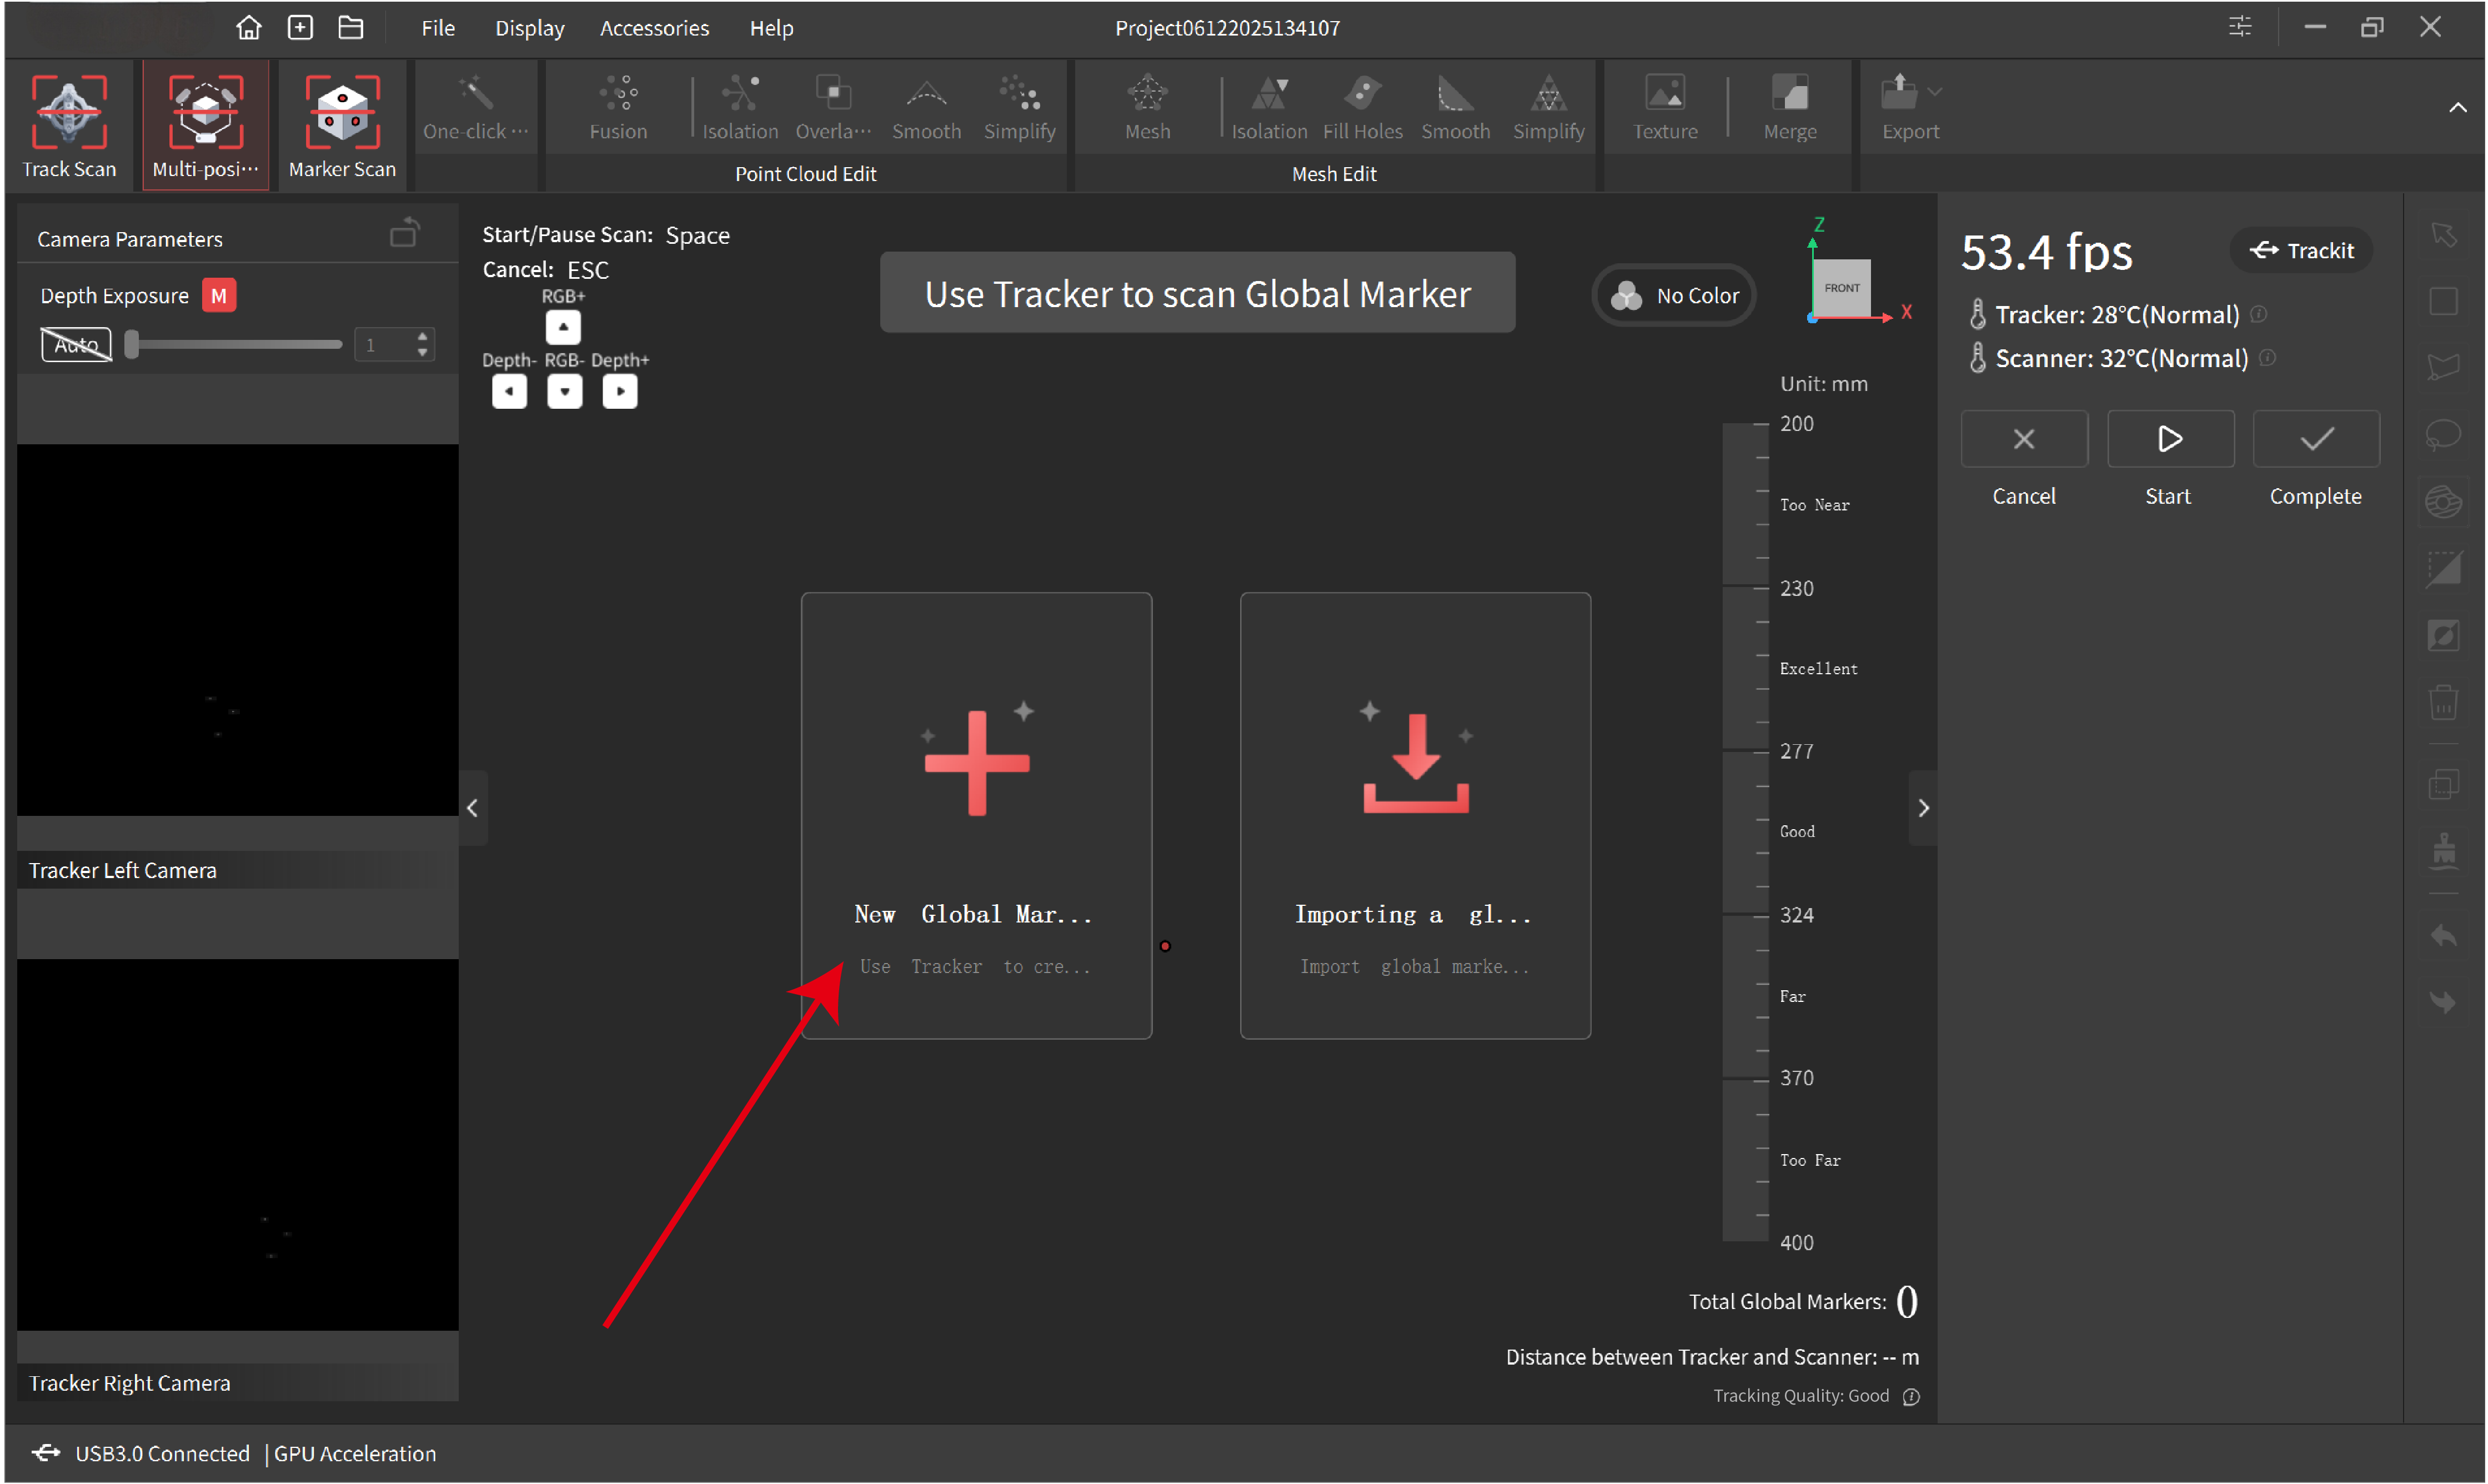
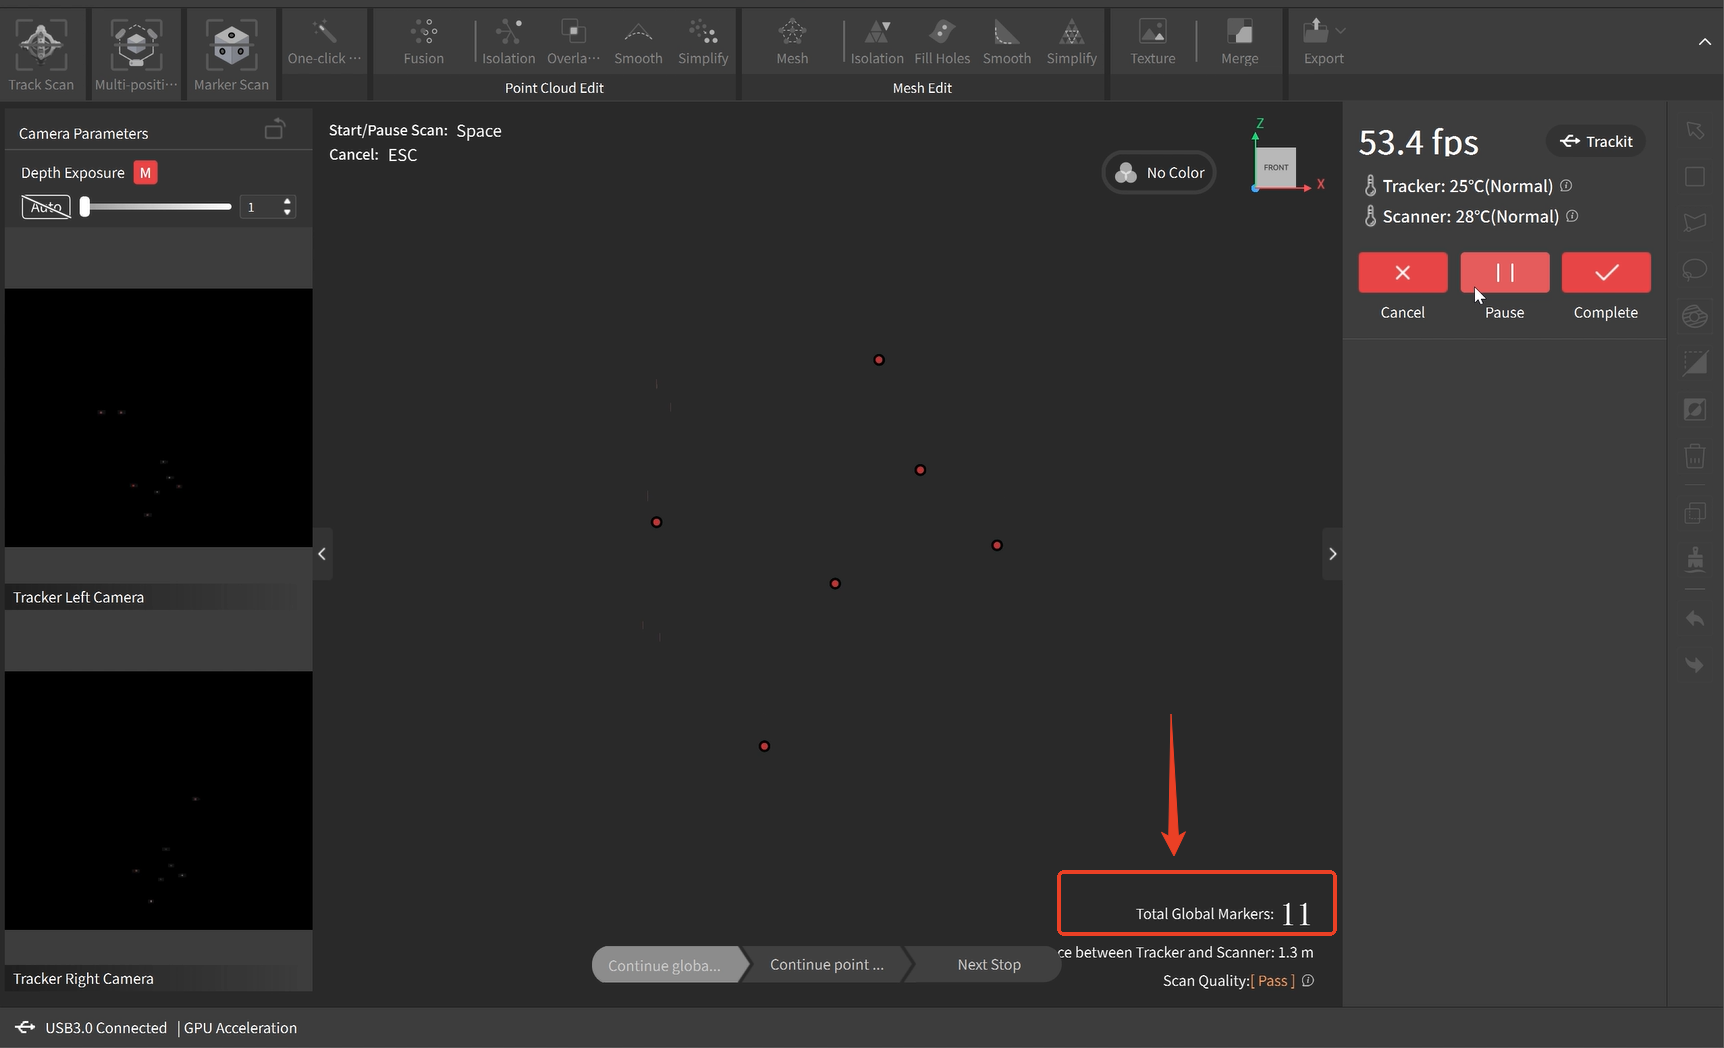
2) Scan the global markers in the starting area
When scanning the global markers, keep the Scanner out of the Tracker's field of view to ensure only the markers on the object are captured.
Click the New Global Markers button to capture the markers.
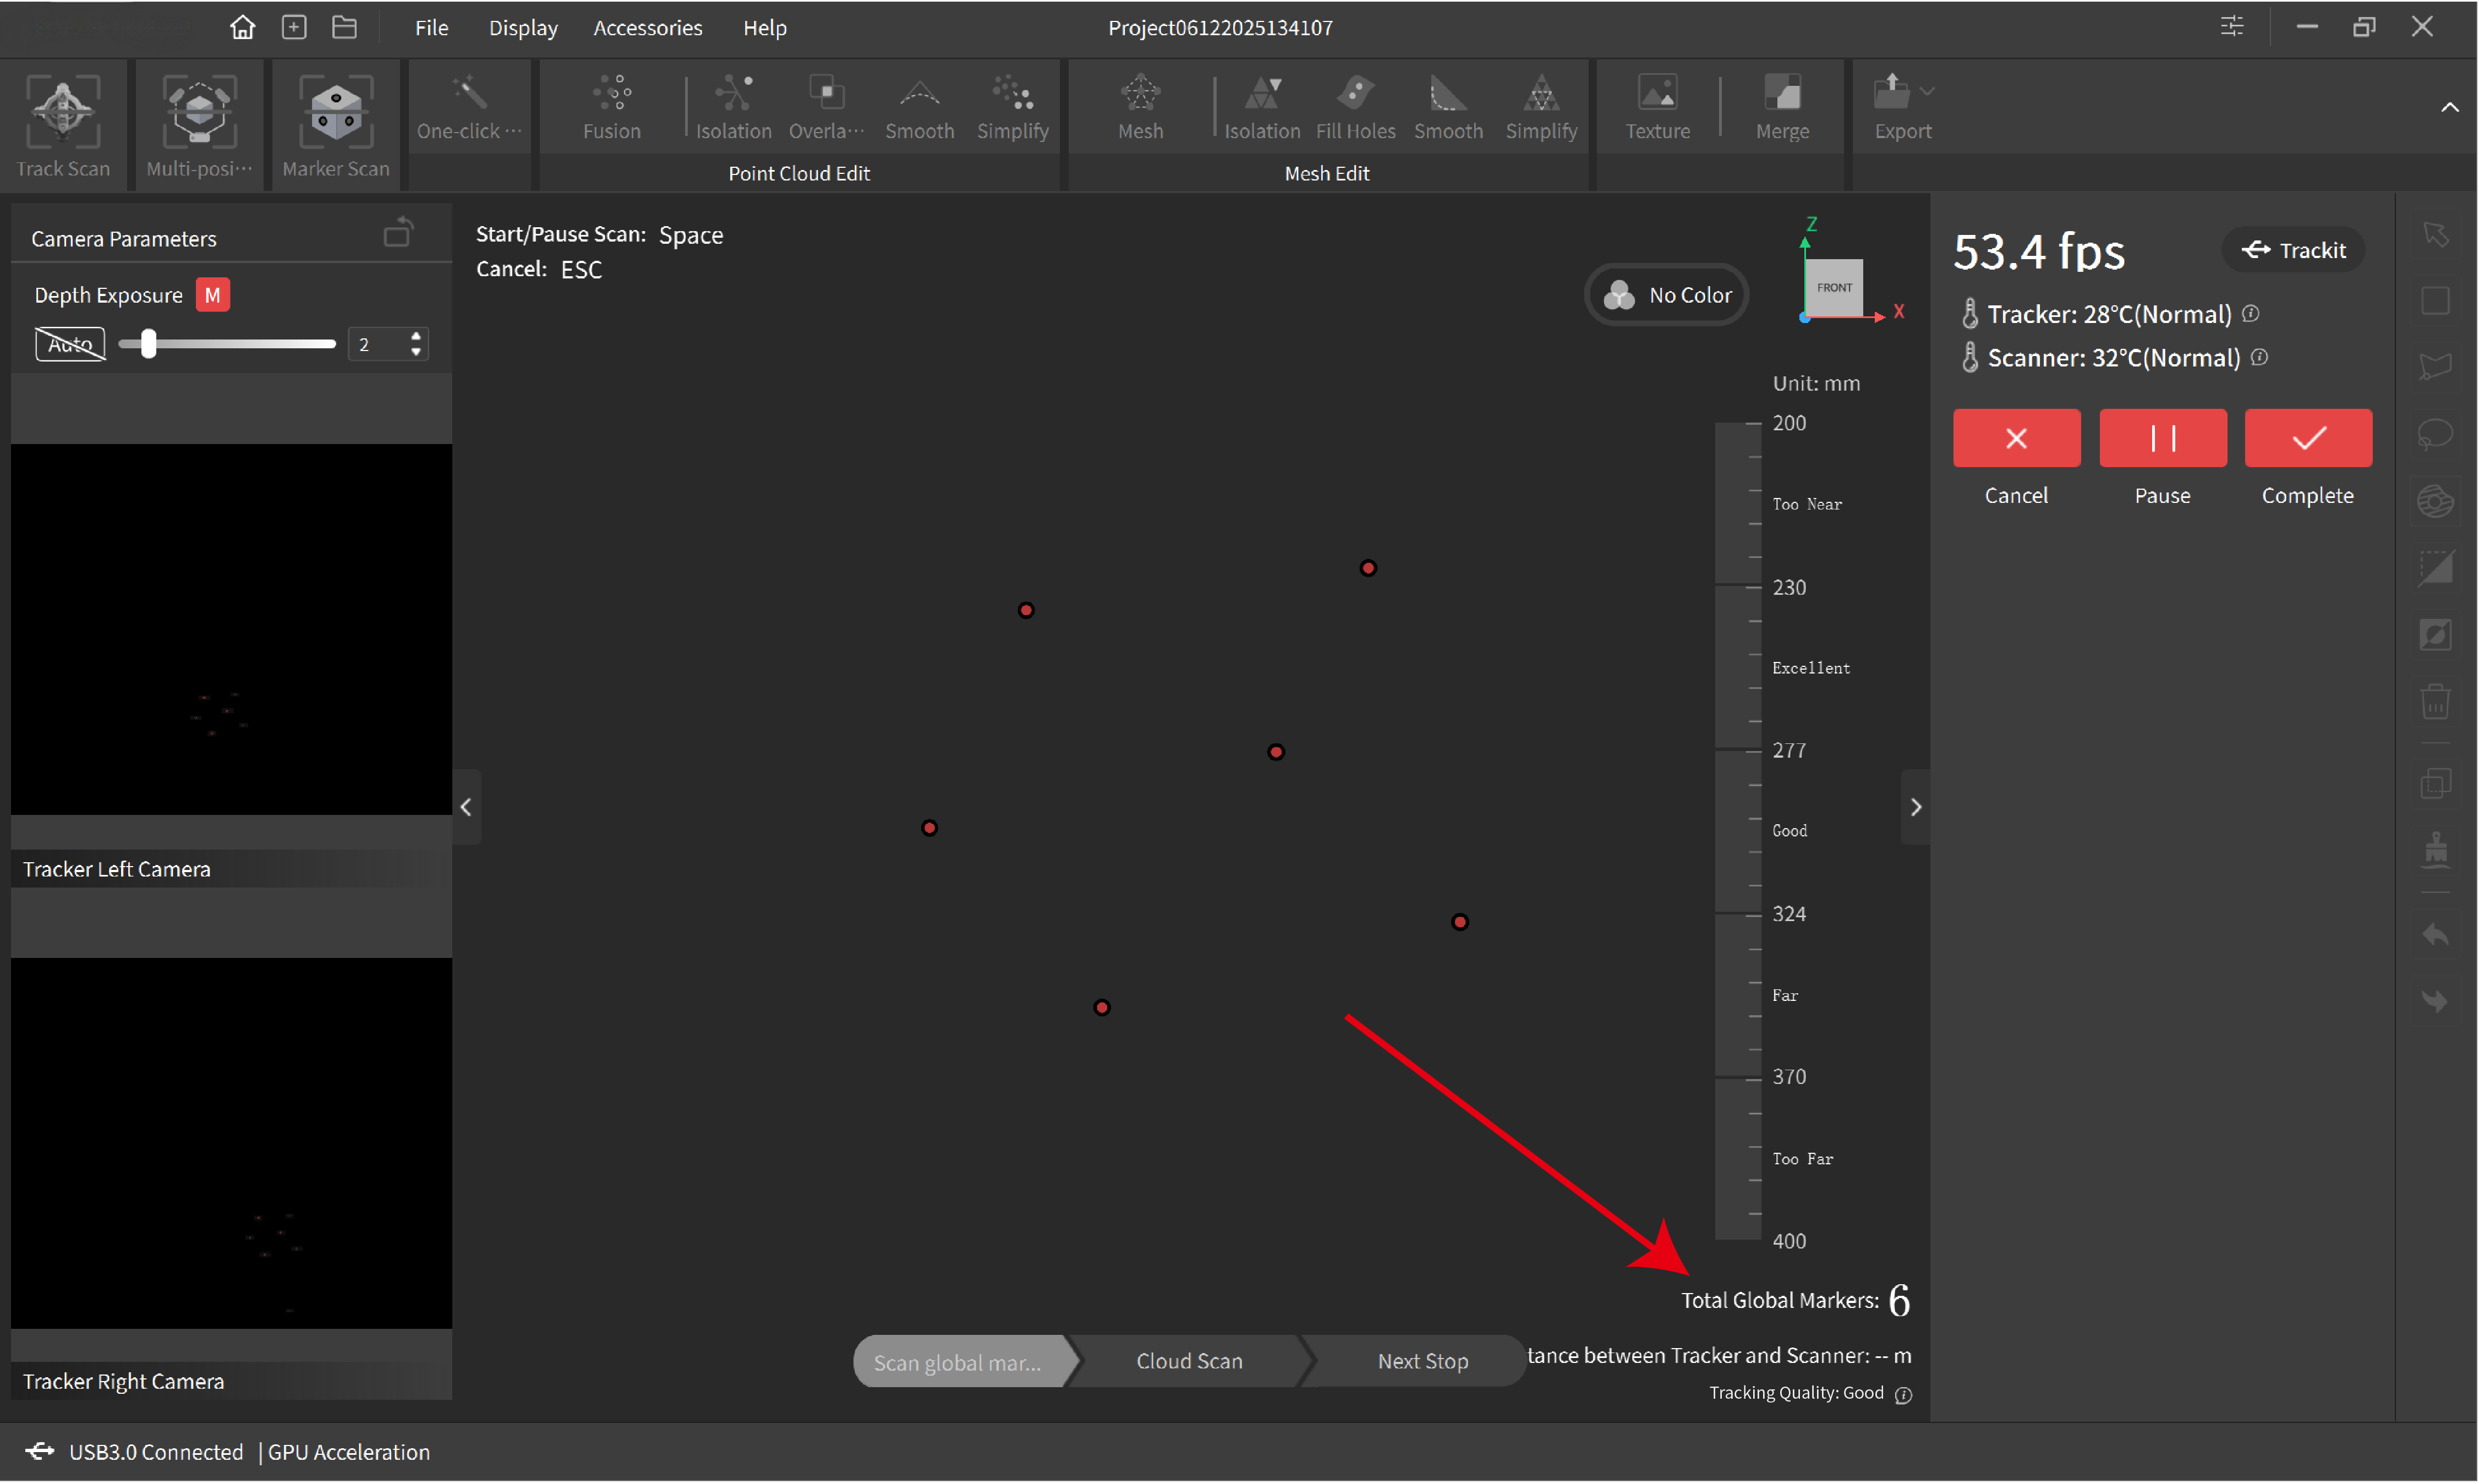
Click the Start button, and the Tracker will capture the global markers. During the process, the total number of global markers captured is displayed in the lower right corner.
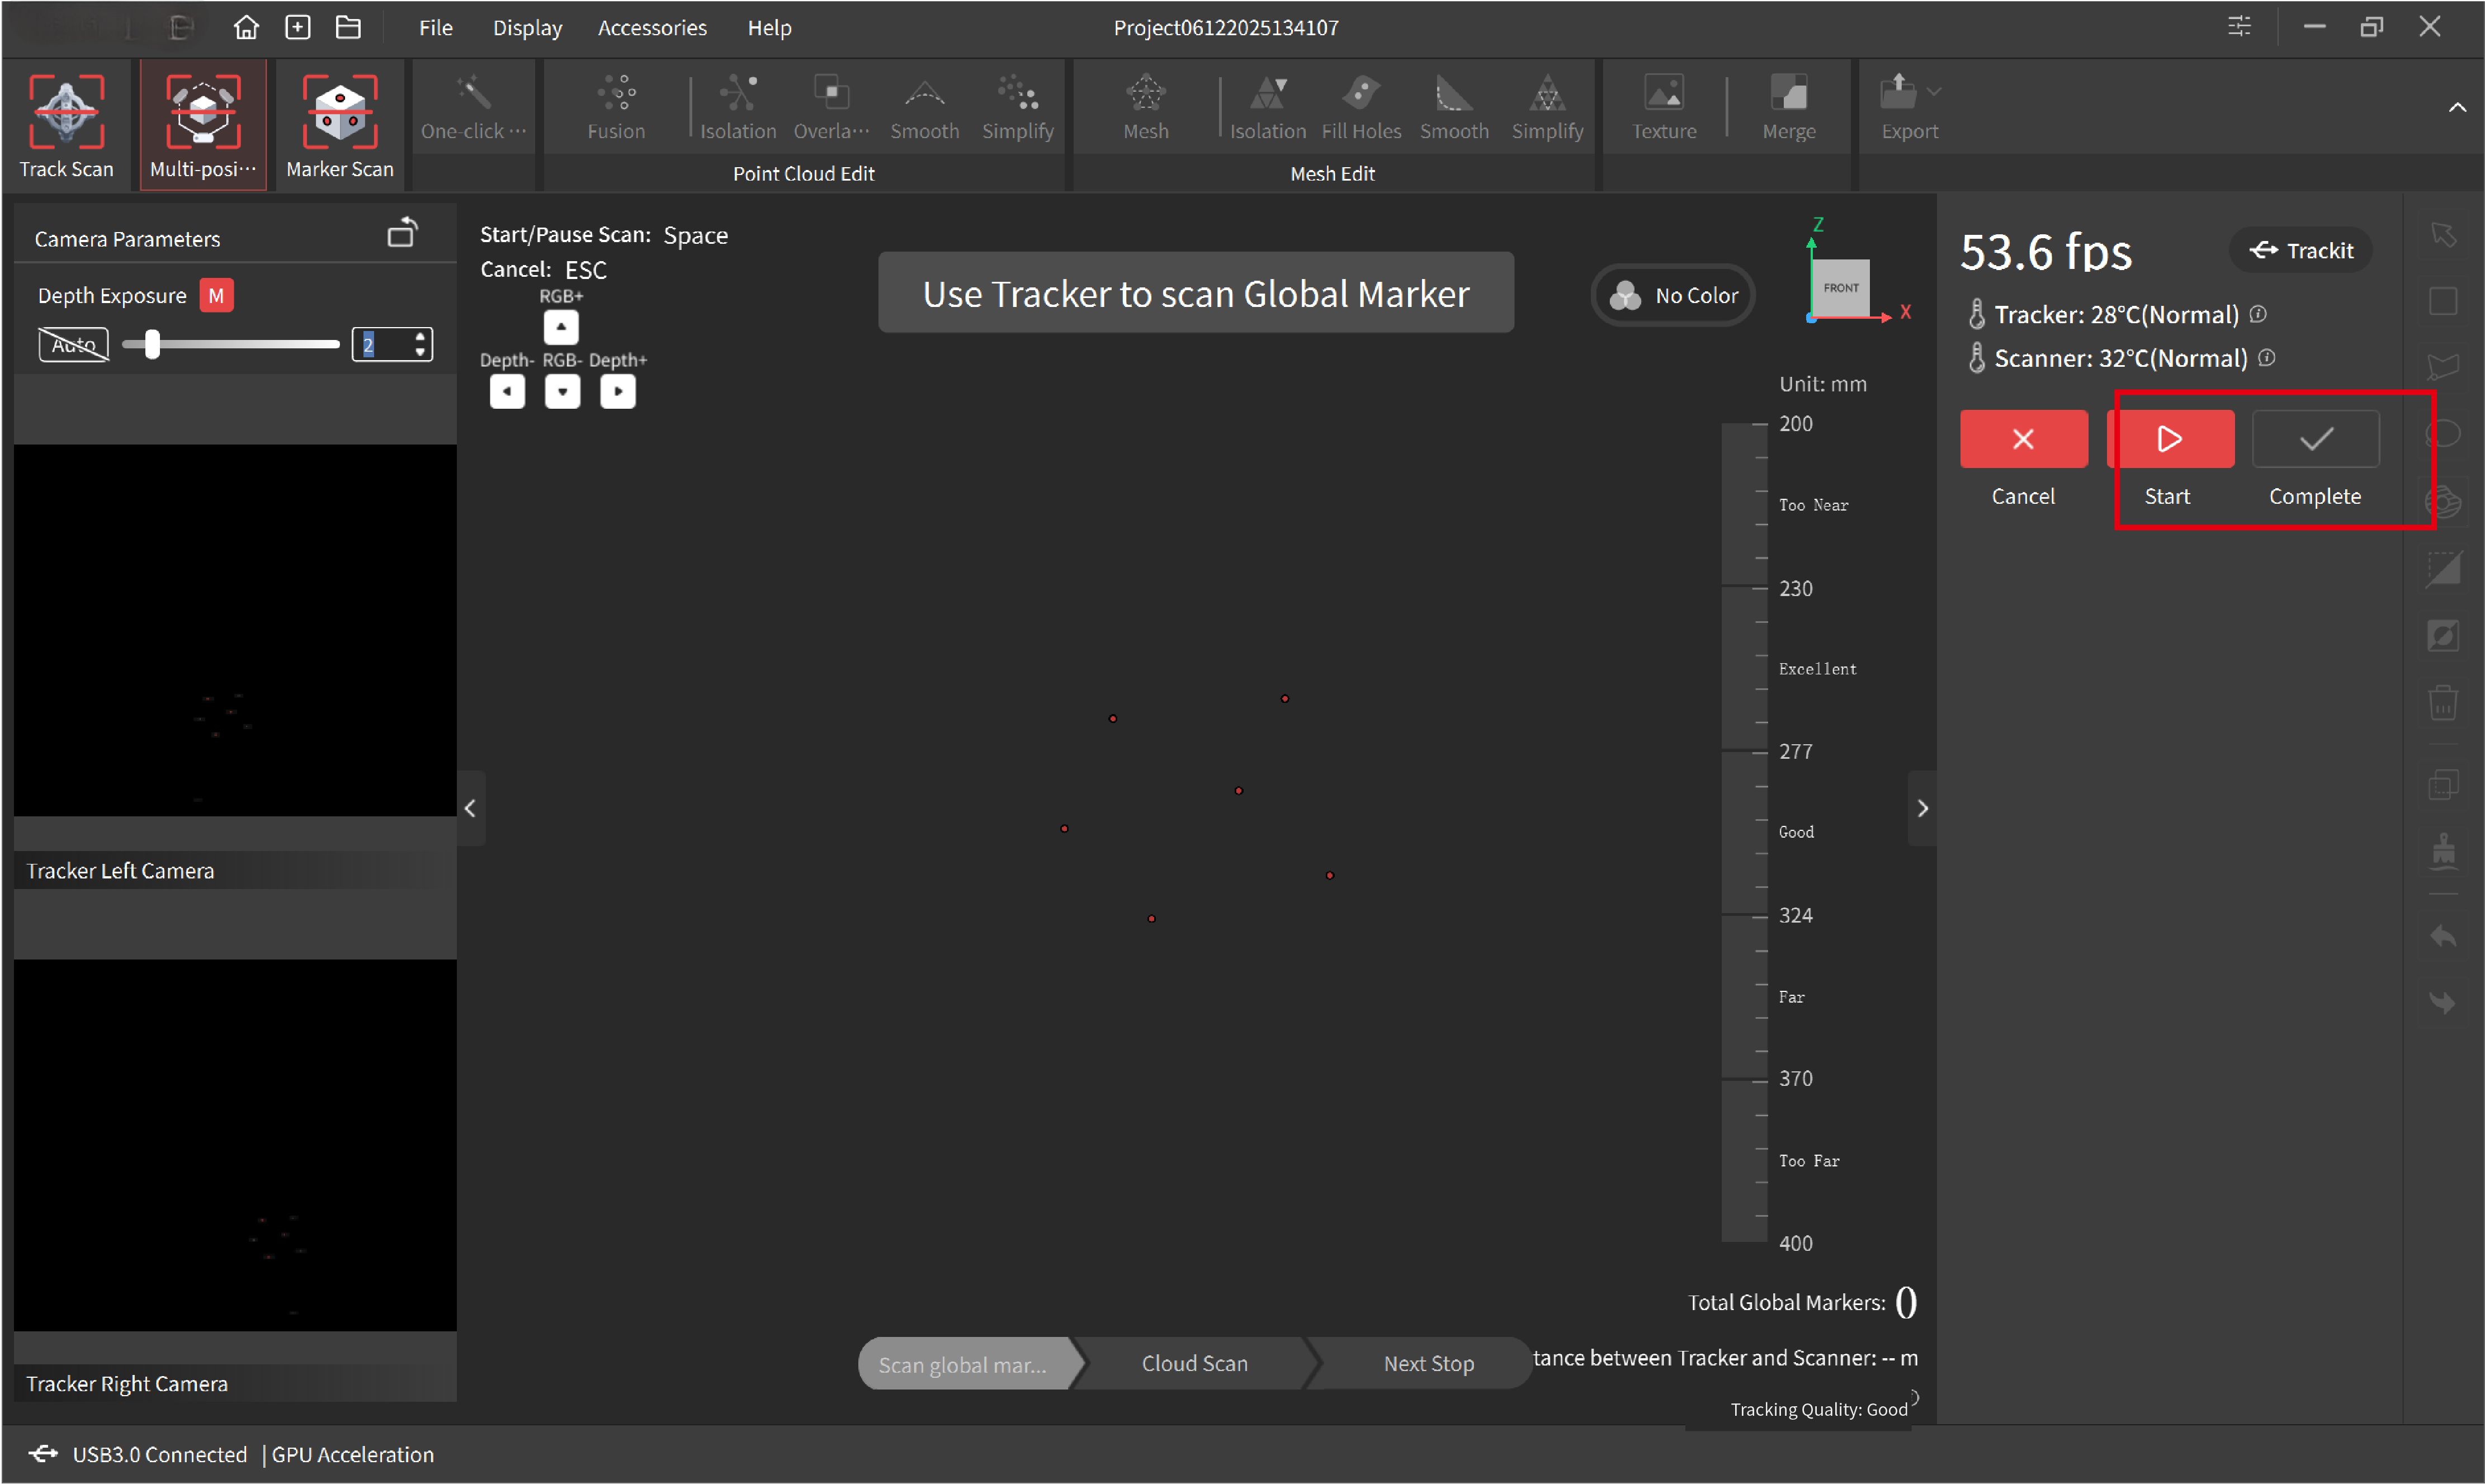
When it shows at least five markers, click the Complete button to finish.
3) Scan the Point Clouds in the starting area
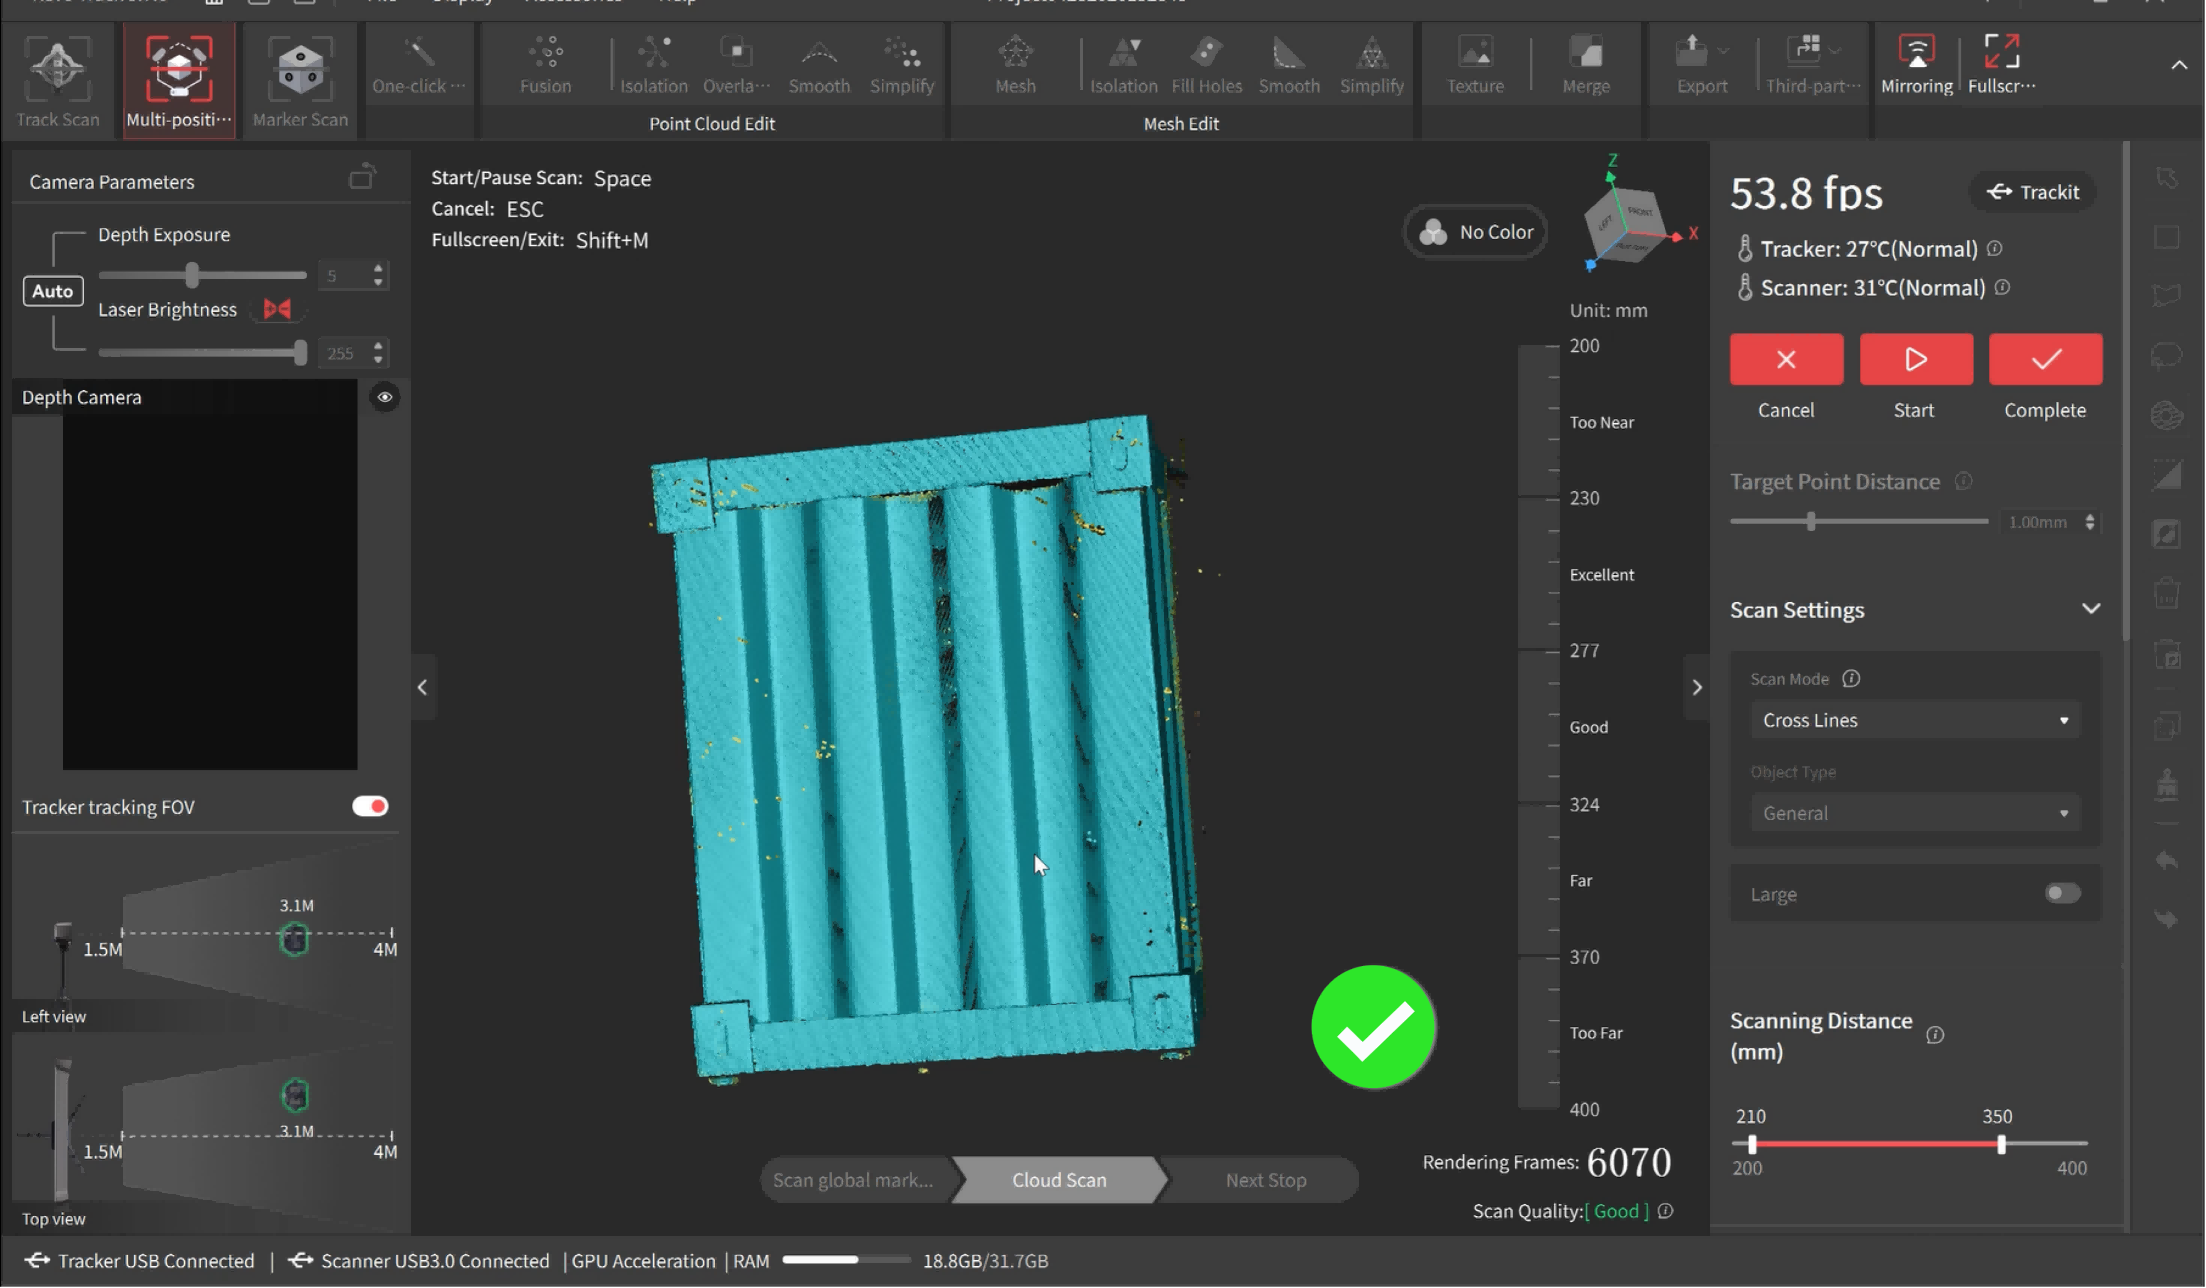
Click the Cloud Scan button.
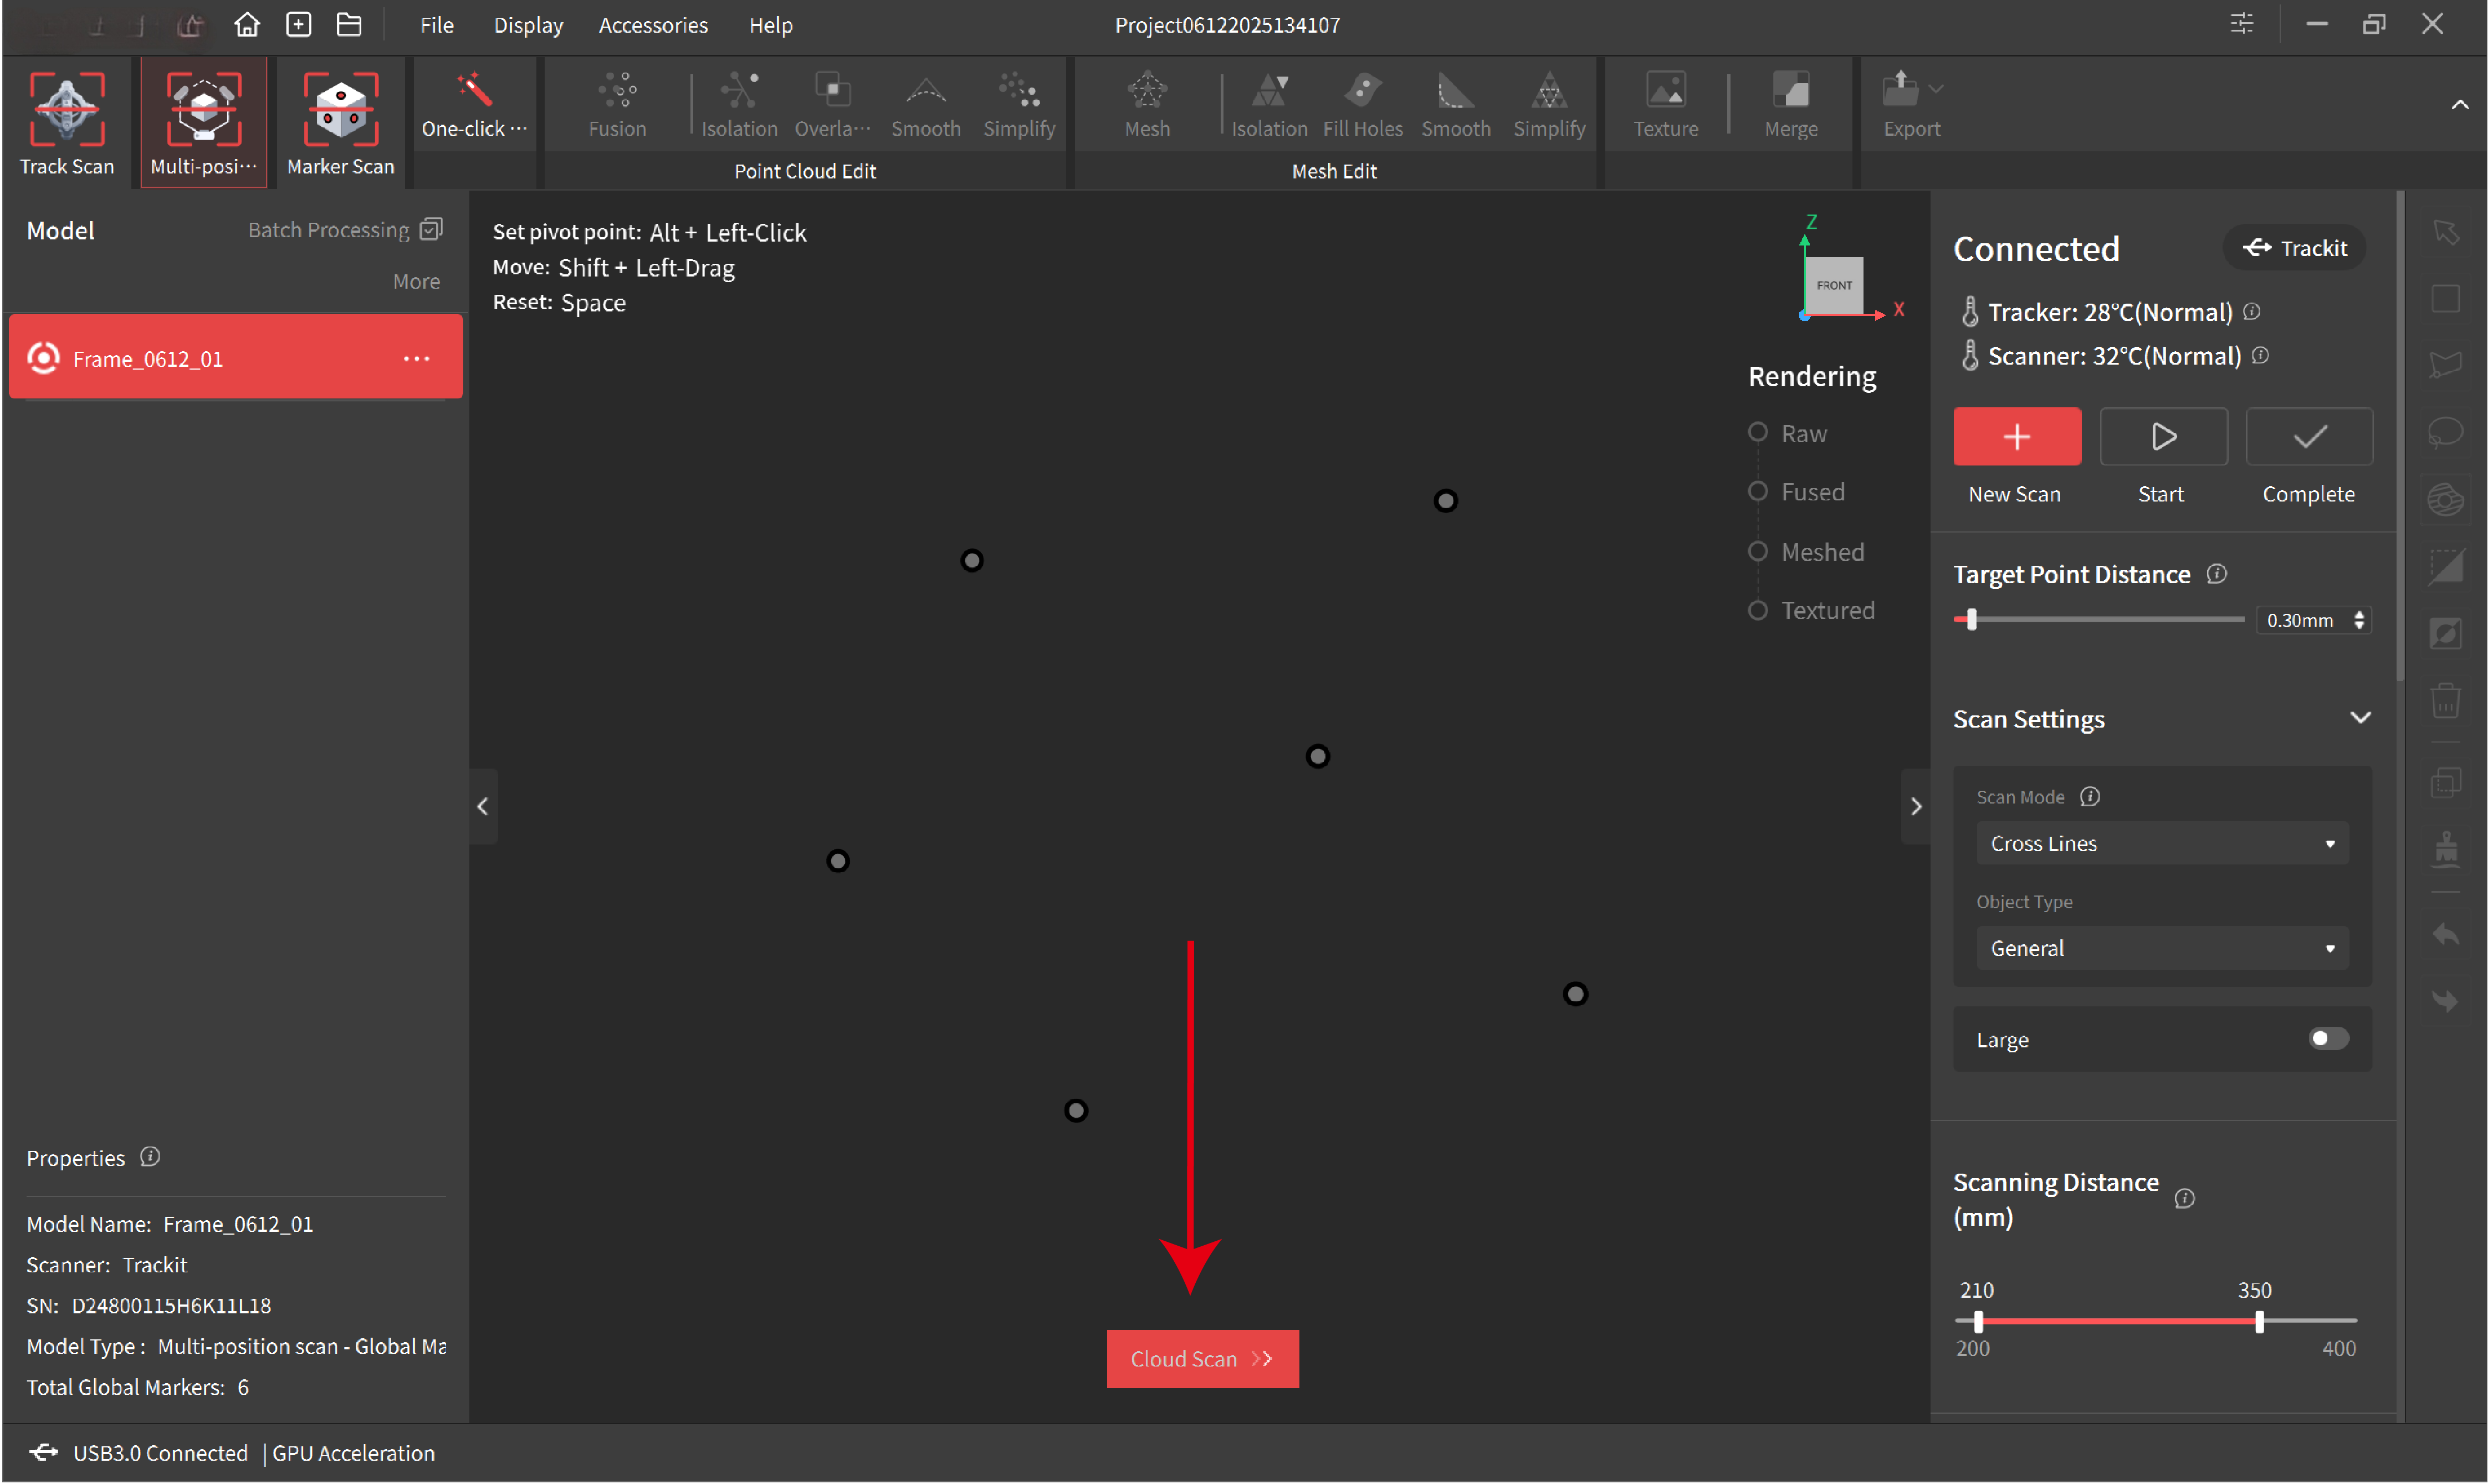
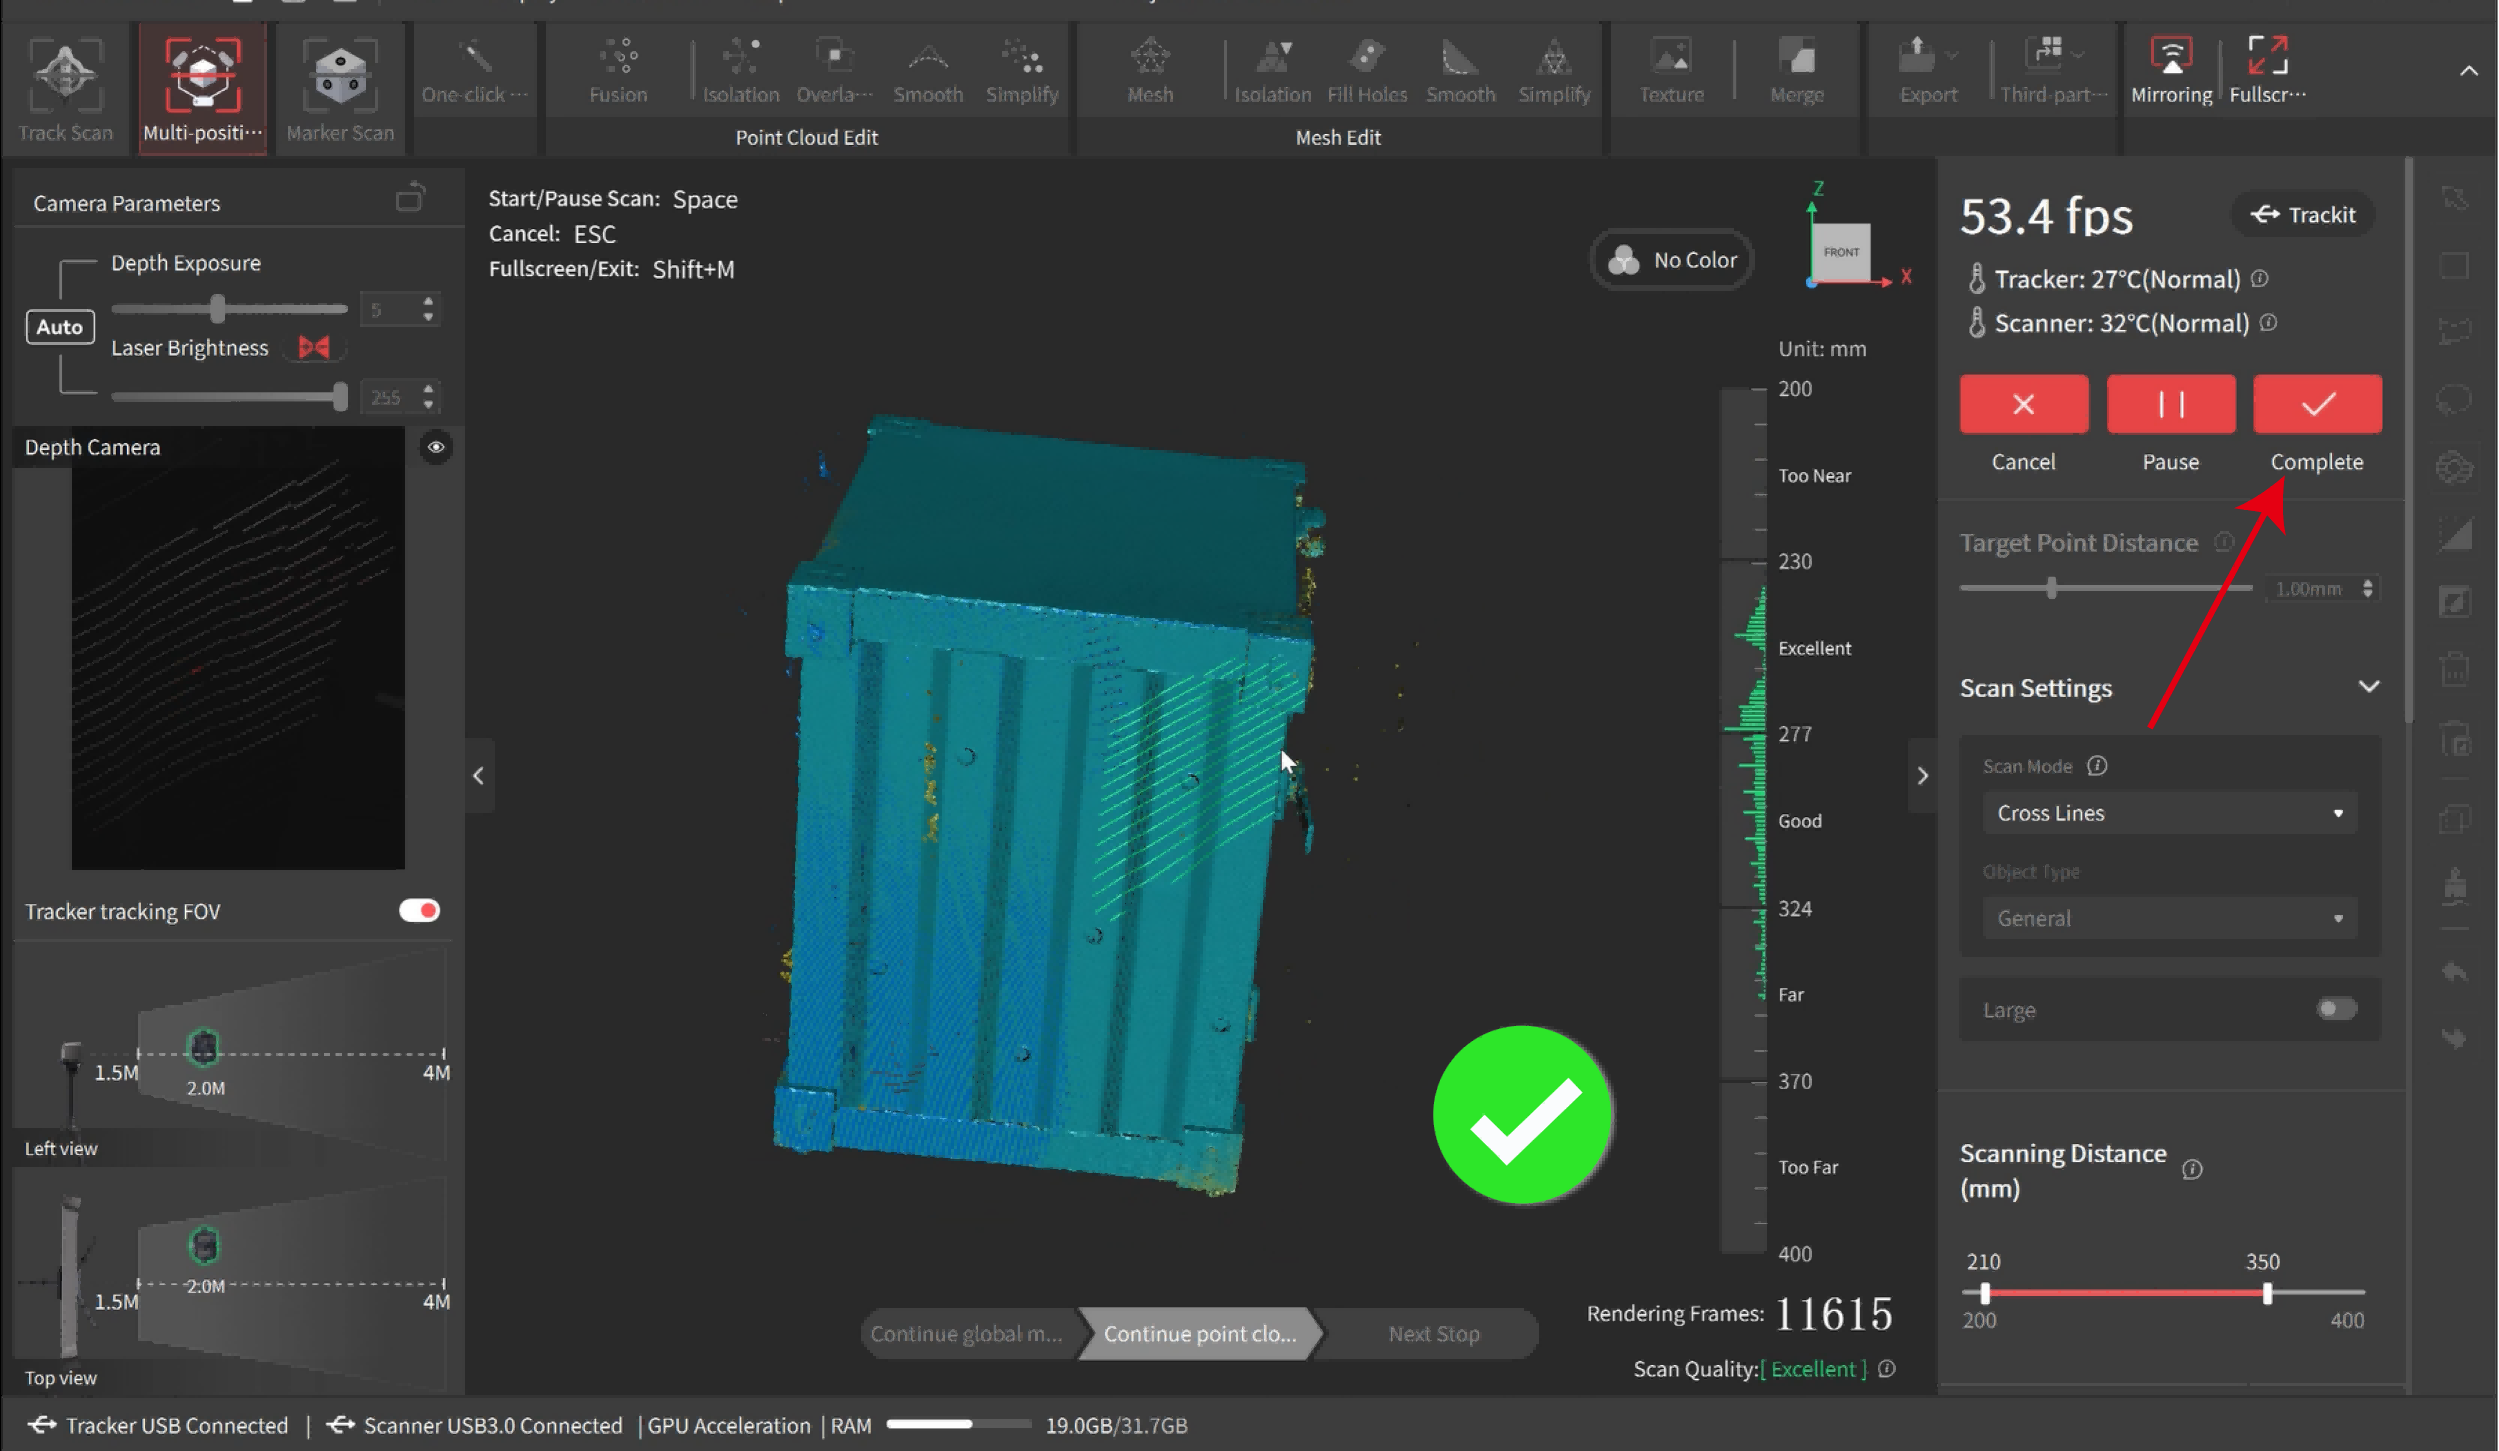
In Scan Settings, select the scan mode, object type, and set the target point distance as required. Then click the Start button to capture the point clouds.
Hold the Scanner and move slowly and steadily to capture the point clouds in the first area. Ensure that at least five markers out of the captured markers are always visible to Tracker during scanning.
When scanning, don't block Tracker's FOV or the markers on the object. Ensure the Tracker sees both the Scanner and the markers on the object.
During the scan, the point clouds change from yellow to blue as more data is captured. A totally blue point cloud indicates higher-quality data, so it's best to ensure the model is mostly blue before finishing.
4) Set up the Next Area
Set up the next area with at least 5 anchor blocks or markers on the object surface. Please note that you should not remove the anchor blocks from the first capture area, as Tracker still requires them for frame stitching reference.
5) Reposition Tracker to the Next Area
Click Next Stop to enter the next sation interface.
Slowly and steadily reposition the Tracker from the starting area to the next (or move the object from the starting area to the next area), ensuring the Tracker sees five markers in each frame during the process.
Refer to the total global markers in the lower right corner. When the total equals the number of markers in both areas, click the Complete button.
6) Scan the Point Clouds in the Next Area
Click the "Continue point cloud scan" button to capture the point clouds in the next area.

Then, hold the Scanner and move slowly and steadily to start capturing the point clouds in the next area.
When scanning, don't block Tracker's FOV or the markers on the object. Ensure that both the scanner and the markers on the object are visible to the Tracker.
Click the Complete button after the model's surface is totally blue.
7) Scan the Subsequent Areas
If the scan is not finished, repeat step 5 and 6 to continue capturing the rest of the object's surface until the entire object is captured.
8) Process the Model
Click One-click Edit to process the model automatically, or manually edit the model using the Fusion and Mesh settings, along with other tools, if you need a more detailed model. When manually processing for point cloud fusion, it is recommended to use the system's suggested point distance. Setting a very small point distance will result in a lengthy calculation time. For details, please refer to the Model Editing chapter.
9) Export the Model
After post-processing, export the model in formats such as PLY, OBJ, or STL.
¶ 3. Marker Scan
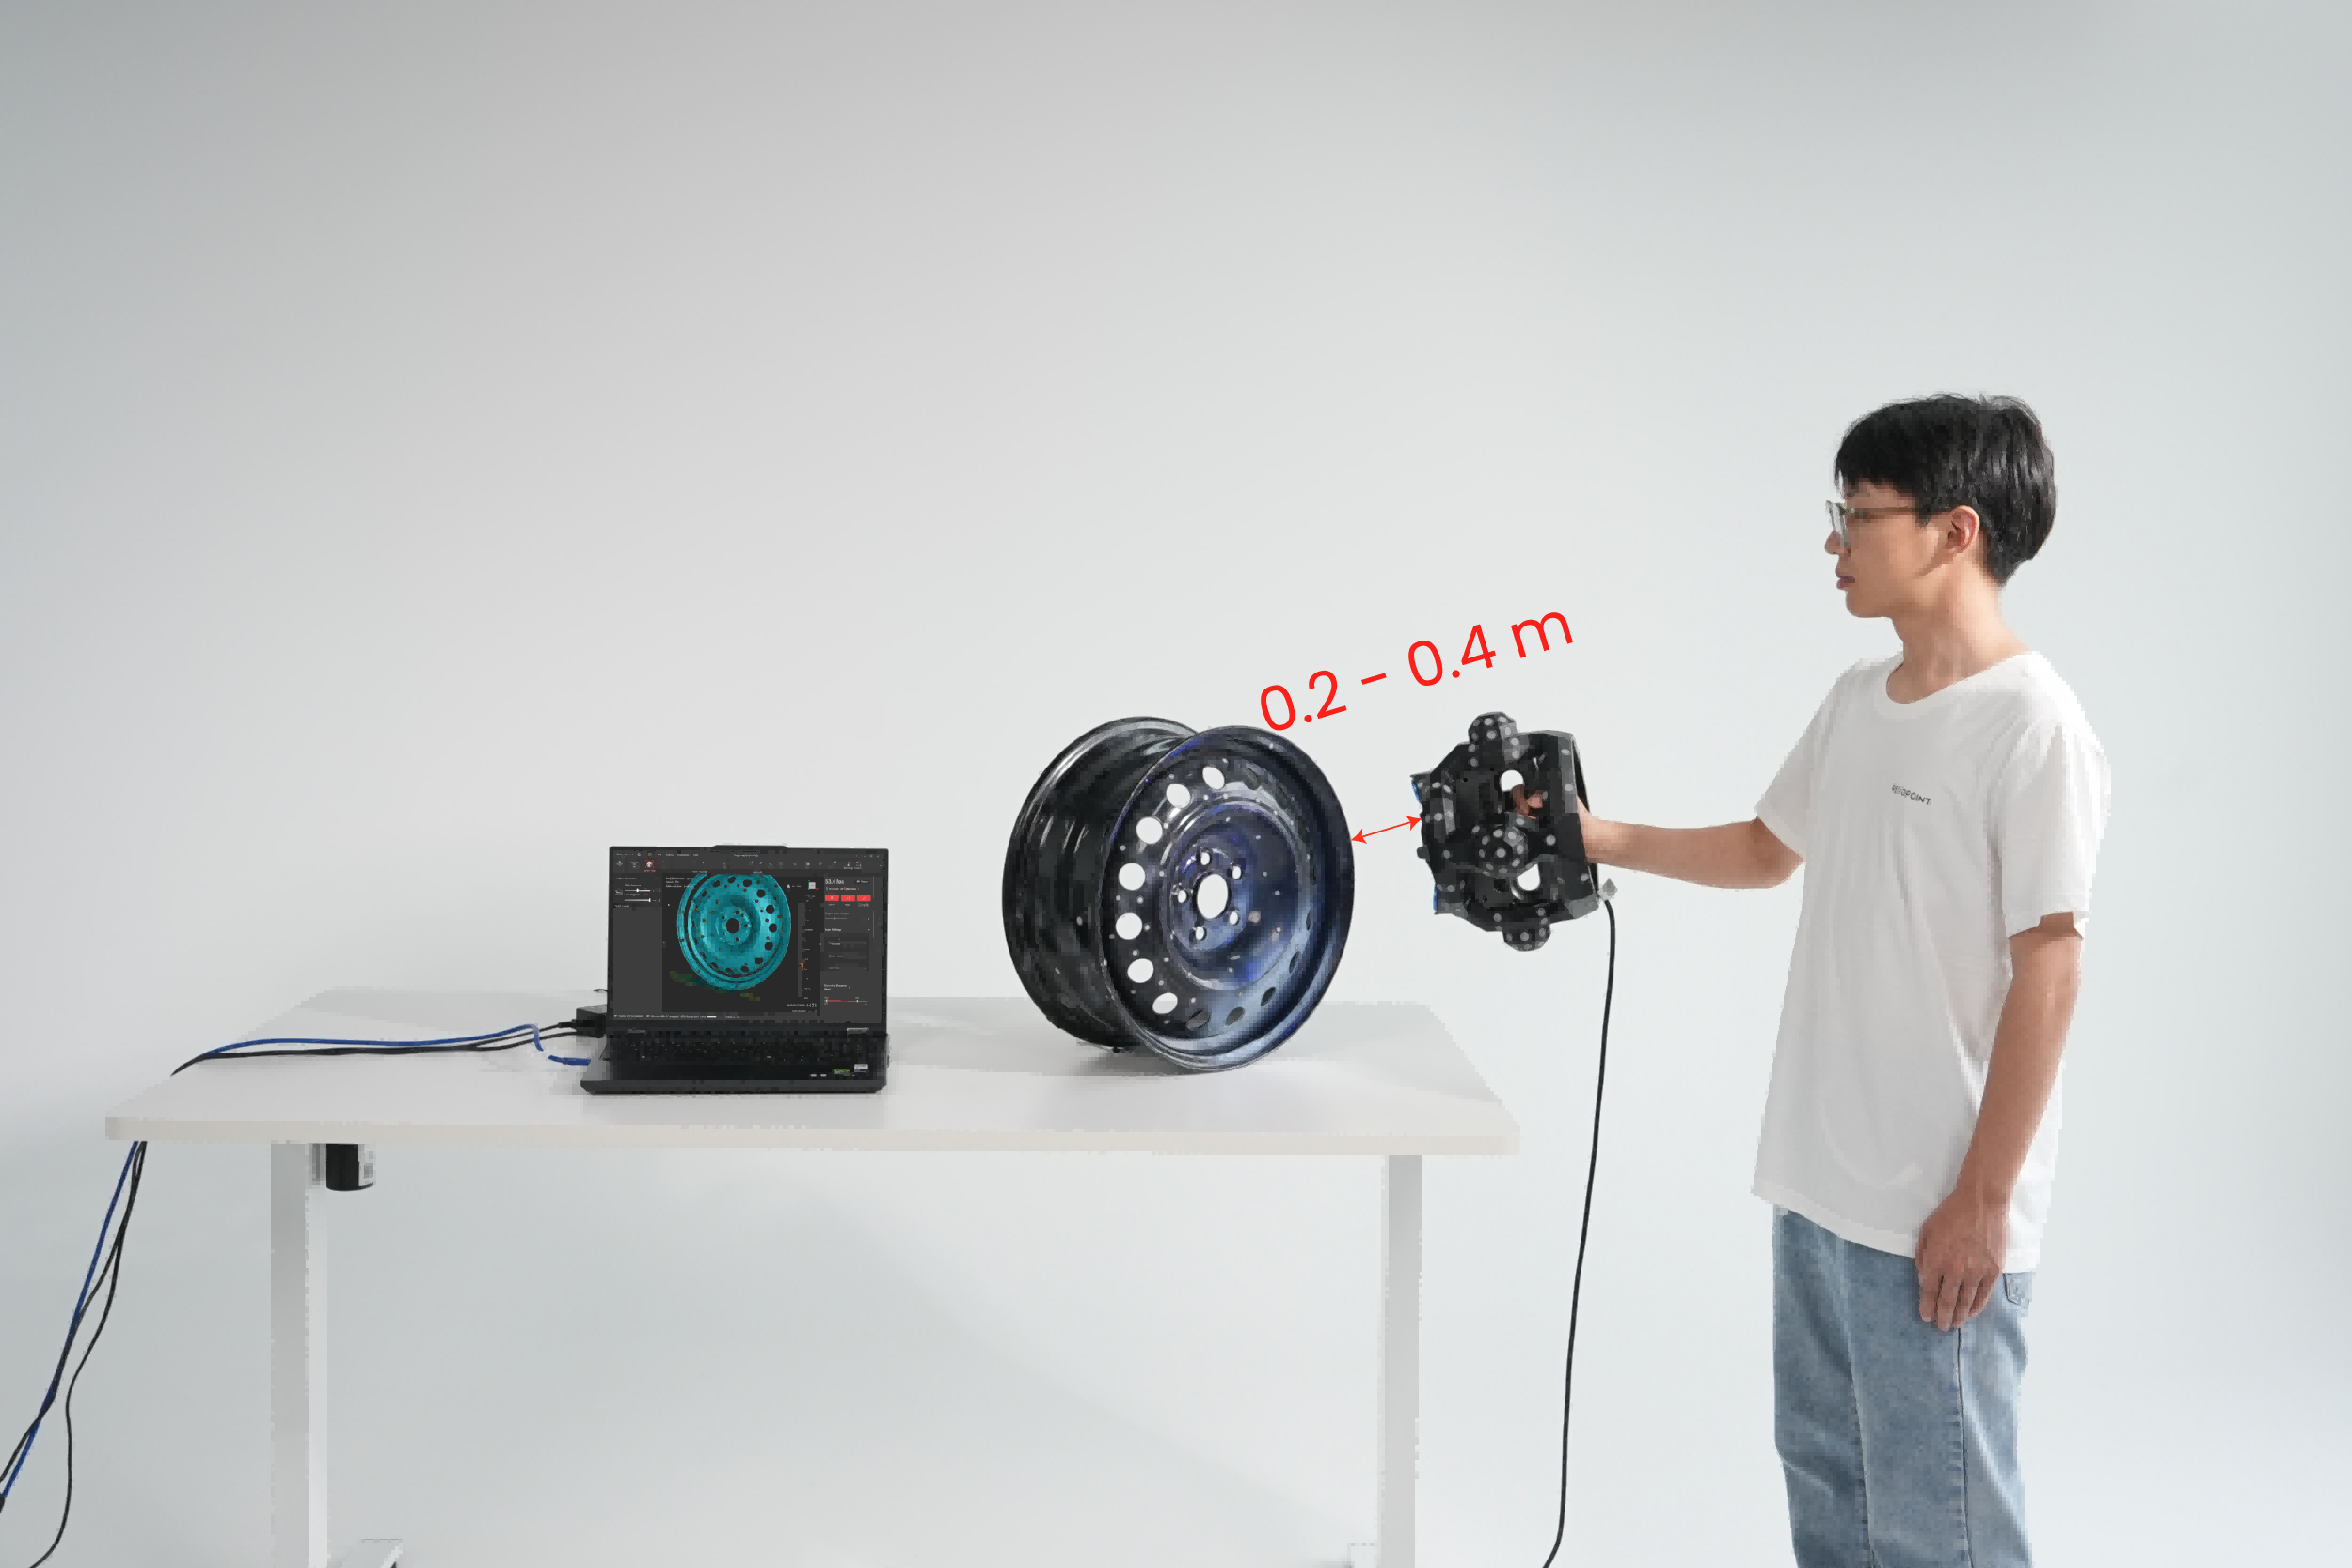
The Scanner also functions as a standalone 3D scanner, but it requires markers to be placed on the objects for the scan to be performed successfully. It’s suitable for scanning small and medium-sized objects.
Before scanning, you need to create a marker-rich environment by placing at least 5 markers per frame with around 6 cm spacing on the object's surface or surrounding it with marker blocks.
After the scanner is connected, click the New Project button on Revo Trackit’s Home page to enter the project interface. Select "Marker Scan."
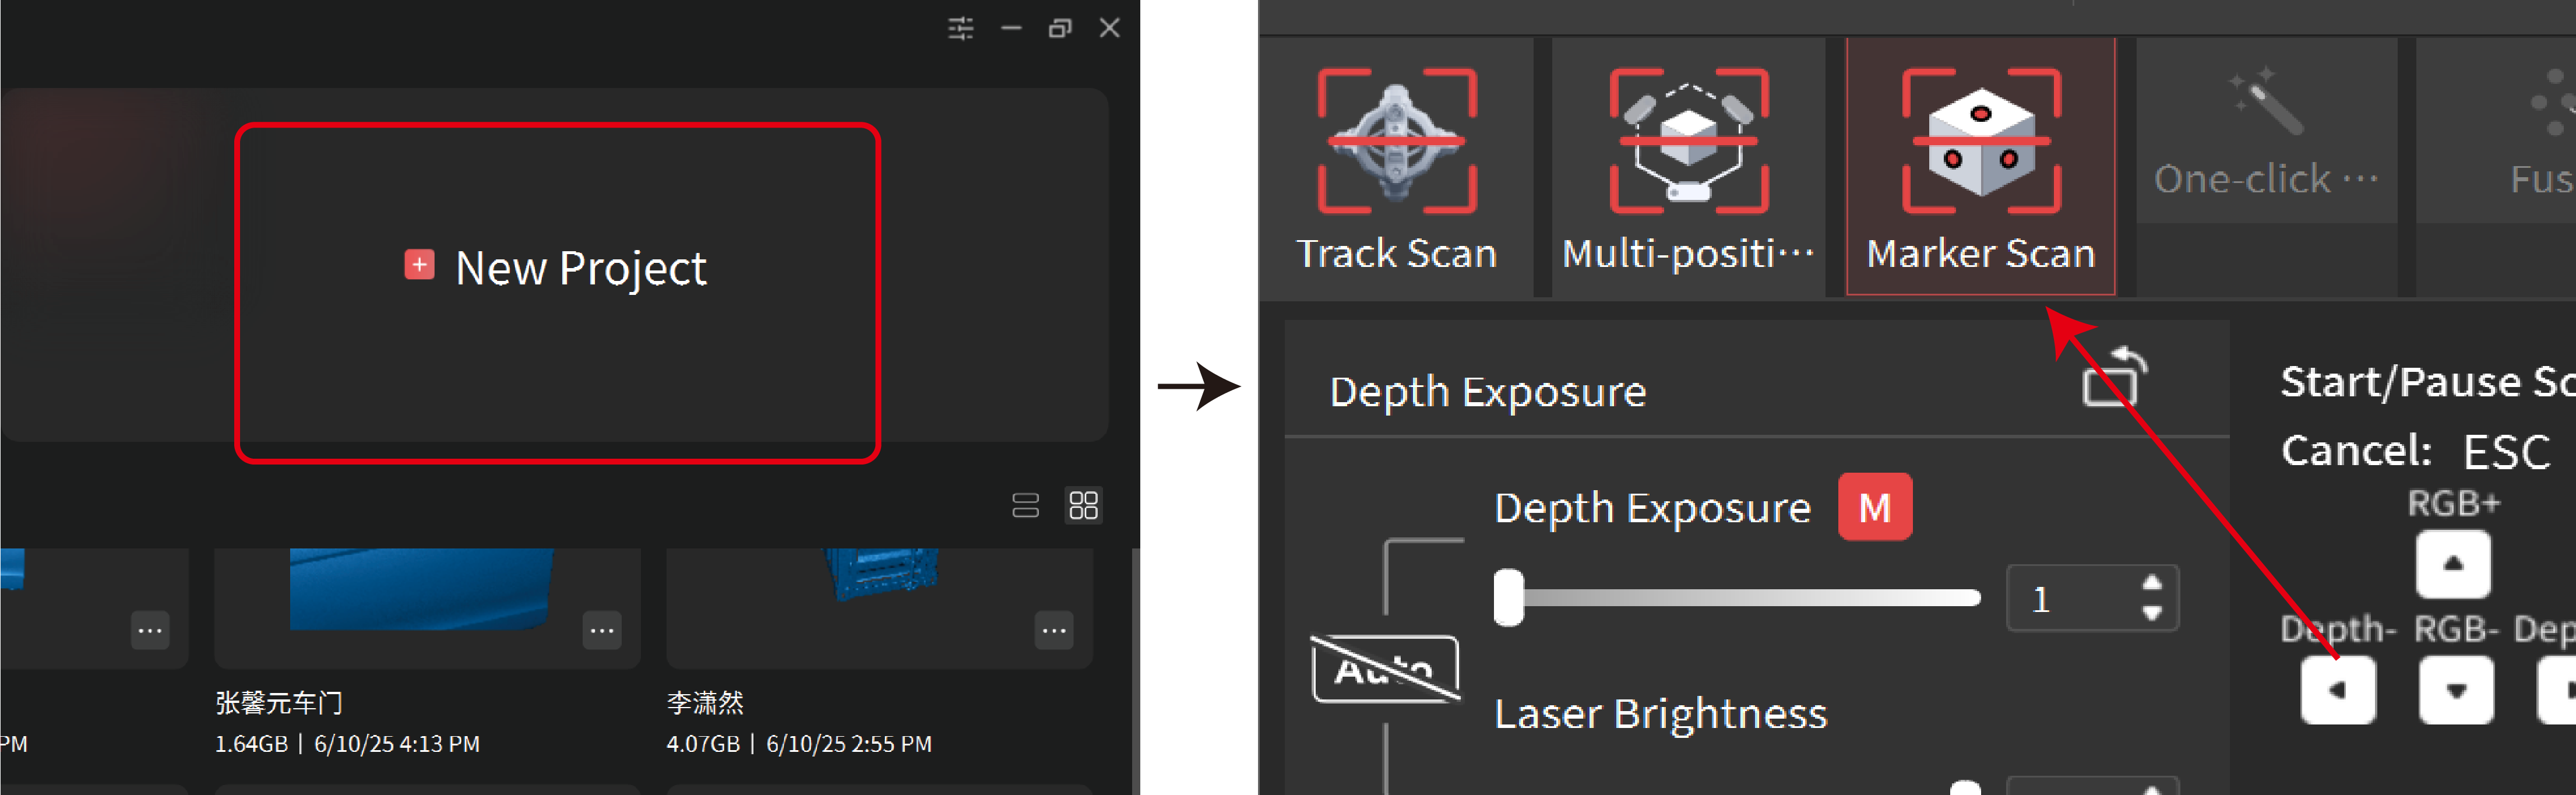
Follow the steps below to start your marker scan:
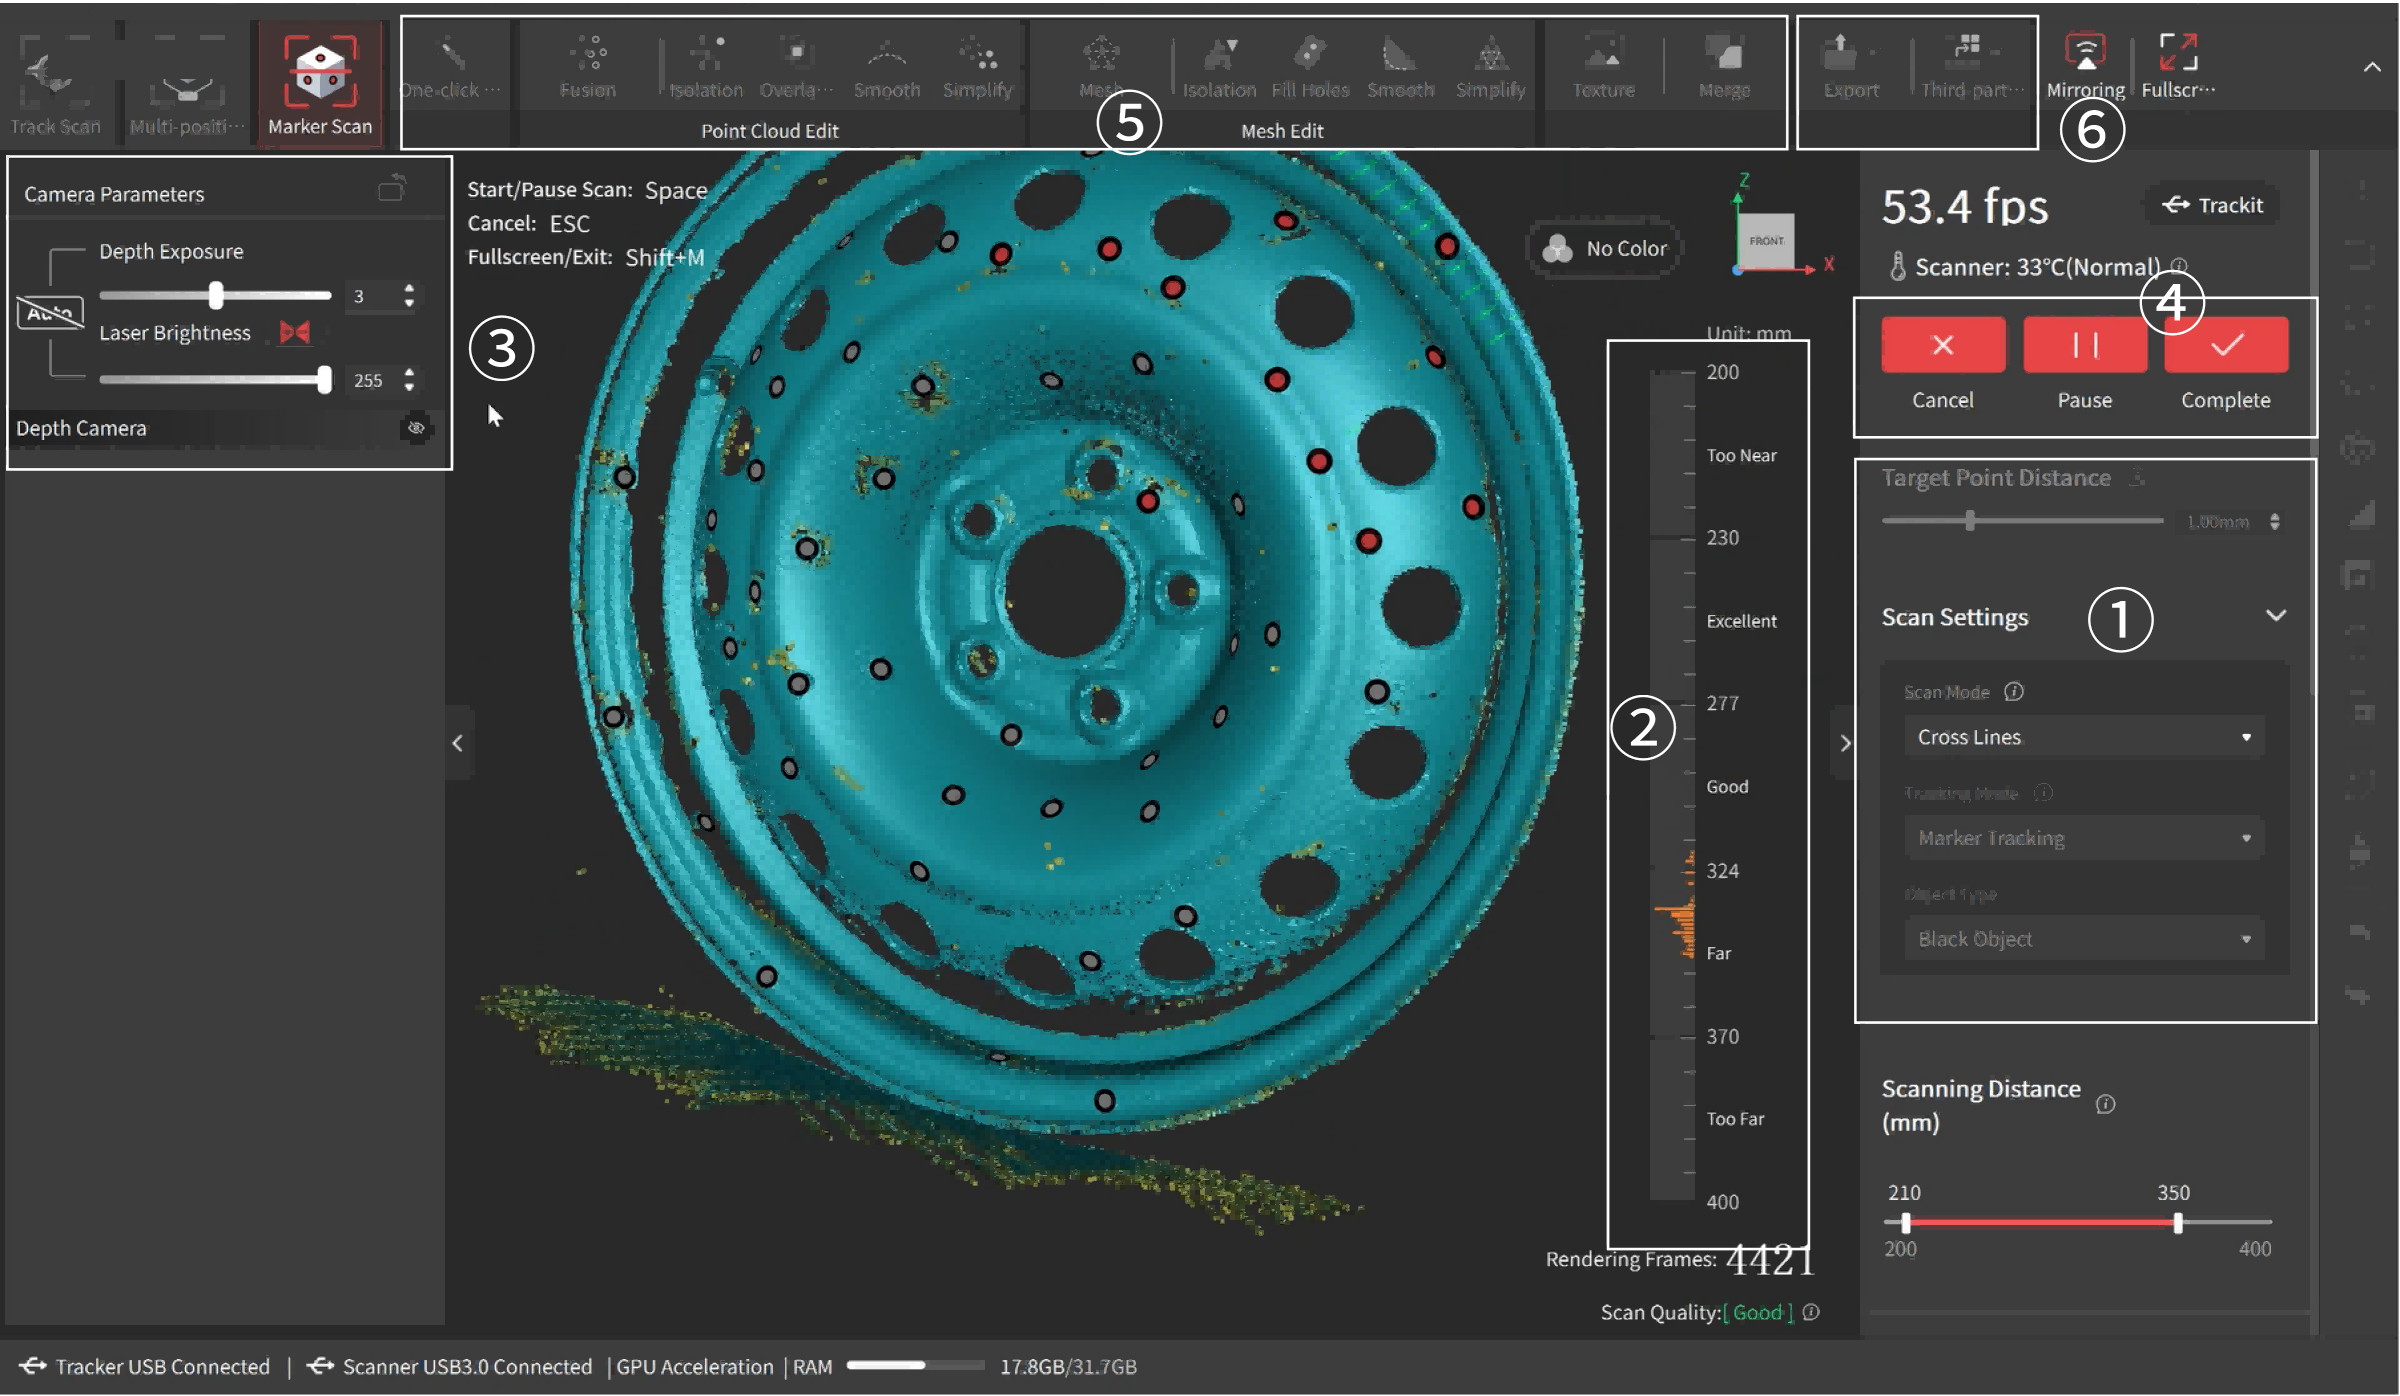
① In Scan Settings, select the Scan Modes, Object Type, and set the Target Point Distance according to your requirements.
② Move the scanner closer or further away from the object until the scanning distance indicator bar shows Excellent or Good.
③ Click the Auto button to automatically set the Depth Cameras’ exposure, or turn off the Auto exposure and adjust it by dragging the slider until the laser lines are clear in the preview window.
Note: You can manually click the button in the upper-right corner to make the preview window displayed.
④ Click the button to begin your scan. During the scan, aim the scanner at the object, move the scanner slowly and steadily around the object, and keep the distance between the scanner and the object at 200 - 400 mm. In the 3D scanning interface in Revo Trackit, refer to the distance indicator bar to ensure an excellent distance. You can click the button to stop and check your model anytime during your scan. If the model is incomplete, click the button to continue your scan. Click the button to finish the scan when the model is complete.
Note: During scanning, the point cloud changes from yellow to blue as more data is captured. Blue indicates higher quality, so it's best to scan the same areas from different angles and finish when the model is mostly blue.
⑤ Click One-click Edit to process the model automatically, or manually edit the model using the Fusion and Mesh settings, along with and other tools, if you need a more detailed model. When manually processing for point cloud fusion, it is recommended to use the system’s suggested point distance. Setting a very small point distance will result in a lengthy calculation time. For details, please refer to the Model Editing chapter.
⑥ After post-processing, export the model in formats such as PLY, OBJ, or STL.