¶ 1. Use this Manual
Thank you for choosing the MIRACO 3D scanner! This User Manual is designed to help you learn how to use the MIRACO's functions and solve problems during your scan. You can click on a topic in the navigation bar to go to that section.
To save the current webpage as a PDF manual, scroll down to the bottom of the Contents bar, tap the printer icon, and then choose "Save as PDF" from the options presented.

¶ 1.1 Copyright
This document is copyrighted by Revopoint, and all rights are reserved. Unless otherwise authorized by Revopoint, you are not eligible to use or allow others to use the document or any part of the document by reproducing, transferring, or selling it. Users should only refer to this document and its content as instructions to operate Revopoint MIRACO. The document should not be used for other purposes.
¶ 1.2 Warnings


¶ 1.3 Read Before the First Scan
① Revopoint provides users with tutorial videos and the following documentation:
· User Manual (Browsing)
It is recommended that you watch all the Tutorial Videos and read the Quick Start Guide before using MIRACO for the first time. Please review this manual for more information before your first scan.
② The videos and pictures about the software interface in this manual are for guidance only. Please refer to the latest software version for actual content.
¶ 1.4 Contact and Follow Us
¶ 2. Quick Start Scan
We will do a scanning demonstration for you using the accessories included in the package to guide you through your first scanning experience. For the first scan, it is recommended that you scan the Sample Bust included in the package. After turning the scanner on, you can set up MIRACO and start your scan using the following steps.
¶ 2.1 Connect the Mini Turntable
Step 1: Connect the turntable to a PC or a socket via the turntable's power cable. When it is powered, the turntable's power indicator will turn green.
Step 2: Place the bust on the turntable. Flick the switch left or right to adjust the turntable's rotational direction, and twist the dial to change the rotation speed.
Note: For optimal results and efficiency, it is recommended that small objects, such as the Sample Bust, be scanned using the Mini Turntable.
¶ 2.2 Select a Scanning Mode

Select [Continuous] and [Near] modes to scan the Sample Bust.
¶ 2.3 Scan Settings Before Scanning

The recommended scan settings for Sample Bust are [High Accuracy], [Feature], [General], and [Color] toggled off.It's also recommended that [Base Removal Off] be turned off.
¶ 2.4 Adjust Scan Distance
Aim MIRACO at the Sample Bust and move the scanner to adjust the distance between it and the target object, ensuring the scanning distance indicator bar displays green and shows Excellent or Good.
Note: The exposure will change at different distances, so ensure it's the correct distance from the object before adjusting the exposure.
¶ 2.5 Adjust Exposure
It's recommended that the exposure bar of Depth Cameras be manually adjusted to minimize red or blue areas in the preview instead of using [Auto] exposure.
Note: When the Color scan is toggled off, RGB exposure, white balance, and white flash LEDs need not be adjusted.
¶ 2.6 Start Scanning
Next, tap the  to begin scanning.
Note: Hold the scanner steady and move slowly during your scan if doing a handheld scan.
¶ 2.7 Pause/Complete Scan
Tap the Pause  button to pause your scan and check the model anytime.
When pausing scanning, tap the  icon for full-screen viewing.
Tap the Cancel  button to cancel the scan if unsatisfied with the model, or tap the Redo
  and Undo
  buttons to correct errors during scan pauses.
Aim the scanner at an area with rich geometric features that have been scanned, and tap the Play  button to continue scanning if the model is incomplete.
Tap the Complete  button to finish the scan if the model is complete. The model will be saved to the model hub in the lower right corner.

Helpful Screen Gestures for the Home or Post-processing page:


¶ 3. About MIRACO
¶ 3.1 Product Profile

¶ 3.2 What's in the Box
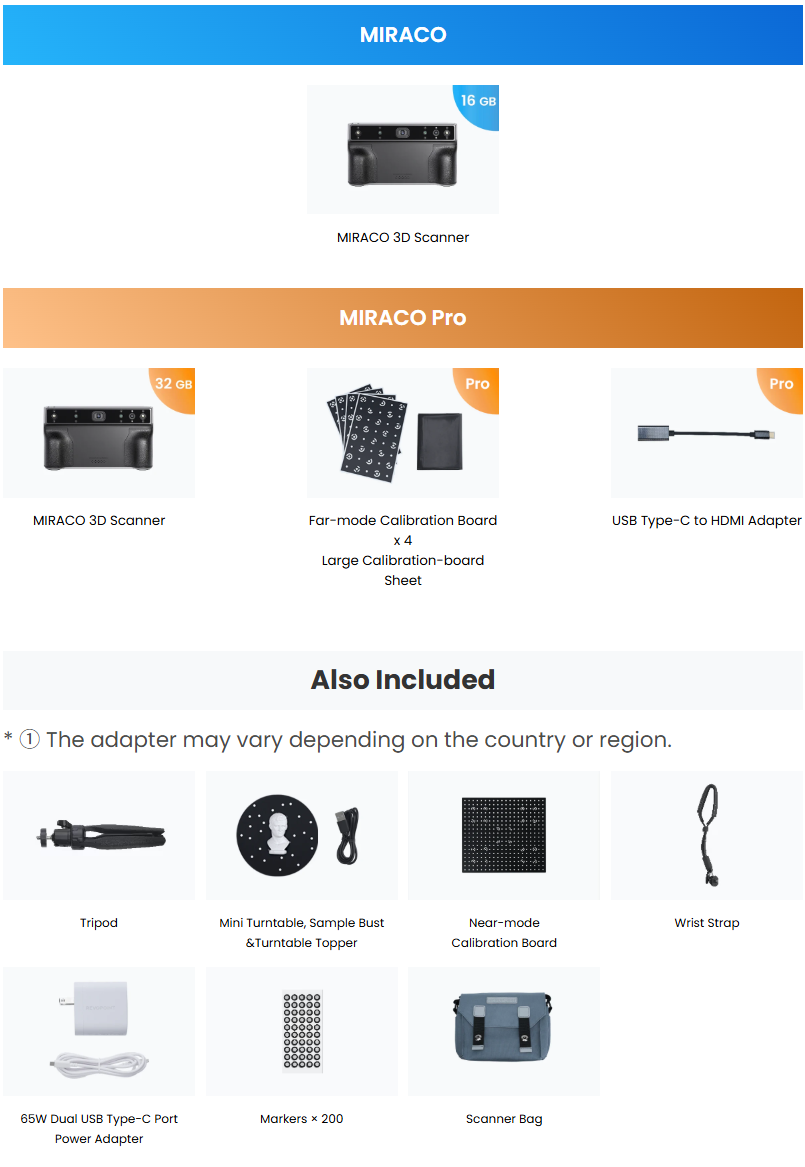
Note: The image shown here is indicative only. The actual product may differ.
¶ 4. First Boot Setting
¶ 4.1 Battery Requirement
Before first use, please charge the MIRACO to more than 60%.

¶ 4.2 Power On Setting
Step 1: Long-press the Power Button (5s) to turn on. (The same goes for shutdowns)

Step 2: Select a language.

Step 3: Connect to a Wi-Fi network for project transfers and software update notifications.

Step 4: Adjust and confirm the Date and Time.
Step 5: Tap Next to enter the Scan Interface.
¶ 5. Scanner Setting Center
Swipe down from the top of screen to access the Quick Settings Center.

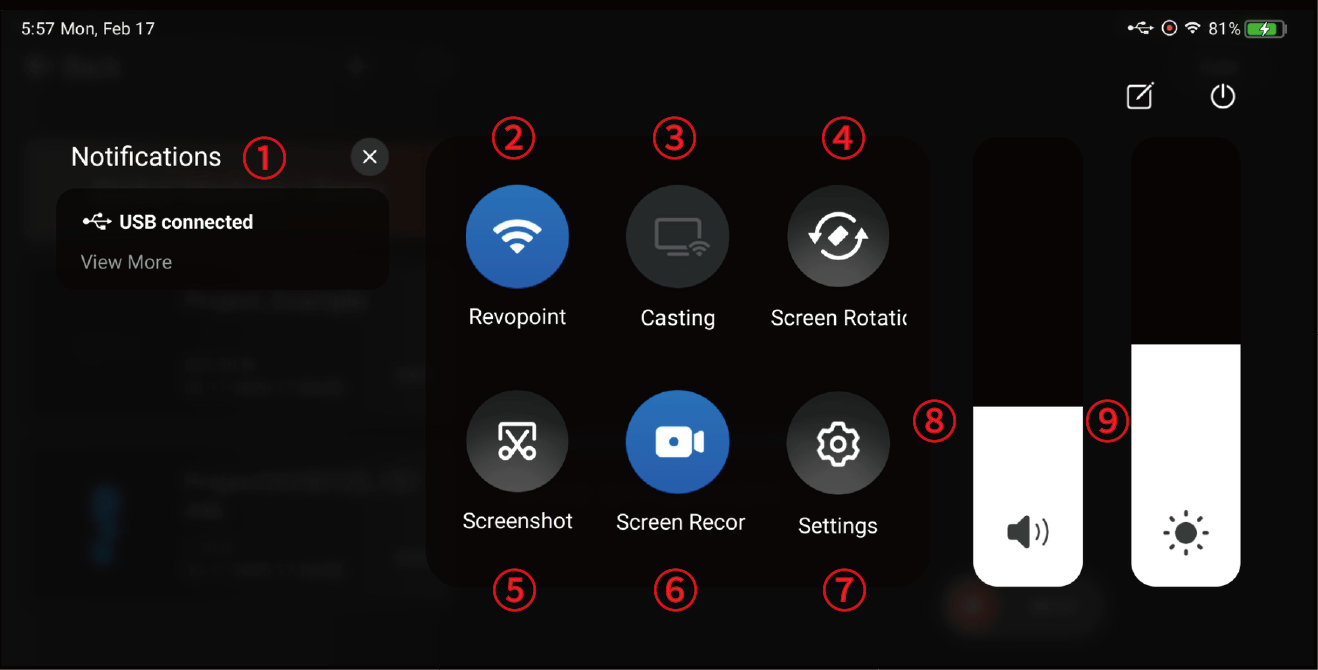
① Notifications: Shows the notifications about software update, USB connection status, low battery, and so on.
② WLAN: Check the network connection. Long press the icon to go to Wi-Fi settings.
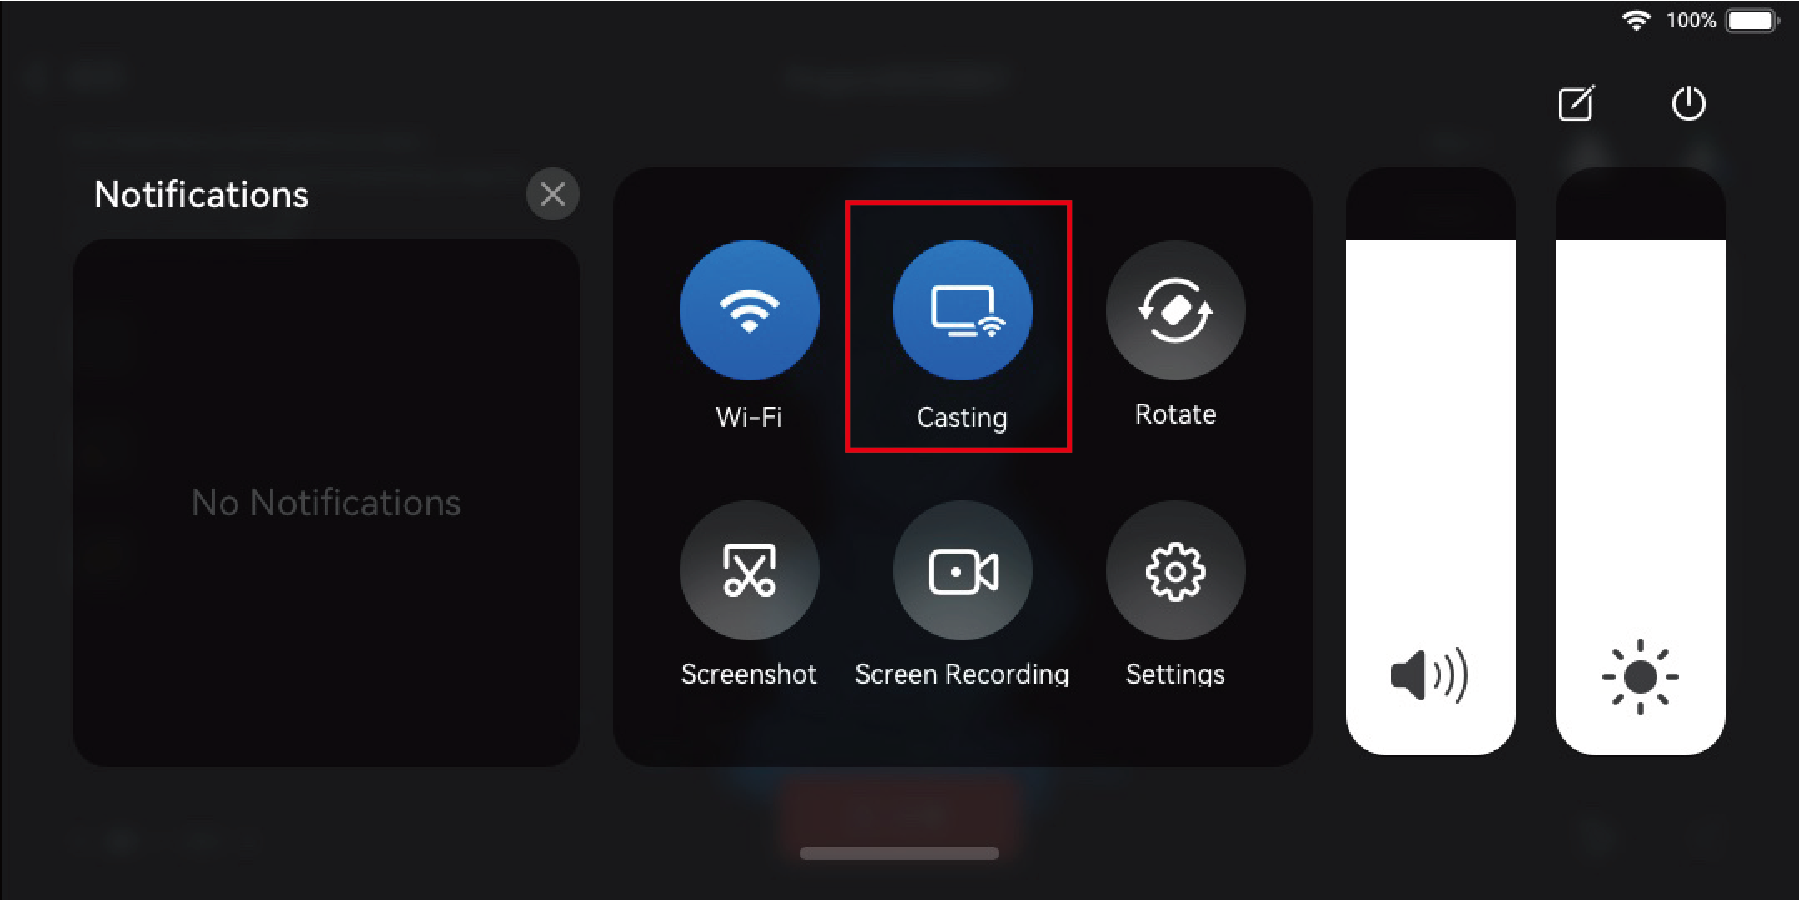
③ Casting: Tap to mirror your screen to a monitor or TV.
④ Screen Rotation: MIRACO's display can automatically switch between portrait and landscape orientations based on device orientation.When screen rotation is enabled, the content on the screen adjusts to match the device's orientation.
⑤ Screenshot: Use to capture a screenshot of the MIRACO's screen.
⑥ Screen Recording: Capture video footage of the MIRACO's screen. This feature is helpful for creating tutorials, demonstrating app usage, orrecording any on-screen activity.
⑦ Settings: A shortcut to MIRACO's main settings page.
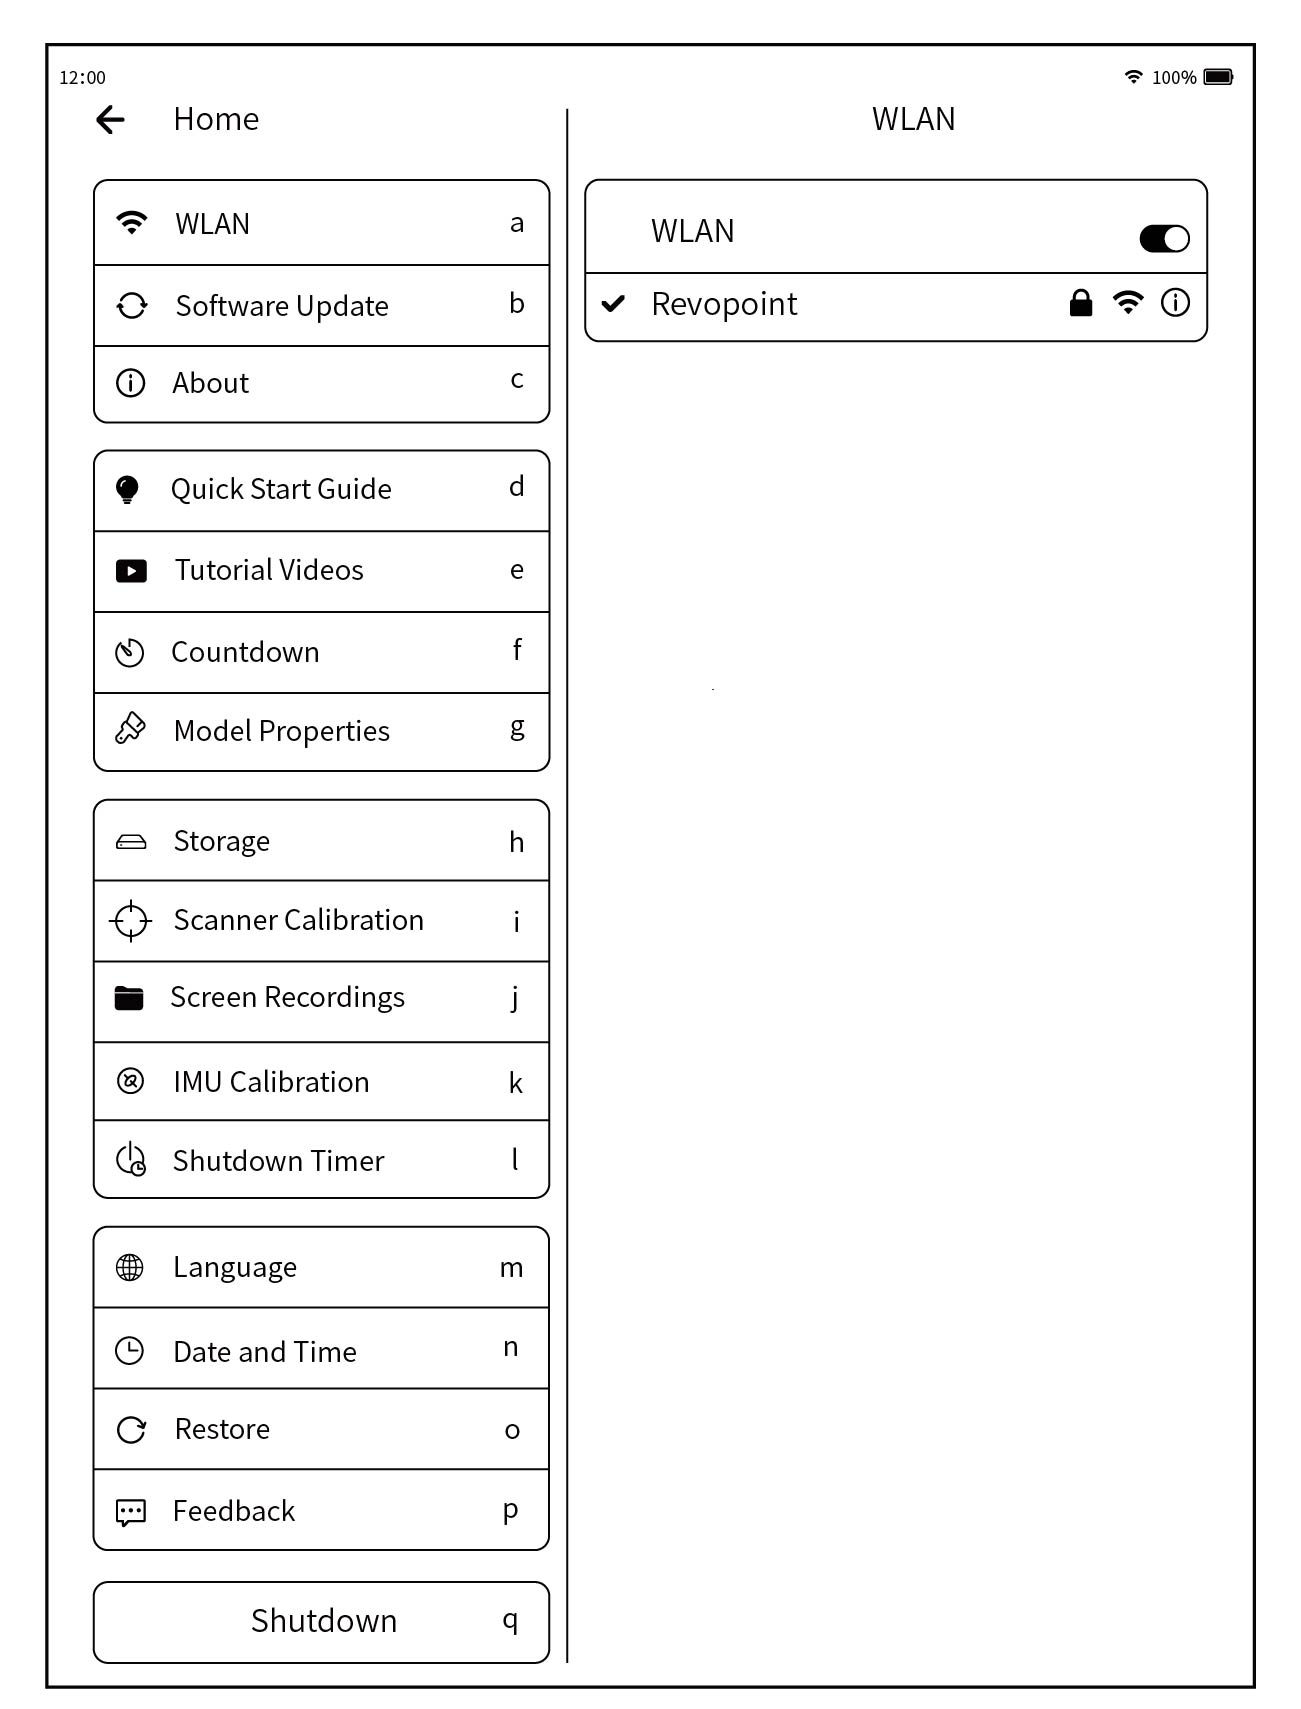
a. WLAN
Tap to change the network connection.
b. Software Update
Tap to check for and install the latest version of software.
1) Swipe down from the top of the screen, tap [Settings] > [WLAN], and connect to a network.
2) Tap [Software Update] to check if a new version is available. If yes, tap [Download and Install] to update it.
3) The update will install automatically. After the update, MIRACO will restart.
c. About
See detailed information about MIRACO, including product name, Serial Number, RAM, app version, and system version.
d. Quick Start Guide
Tap to see MIRACO's Quick Start Guide.
e. Tutorial Videos
Tap to watch MIRACO's tutorial videos.
f. Countdown
Tap to set a countdown so that you can have several seconds to get ready after tapping the Start button.
g. Model Properties
Tap to change the no-color model's color and surface properties.
h. Storage
Shows the used storage space.
i. Scanner Calibration
Calibrate to ensure accuracy.
j. Screen Recordings and Screenshots
Tap to view saved screen recordings and screenshots on MIRACO. You can export them to external storage or to Revo Scan (V5.3.9 or above) on mobile.
k. IMU Calibration
Tap to calibrate the IMU to maintain tracking and accuracy.
l. Shutdown Timer
Schedule a timer to automatically power off MIRACO.
m. Language
Tap to select a preferred language.
n. Date and Time
Tap to set the date, time, and time zone.
o. Restore
Tap to erase app data, reset the scanner, or restore calibration.
p. Feedback
Tap to give us suggestions and feedback.
q. Shutdown
Turn off MIRACO.
⑧ Sounds: Adjust the volume. Setting it to 0 will turn all sounds off.
⑨ Brightness: Adjust MIRACO's screen brightness.
¶ 6. Scanner Usage
¶ 6.1 Handheld & Desktop
When performing a handheld scan, the scanner can be moved freely to capture an object's details from different angles. Please hold the scanner steady and move slowly during your scan.

When using MIRACO as a desktop scanner, objects can be scanned without moving the scanner. To do so, put an object on the Mini Turntableand place the MIRACO on a flat surface.

¶ 6.2 Vision & Light
Please ensure that only the object being scanned is visible in the Depth Cameras preview window. If you need a color model, ensure the object is evenly lit to remove shadows.
¶ 7. Object Scanning Tips
Successful scanning requires corresponding scanning settings, object handling and the use of props for different types of scanned objects with different material properties.
Please browse: Scanning Tips.
¶ 8. Software Operation
¶ 8.1 Scanning Interface

➀ Depth Camera Preview Window
Displays the live feed from the Depth cameras.

• Adjusting the exposure of Depth Cameras is essential to capturing accurate 3D data. Fine-tune the exposure until there are minimal blue and redpatches on the object in the preview window to ensure an accurate scan. It is also possible to switch from manual to automatic exposure by tapping the Auto icon to turn auto exposure on/off. When auto exposure is turned off, the slider can be dragged to adjust the exposure value.

• Reduce noise, increase the smoothness, and capture even finer details with 1.5x and 2x infrared optical zoom.
➁ RGB Camera Preview Window
Displays the live feeds from the RGB camera.


• Adjust the RGB Camera's exposure and white balance for better color scans.
• Proper exposure and white balance are crucial in producing high-quality color 3D models. When capturing a color model, adjust the RGB Camera's exposure till the object's colors look accurate, neither too dark nor too bright.
• Tap the flash icon to turn the White Flash LEDs on if necessary.
• Tap the Auto icon to turn on/off auto exposure/white balance.
• Tap the Sun or WB icon to toggle between controls for exposure and white balance.
• Auto exposure can be turned off or on individually for exposure and white balance. When turned off, the slider can be dragged to adjust the exposure/white balance value.
➂ Far & Near Mode Switching
Tap the Far-Near mode button to switch between modes.
• Far Mode is usually used to scan objects located at a greater distance or large objects like cars or people. The far-mode camera system has a large aperture lens, which helps capture fine details of distant objects.
• Near Mode intended for scanning small objects with rich details at a closer distance, such as screws or miniature models. The near-mode camera system has a small aperture lens that precisely captures intricate details. For more details about using the Far Mode and Near Mode, please refer to the following tutorial videos:
a. How to Switch Between Near and Far Mode Mid-Scan
b. How to Use Near and Far Mode
➃ Redo/Undo
The Redo and Undo buttons allow for the removal and restoration of multiple frames of scan data, enabling the correction of errors during scan pauses. Long tap the undo button to remove multiple frames in one time.
➄ 3D Display Window
• Displays the 3D model preview, the data captured during the scan, or the final completed model.
• During a scan, the color green indicates the current data being captured, while blue represents the captured data.
• When in Color mode, the green area represents the data being captured, and the color area represents the captured data.
➅ Distance Indicator Bar
Shows a visual indicator representing the distance between the target object and the scanner. When the color bars are green, the distance isoptimal.
➆ Tool Bar
• Base Removal
This function automatically removes unwanted, flat background surfaces during the scan. If scanning an object with large areas offlat surfaces, turn this function off to avoid deleting any of the object's details.
• Scanning Distance
Adjusts the Depth Cameras' working distance so that any unwanted background or foreground objects aren't included in the scan.
• Color Display
Hides or displays the original color of the target. This button is only active when the color scanning mode is enabled.
• 3D Coordinates: Tap the Coordinates button, and the model will be centered on the chosen face.
⑧ Scanning mode settings
See parts 2, 3 in this chapter.
➈ Continuous & Single-shot Switch
Switch between Continuous and Single Shot modes by tapping their names. The scanning mode cannot be switched mid-scan. To resumescanning, ensure the scanning mode is the same.
• Continuous: Press the [Start] button once, then continuously move the scanner or object to ensure the scanner captures surface data from multiple angles tocomplete the scan. Continuous scanning is used for fast object capture.
• Single Shot: Aim the scanner at the object and repeatedly press the [Start] button. Ensure the overlapping area between adjacent frames is more than 50%. Use Single Shot mode for detailed data and clearer textures. Using Single Shot Mode:
Step 1: Tap [Single Shot] to switch to it.
Step 2: Adjust the exposure and other scan parameters.
Step 3: Tap the capture button to record a single frame.
Video link: How to Use Single-shot Mode
➉ Scan Control Buttons
Buttons to Cancel, Start (& Pause) Scanning and Complete the scan. Tap the  to begin scanning, tap the
  to pause the scan, and tap the
  button to continue the scan. When pausing scanning, tap the
  icon for full-screen viewing. Tap the
  button to delete the captured scan / save and start a new scan / cancel the deletion operation. Tap the
  button to finish the scan when all data is captured.
⑪ Model Hub
Tap to access model editing or Project management.
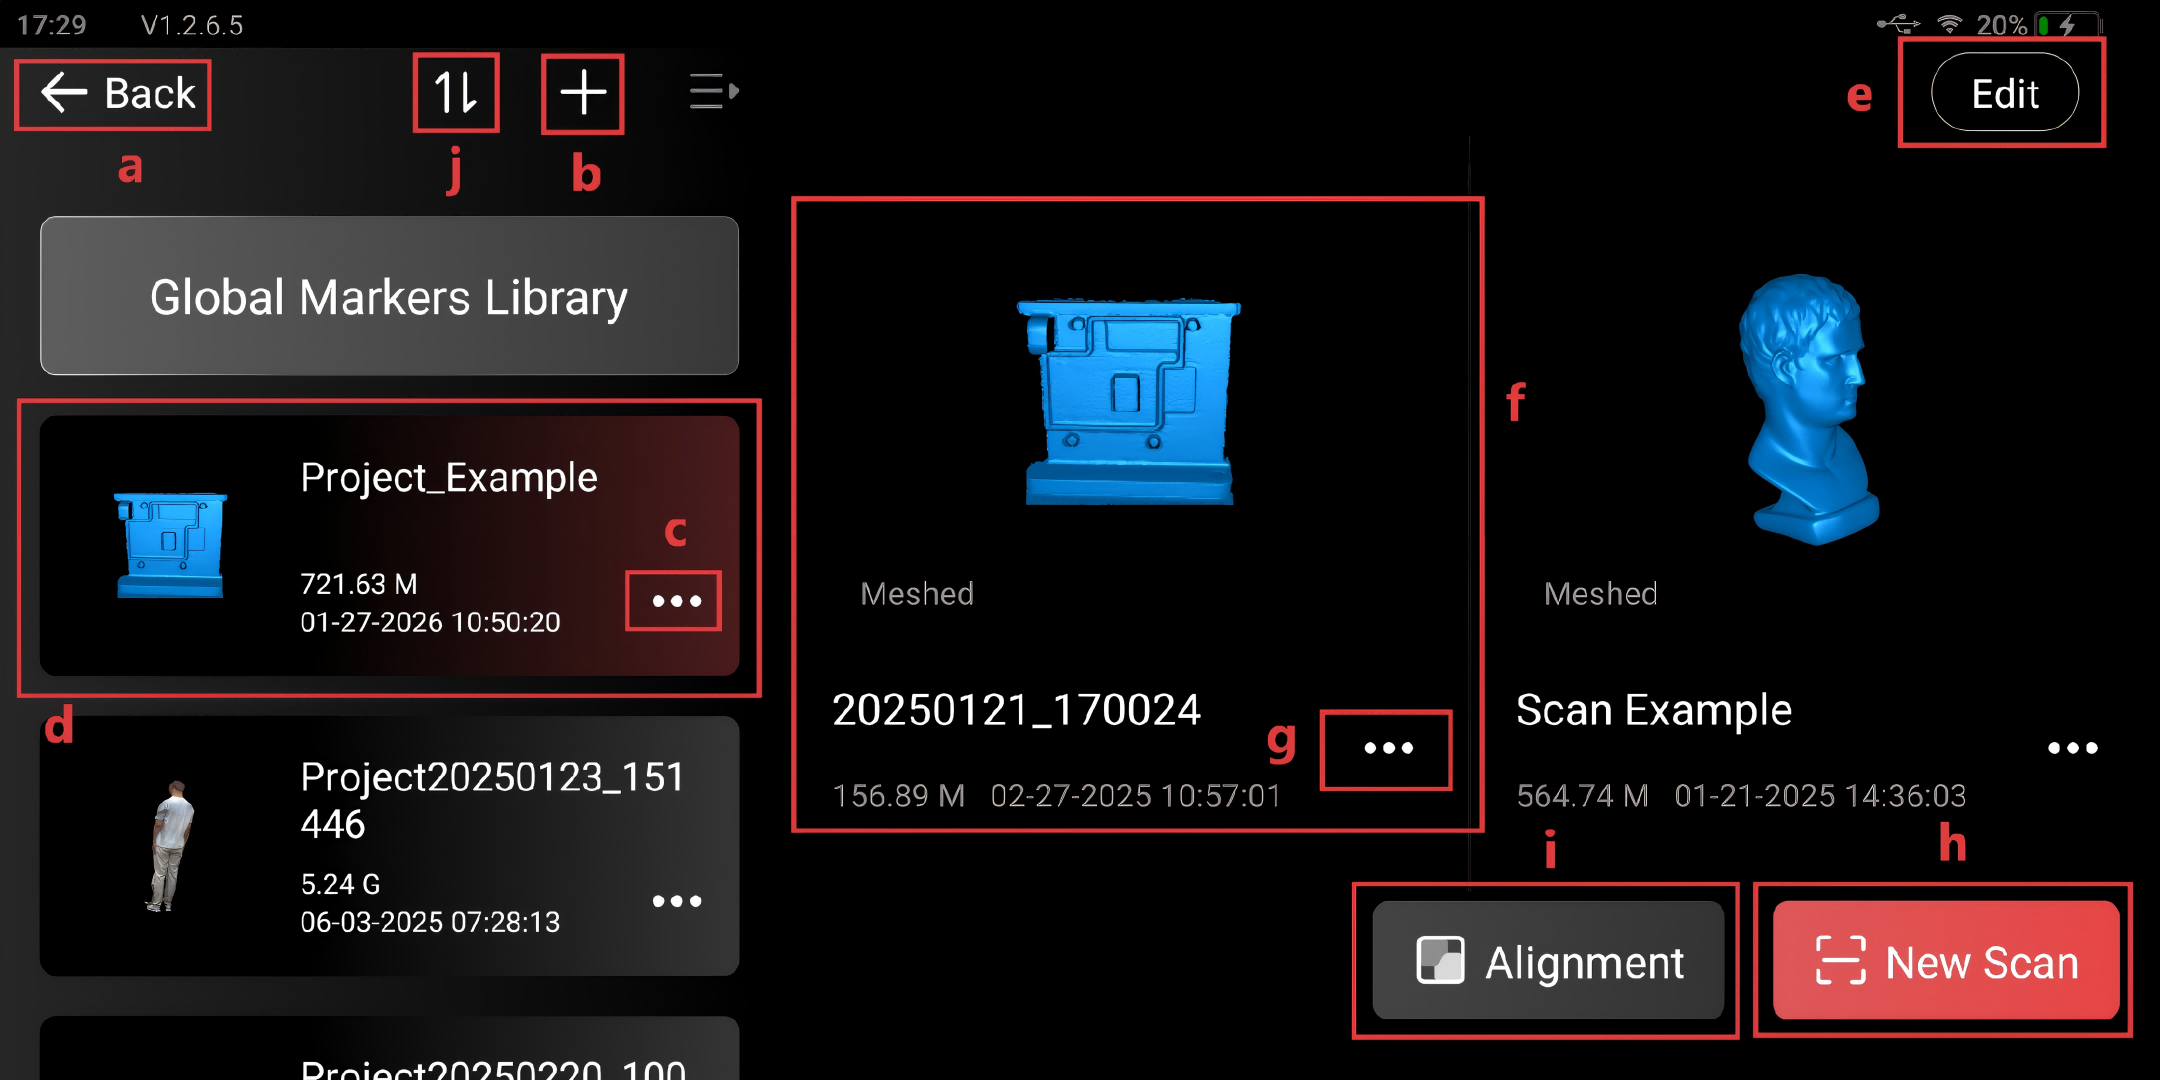
a. Back: Tap to return to the scan interface.
b. New Project: Tap to create a new project.
C. Project Management: Tap to share/rename/delete the project.
d. Project Thumbnail: Tap to see all the models captured as part of a project.
e. Edit: Tap and then select multiple models in a project to mass-edit them.
f. Model Display Area: Shows all the scans in the selected project.
g. Model Management: Tap to resume the scan/rename/delete the model.
h. New Scan: Tap to create a new model within the project.
i. Alignment: Tap to align models in a project. See in the chapter: " Model Editing and Sharing">"Model Alignment"
j. Projects Sorting: Tap to sort project lists.
¶ 8.2 Point Clouds Scanning

¶ 8.2.1 Accuracy
① High: This mode captures complex and detailed structures with high precision but has a longer post-processing time. Best used for applications needing more detail.
② Standard: Ideal for simple objects, this mode offers faster processing and is great for general scanning.
③ High-speed: Designed for capturing large objects and people at much faster scanning speeds.
¶ 8.2.2 Alignment
① Feature: Scan objects with unique shapes and distinct features, such as sculptures or people, with no repeating patterns.
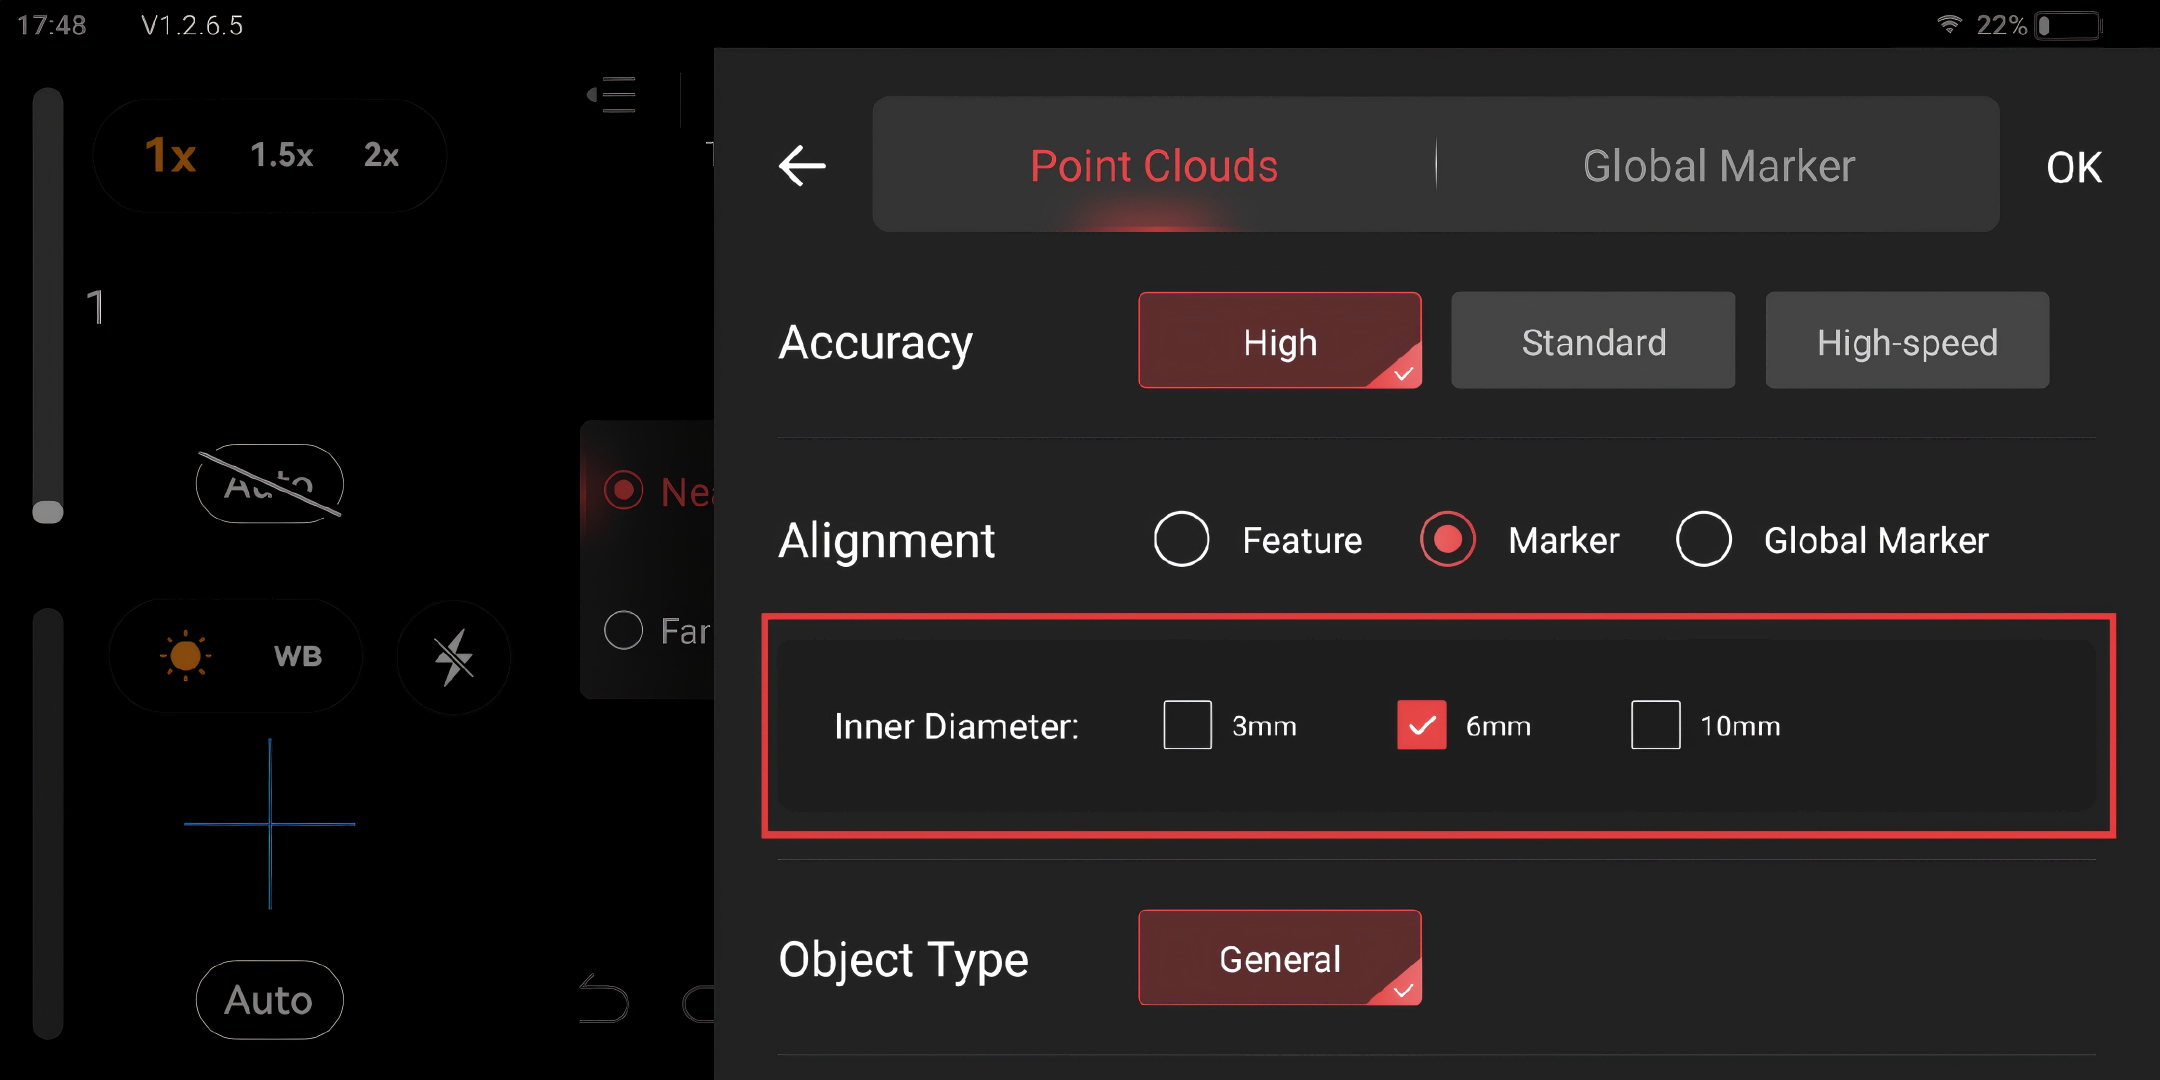
② Marker: Use this mode for scanning flat or symmetrical objects with large, smooth areas or regularly repeating features, such as flat planes like a board or symmetrical items like balls or bowls. Before scanning, select the inner diameter of the current markers to help improve scanning accuracy.
Note: Markers must be placed on or around the object.
③ Global Marker: See 8.3 Global Marker Scanning.
¶ 8.2.3 Object Type

① General: Scan general objects that don't match any of the object type settings below.
② Dark: Scan objects with dark surfaces, such as black or dark gray clothes, black boxes, etc. However, not all dark objects can be successfully scanned. One example would be black leather shoes because leather absorbs light.
③ Body: Scan human bodies in High-speed mode.
④ Large: Scan large objects in High-speed mode.
⑤ Color: Turn on Color to capture an object's surface color. After meshing the data, Texture Mapping can be applied to the 3D model using color data captured by the RGB camera. If turned off, the scanned model will not have color information, only shape data is captured.
¶ 8.3 Global Marker Scanning
Global Marker: Provide more accurate results when scanning featureless large objects such as cars and sofas.
¶ 8.3.1 Scanning Flow
Step 1: Stick markers across the object's surface irregularly.
Step 2: Turn on MIRACO and select [Global Marker] in Scan Settings. Then select the inner diameter of the current markers to help improve scanning accuracy.
Step 3: Tap [Start Marker Scan] to capture the markers and calculate the global marker coordinates.
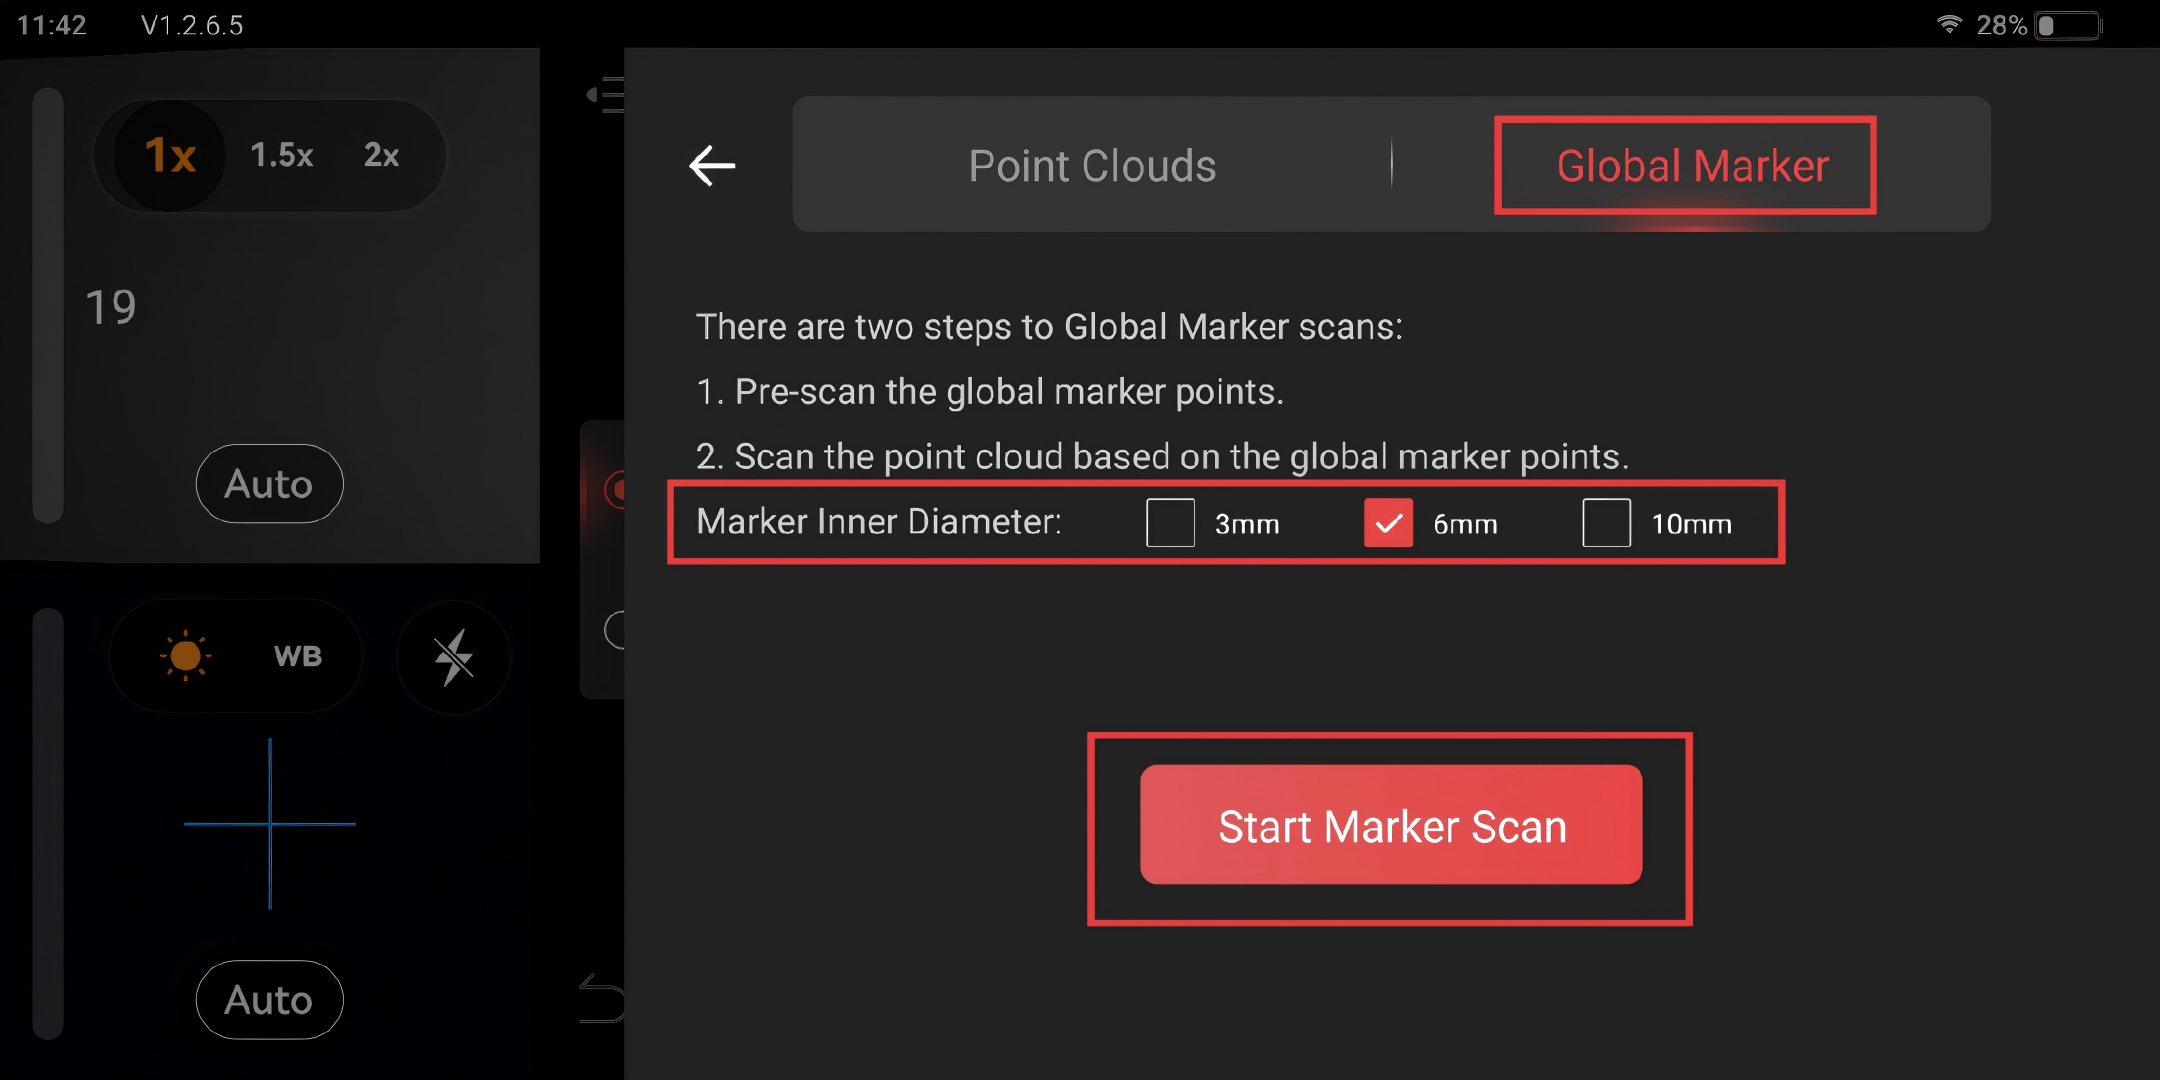
Step 4: In Scan Settings, choose Global Marker alignment. Select the captured global marker coordinates and tap [OK].
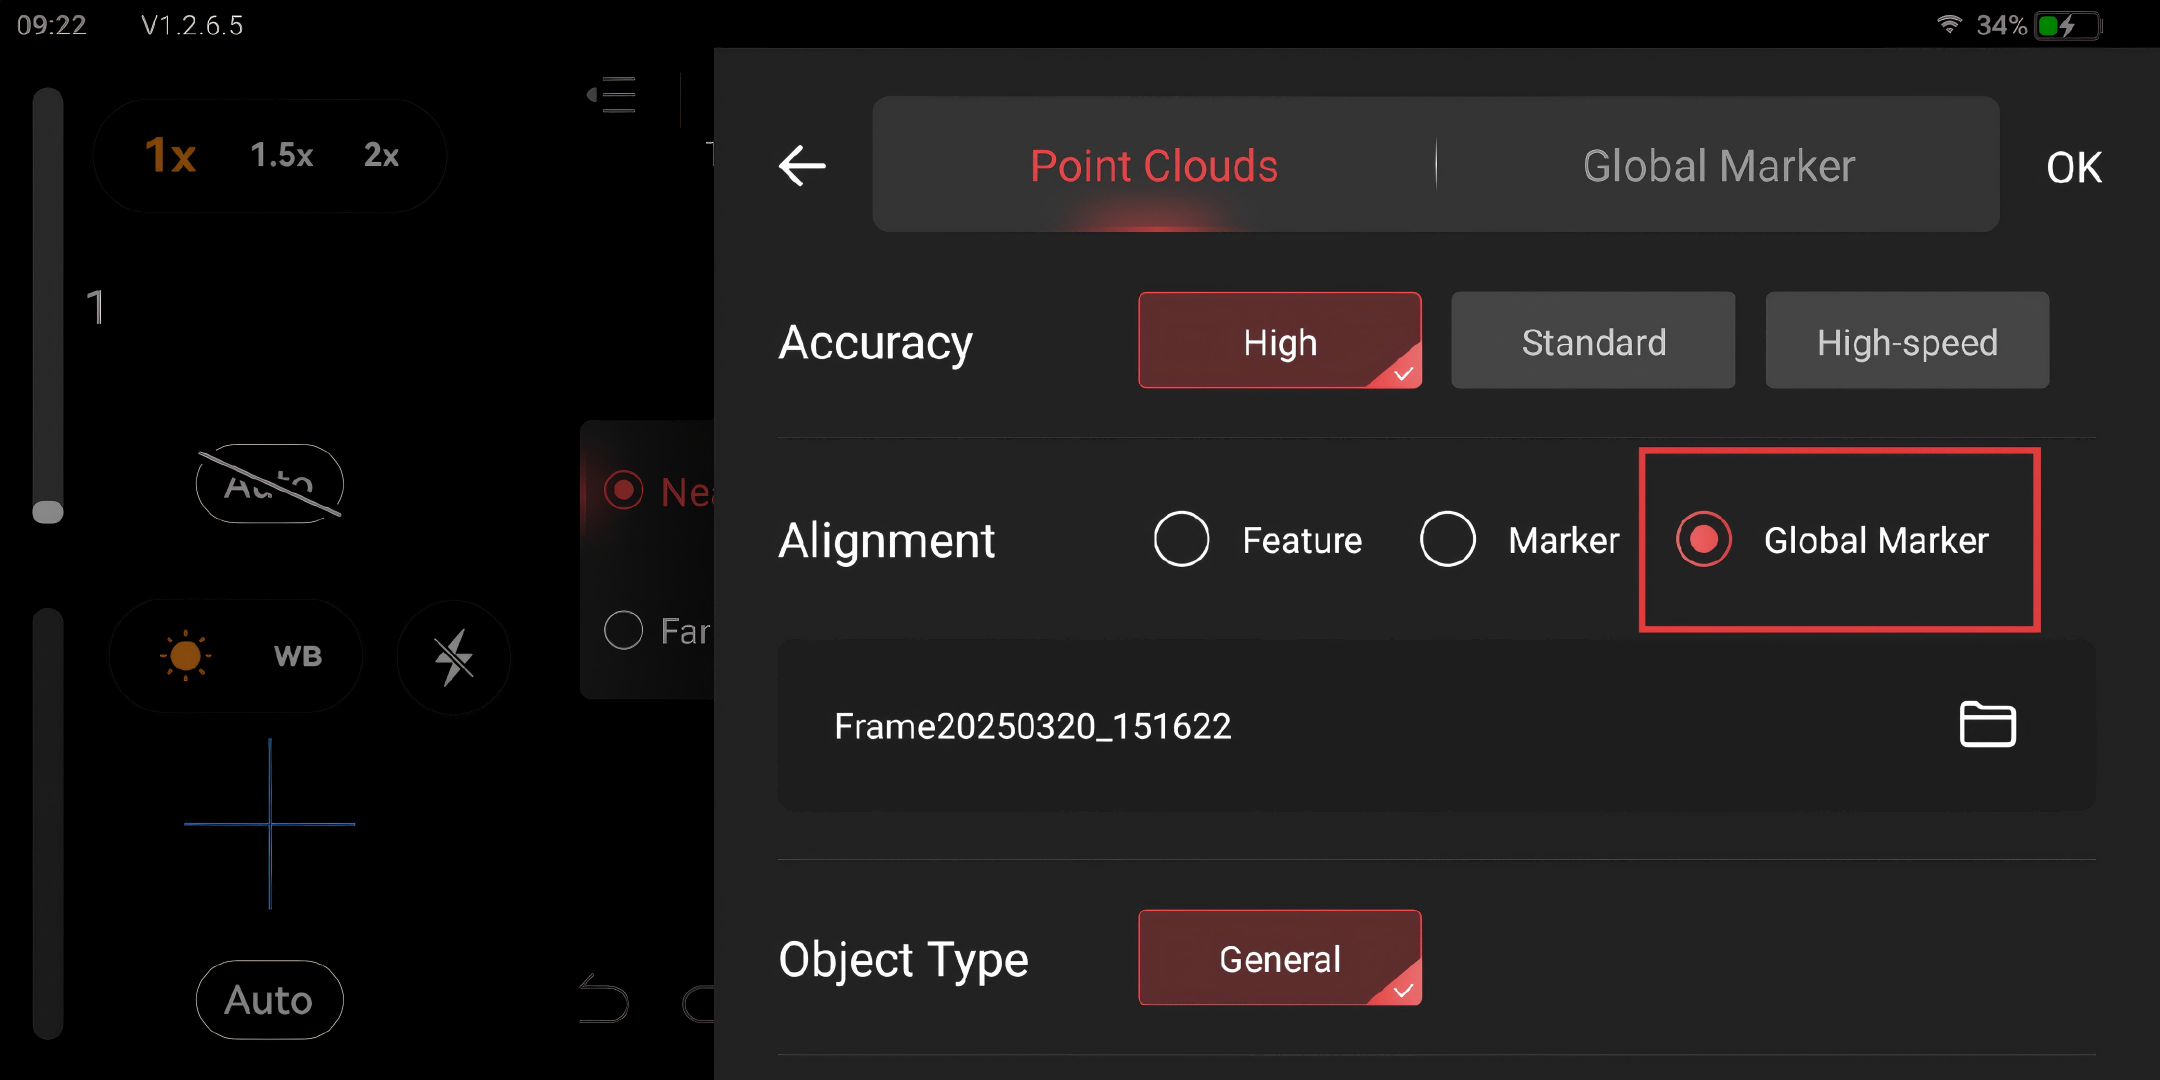

Step 5: Scan the object using the created coordinates.
¶ 8.3.2 Exporting Global Marker Coordinates
See chapter 10, part 2
¶ 9. Model Editing
¶ 9.1 Editing Interface
After completing the scan, Click  to enter the model editing interface.
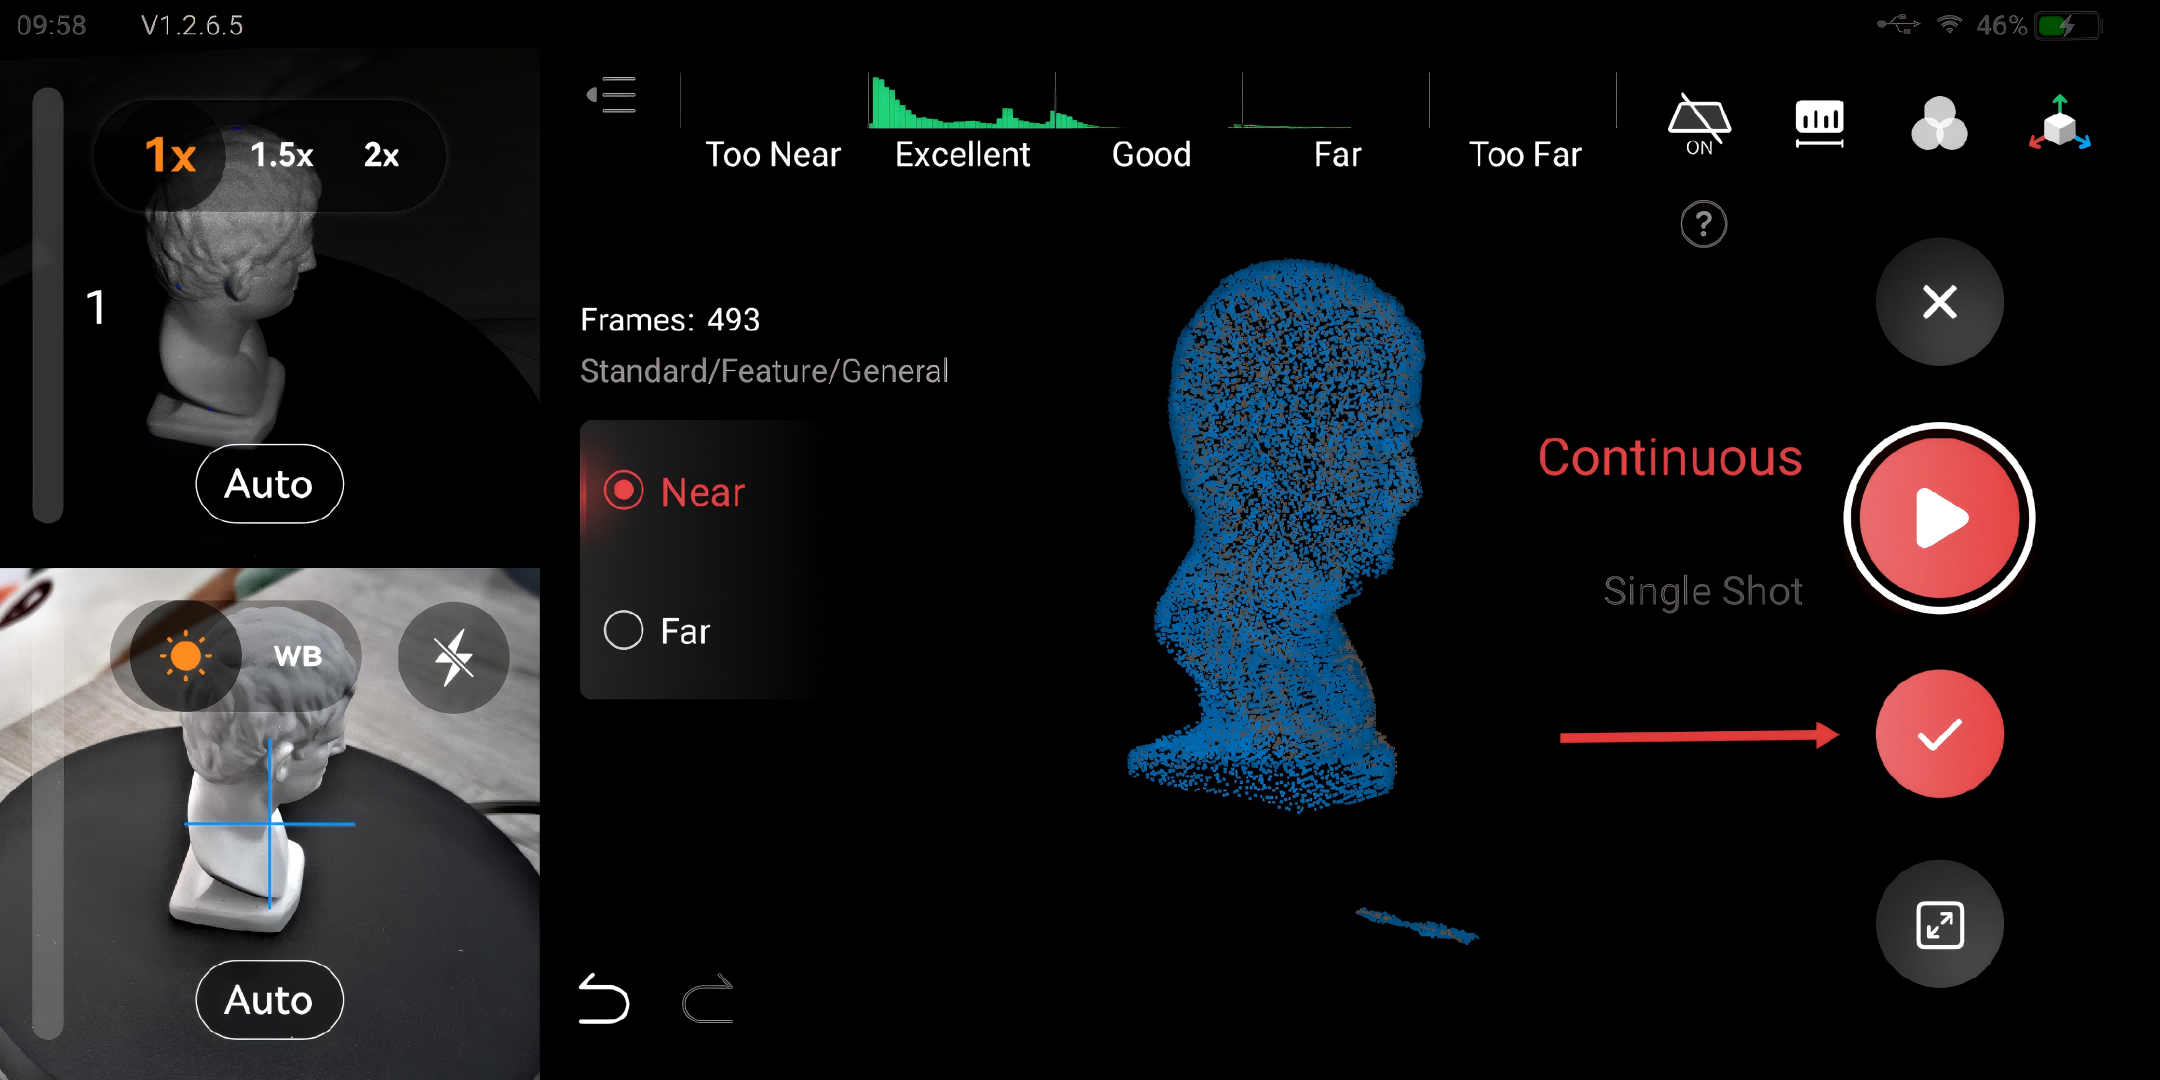

① Scan: Tap to return to the Scan interface.
② Model: Go to the model hub.
③ Scan Details: Displays the scan settings, Camera Module, and total frames.
④ Rendering: It enables jumping between different model states, displaying the current status after the model has been fused, meshed, or textured (for color scanning only).
⑤ Model Switch: Switch between models within the project.
⑥ Model Name: Displays the Model's name.
⑦ 3D Display Window: Displays the data captured and its various states.
⑧ Resume Scan: Tap it to resume the scan of the displayed model.
⑨ Share: Share the model to a PC, mobile devices or external storage.
⑩ 3D Coordinates: Tap the Coordinates button, and the model will be centered on the chosen face.
⑪ Scan Edit: After scanning, process the scan as required here. Beginners can use One-tap Edit, while experienced users can perform Fusion, Mesh and Texture step by step after scanning.
⑫ Redo/Undo: Tap the Undo and Redo buttons to undo or redo the last action. Long tap the undo button to remove multiple frames in one time.
¶ 9.2 One-tap Edit & Manual Edit
¶ 9.2.1 One-tap Edit
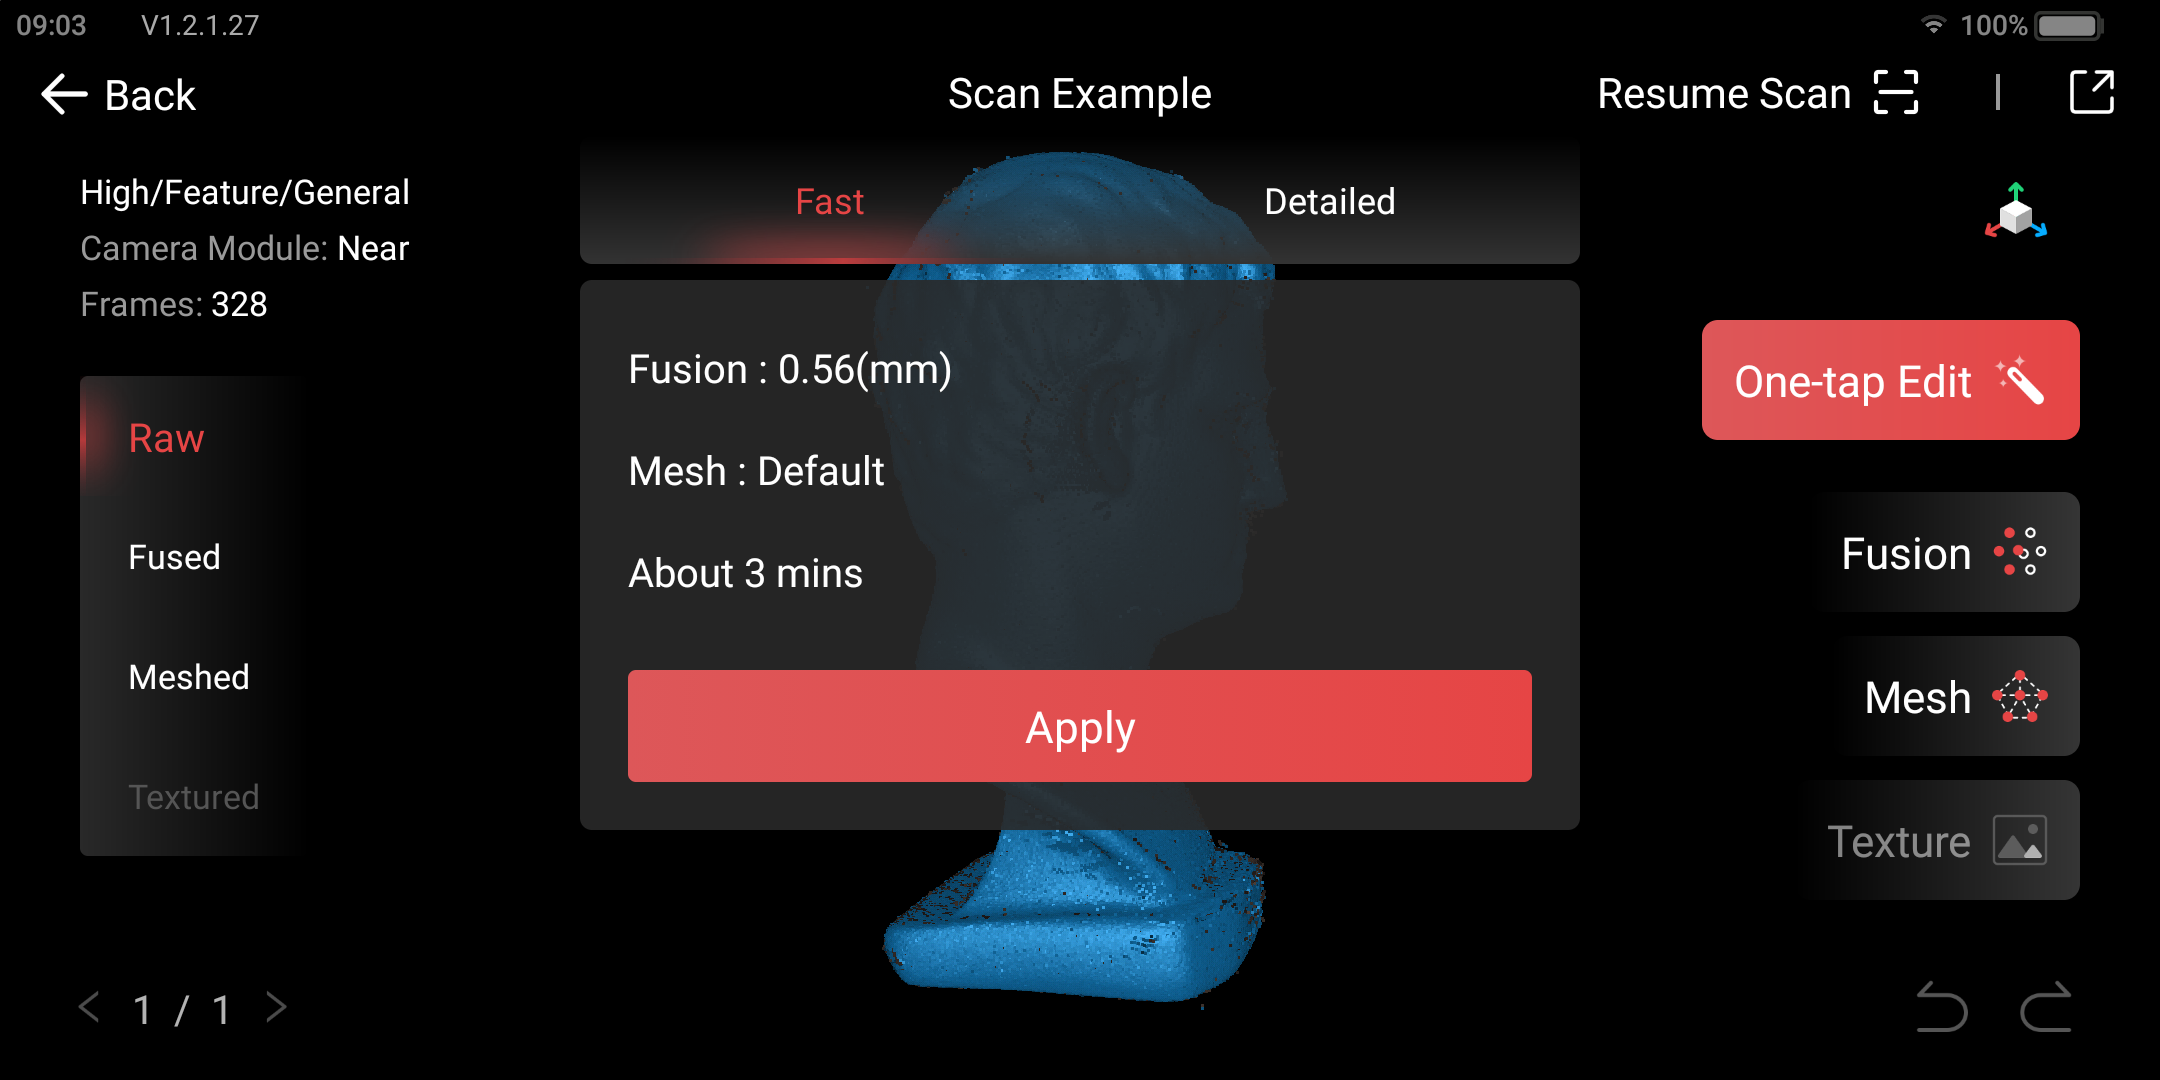
Tap the [One-tap Edit] button, select [Fast] or [Detailed], and tap [Apply] to automatically perform point cloud Fusion, Mesh, and Texture (when Color mode is enabled).
① Fast: Create a less detailed model as fast as possible.
② Detailed: Create a highly detailed model that takes longer to process. For those who are new to 3D scanning, it is recommended to use One-tap Edit.
¶ 9.2.2 Manual Edit
Careful editing can improve the final quality of a 3D model. Tap [Fusion], [Mesh], and [Texture] in sequence to adjust the corresponding parameters and process the scan.
① Fusion
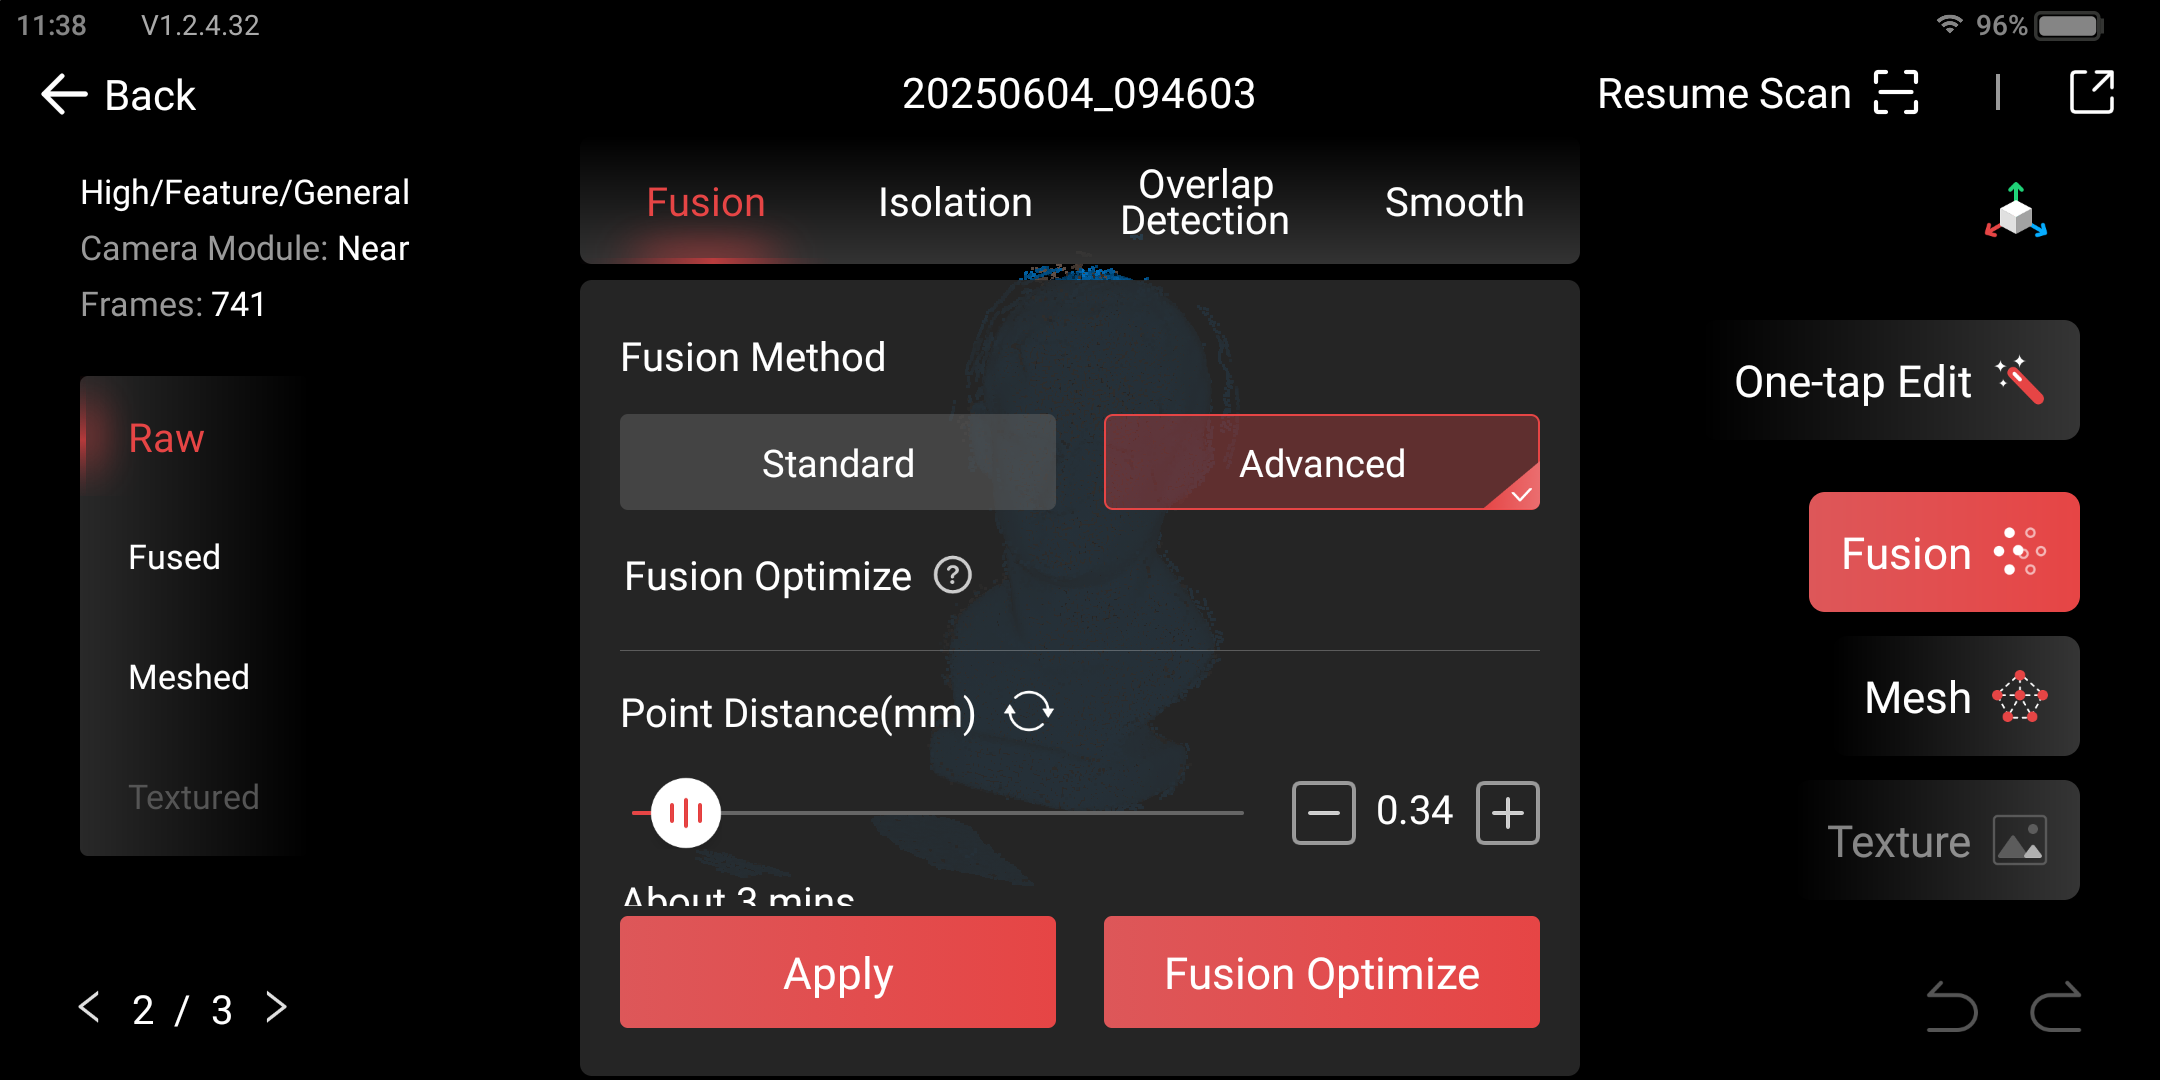
Refers to Point Cloud Fusion, the process of merging multiple point cloud data sets into a single point cloud.
· Standard: It has a faster processing time and is better for dealing with large data scans with many frames to process.
· Advanced: This produces a high-quality point cloud but has a longer processing time. It is suitable for models with irregular surfaces or high detail requirements.
· Fusion Optimize: For objects with geometric features, detail performance can be significantly enhanced through fusion optimization. If you need to undo the optimization, click the undo button in the bottom right corner.
② Point Distance
• Refers to the distance between adjacent points in a 3D point cloud.
• The smaller the point distance, the more detailed the result and the longer the processing time.
Note: Despite having a higher minimum point distance than Standard Fusion, Advanced Fusion will produce a more detailed model due to more advanced algorithms. After Fusion, Isolation, Overlap Detection, and Smooth functions can be used to improve the quality of the fused model.
③ Isolation
• Quickly removes unwanted isolated point cloud data by identifying and deleting isolated (disconnected) points in point cloud data.
• The isolation rate is the percentage of points contained in isolated point clouds relative to the total number of points.
• Setting higher isolation rates results in more isolated point clouds being detected.
④ Overlap Detection
• Identifies and deletes overlapping data in the point cloud for a more accurate and consistent model. This tool can be used repeatedly to simplify point cloud data.
• If the distance between two points in the model is smaller than the set overlap distance, these points are considered overlapping portions.
• The larger the overlap distance, the more overlapping portions will be detected.
⑤ Smooth
• Use it to remove noise from the point cloud to make it smoother.
• A higher smoothing strength results in a smoother point cloud but may lead to the loss of more details.
• Times is the number of times the process is applied.
⑥ Mesh
Mesh refers to converting point cloud data into a solid 3D model.

· Quality: The Quality settings determine the generated mesh model's level of detail and density. A higher quality parameter results in a denser and more detailed mesh model. However, selecting higher-quality parameters also increases processing time.
· Hole Filling: Repairs or fills in missing areas or holes in a model. The size of the hole that can be filled depends on the ratio. Setting a larger ratio will fill larger holes.
Users can also apply the Isolation, Simplify, and Smooth functions to improve the mesh quality.
⑦ Isolation
• Automatically detects and removes isolated mesh data that is not connected or only loosely connected to the model's main body (for example, the top of a shoulder when scanning a person's head).
• Setting higher values for the Isolation Rate will select more of the scan.
⑧ Simplify
• Reduces the mesh's complexity to decrease file size and noise. Simplifying models can also increase post-processing efficiency, reduce calculation & rendering times, and improve the edit ability of the model.
• Setting a lower ratio will preserve more details, while the opposite will remove more details, resulting in a smaller file size.
⑨ Smooth
Smooth flat or curved surfaces and can be applied or undone as often as needed.
• To use it, select its strength and the number of times it applies smoothing.
• Excessive smoothing may result in loss of details.
⑩ Texture
• Texture mapping applies color data captured by the RGB Camera to the mesh to create a realistic-looking 3D model.
• Texture is available only when the Color in Scan Settings is enabled.
⑪ Rectangle Selection (Disabled after texture)
Select multiple parts of a model by drawing a rectangular box around them.
⑫ Lasso Selection (Disabled after texture)
Select multiple parts of a model by drawing a rectangular box around them.
⑬ Selection Connection
Select a point or a data area, and the tool will automatically select the adjacent or connected points or areas.
⑭ Smooth Brush

Adjust the brush size with the slider, then click the mesh's surface to smooth.

⑮ Fill Holes
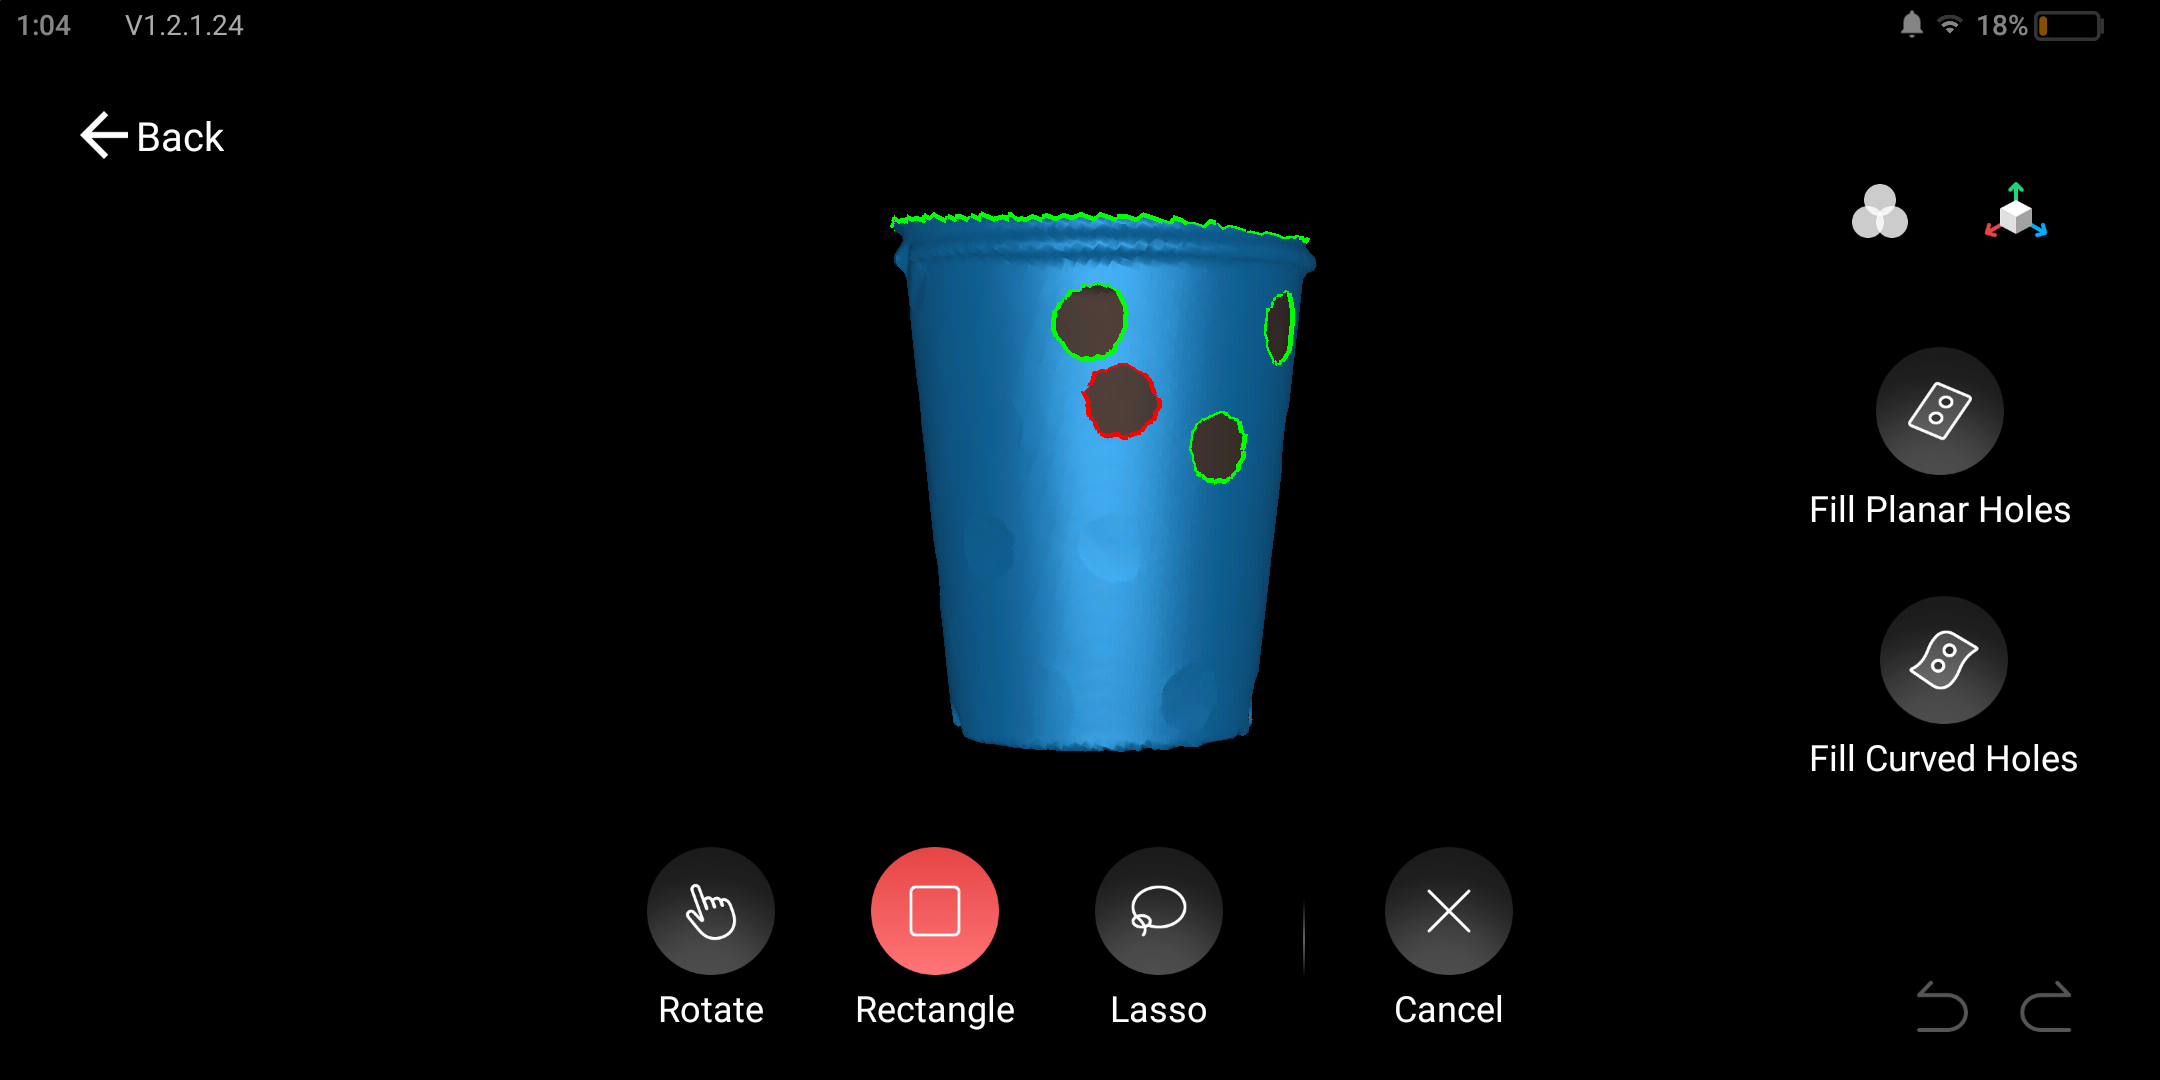
Detects all holes on the model's surface. Select the holes by Rectangle or Lasso selection and fill them with a plane or curved surface.
¶ 9.3 Model Alignment
Multiple scans in a project can be merged into a new object in the alignment tab.

Step 1: Select models to be merged. The overlapping area between any two models should be more than 10% (for best results, 40% to 50% is recommended).

Step 2: Tap the [Alignment] button to preview the merged state of the model.

Step 3: Tap the [Merge] button to generate the merged model.

Note: Currently MIRACO only supports feature merging, for more merging modes you can export the model to Revo Scan (PC) for more operations.
¶ 10. Data Transfer and Share
MIRACO supports data transfer via USB cable, Wi-Fi, or external storage.
¶ 10.1 Export Model
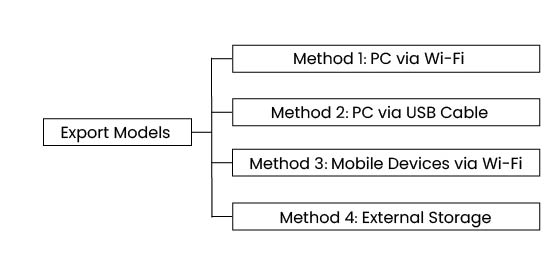
Method 1: PC via Wi-Fi
Step 1: Ensure MIRACO and PC are connected to the same Wi-Fi network.
Step 2: Tap the share icon. Select the wanted model files and tap [Share to PC].

Step 3: Open the Revo Scan 5 on your PC. Click [New Project] > [File] > [Import from MIRACO] > [Wi-Fi]

Step 4:Enter the verification code shown on your PC into MIRACO's share popup or scan QR code by MIRACO Plus, and the project will be shared with the PC.

Method 2: PC via USB Cable
Step 1: Connect your MIRACO to a computer using the USB Type-C to C Cable.
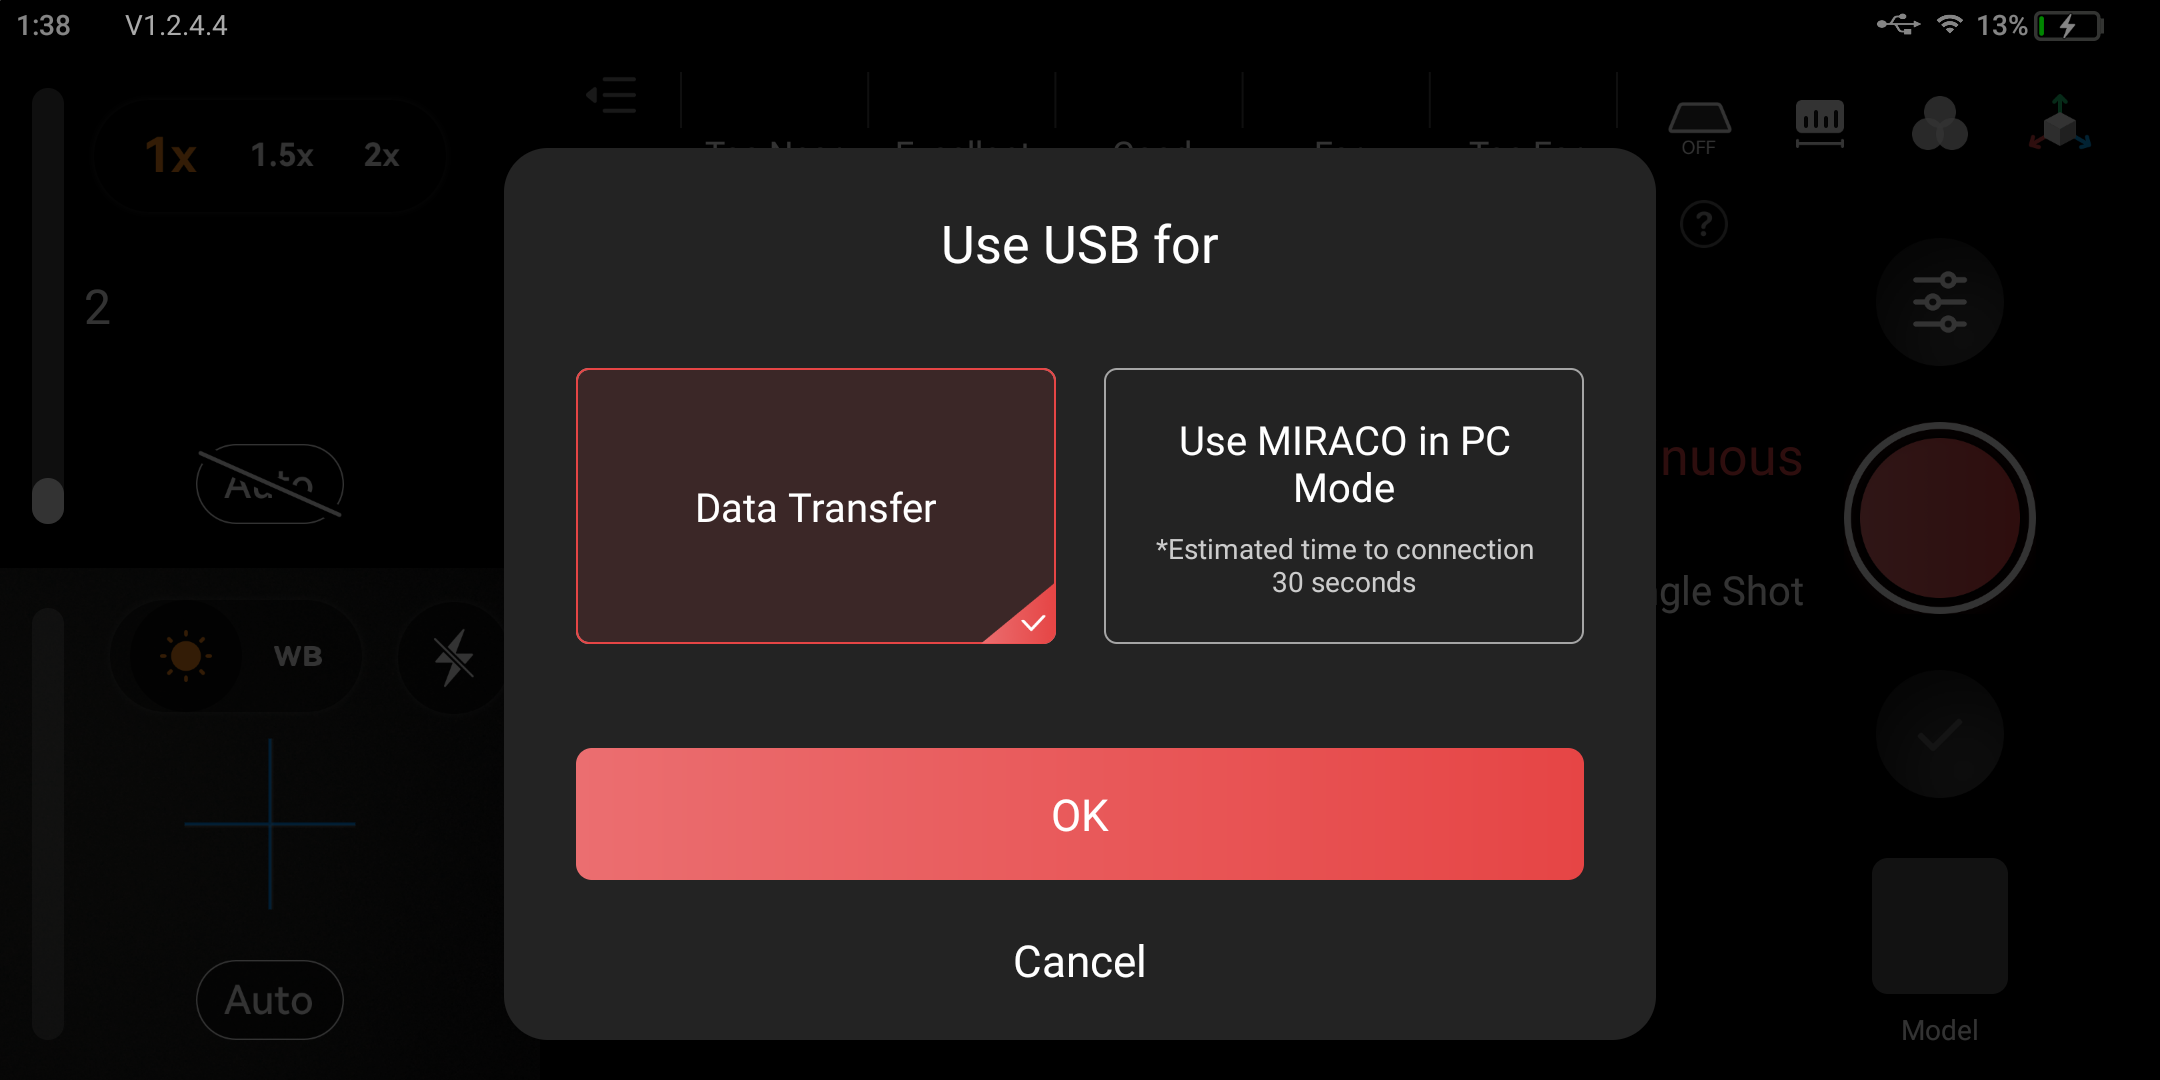
Step 2: See the popup on MIRACO's screen. Tap [Data Transfer] and [OK].

Step 3: Open Revo Scan 5 on your PC (V5.4.1 or after) and a popup will be displayed.
Step 4: Tick the target files and export them on your PC.
Project: An album including the scanning configuration, raw data, processed data, and user operation history in memory or hard disk. Each project can include one or more 3D models.

Or you can open the local file (Only works on Windows PCs)
Step 1: Connect your MIRACO to a computer using the USB Type-C to C Cable.
Step 2: See the popup on MIRACO's screen. Tap [Data Transfer] and [OK].
Step 3: Click [This PC] > [MIRACO] > [Internal shared storage].
Step 4: Copy MIRACO's data to your PC from folders named [Projects], [Screenrecordings], and [Screenshots].

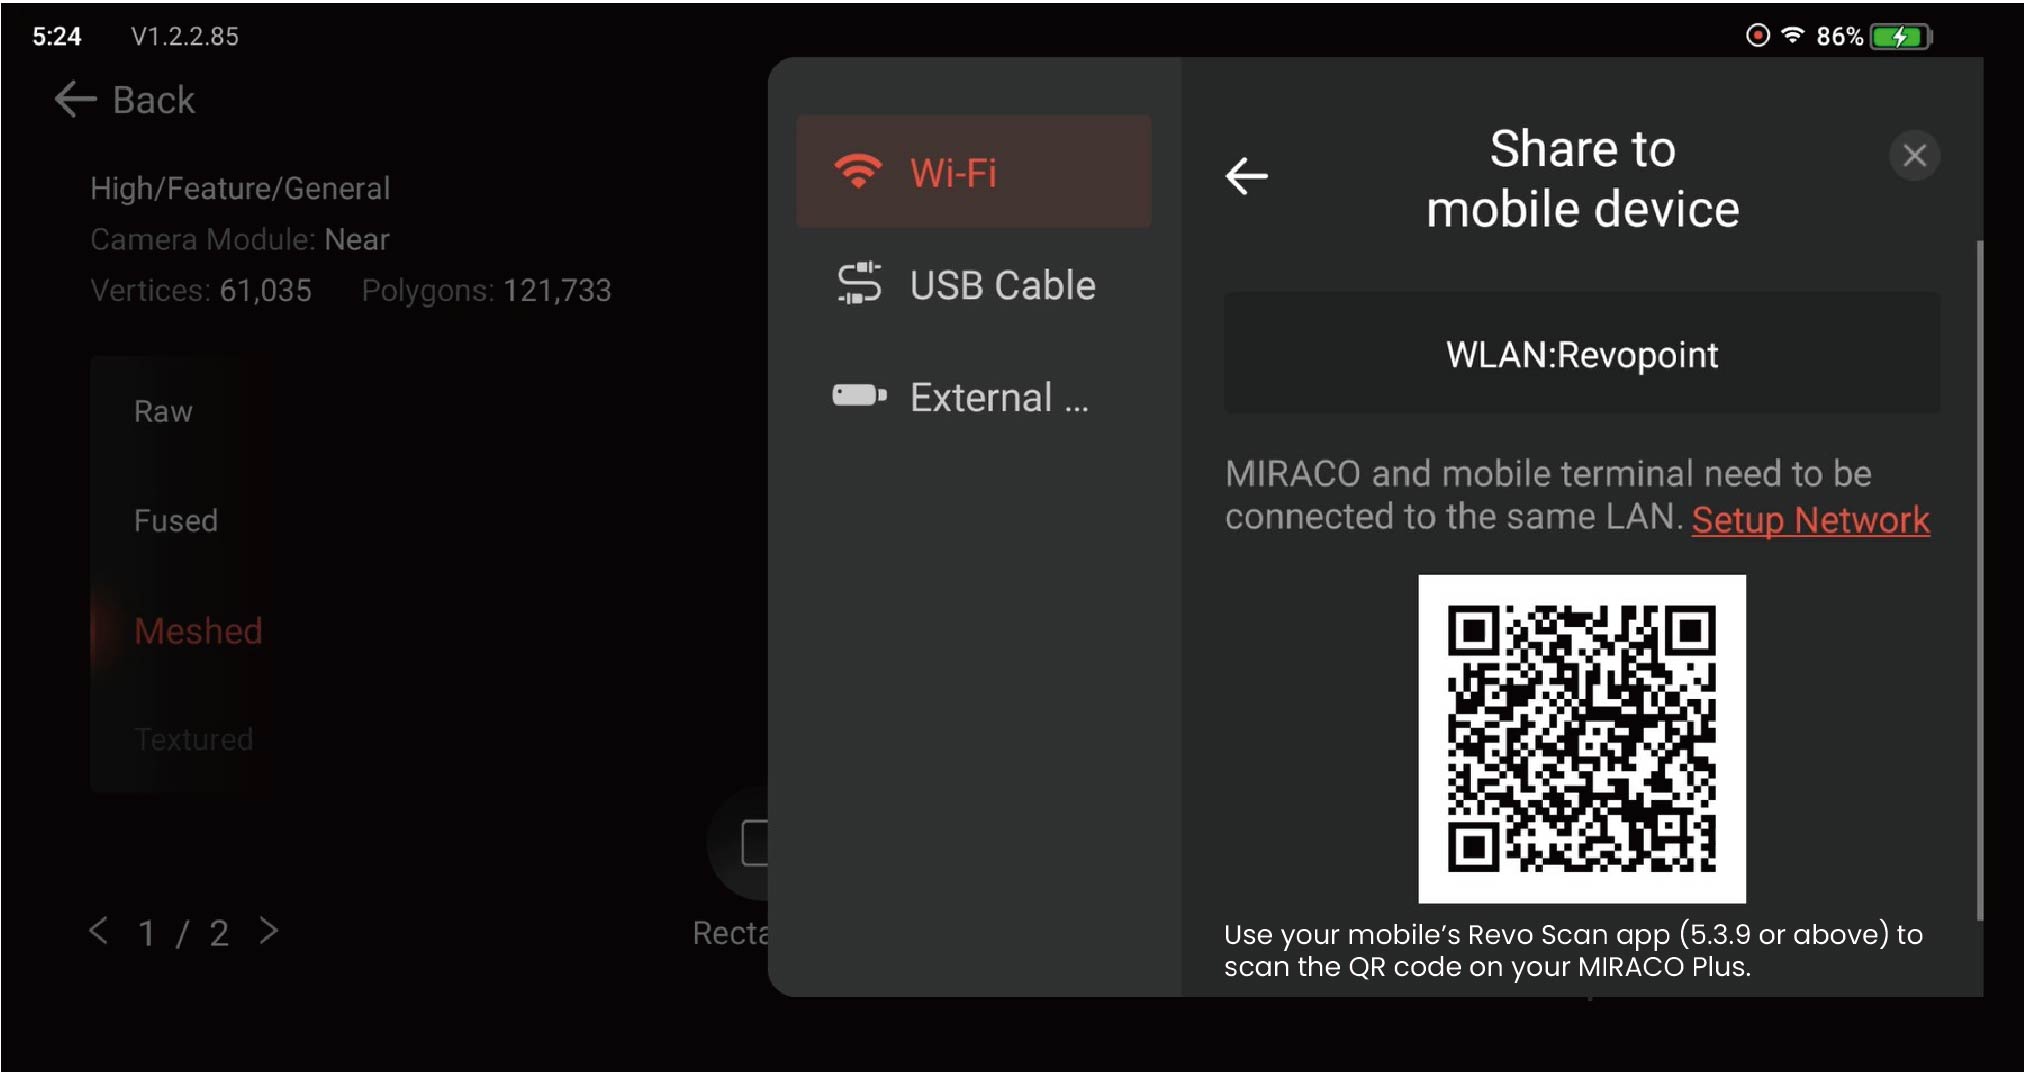
Method 3: Mobile Devices via Wi-Fi
Step 1: Connect MIRACO and a PC to the same Wi-Fi network.
Step 2: Tap the share icon. Select the desired model files and tap [Share to mobile device].

Step 3: To share the model, scan the QR code on MIRACO with your mobile's Revo Scan app (V5.3.9 or above).
Method 4: External Storage
Step 1: Connect a USB Flash Drive to the MIRACO via the USB Type-C to C adapter.
Step 2: Open the desired model. Tap the [Share] icon on the upper right corner, and select external storage.

¶ 10.2 Export Global Marker Coordinates
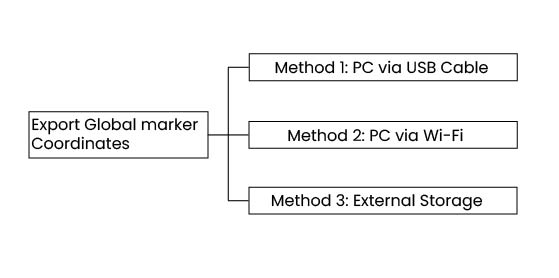
Method 1: PC via USB Cable
Step 1: Turn on your MIRACO, then connect it to a computer using the USB Type-C to C Cable.
Step 2: A popup will appear on MIRACO's screen. Tap [Data Transfer] and [OK]

Step 3: Open Revo Scan 5 on your PC (V5.4.1 or later), and a popup will appear.
Step 4: Choose Global Marker, select the file, and click [Save As] to save it on your PC.

Step 5: Click New Project on Revo Scan's Home page. Choose [Global Marker Library] and [Import] to import the global marker coordinates to Revo Scan on your PC.

Method 2: PC via Wi-Fi
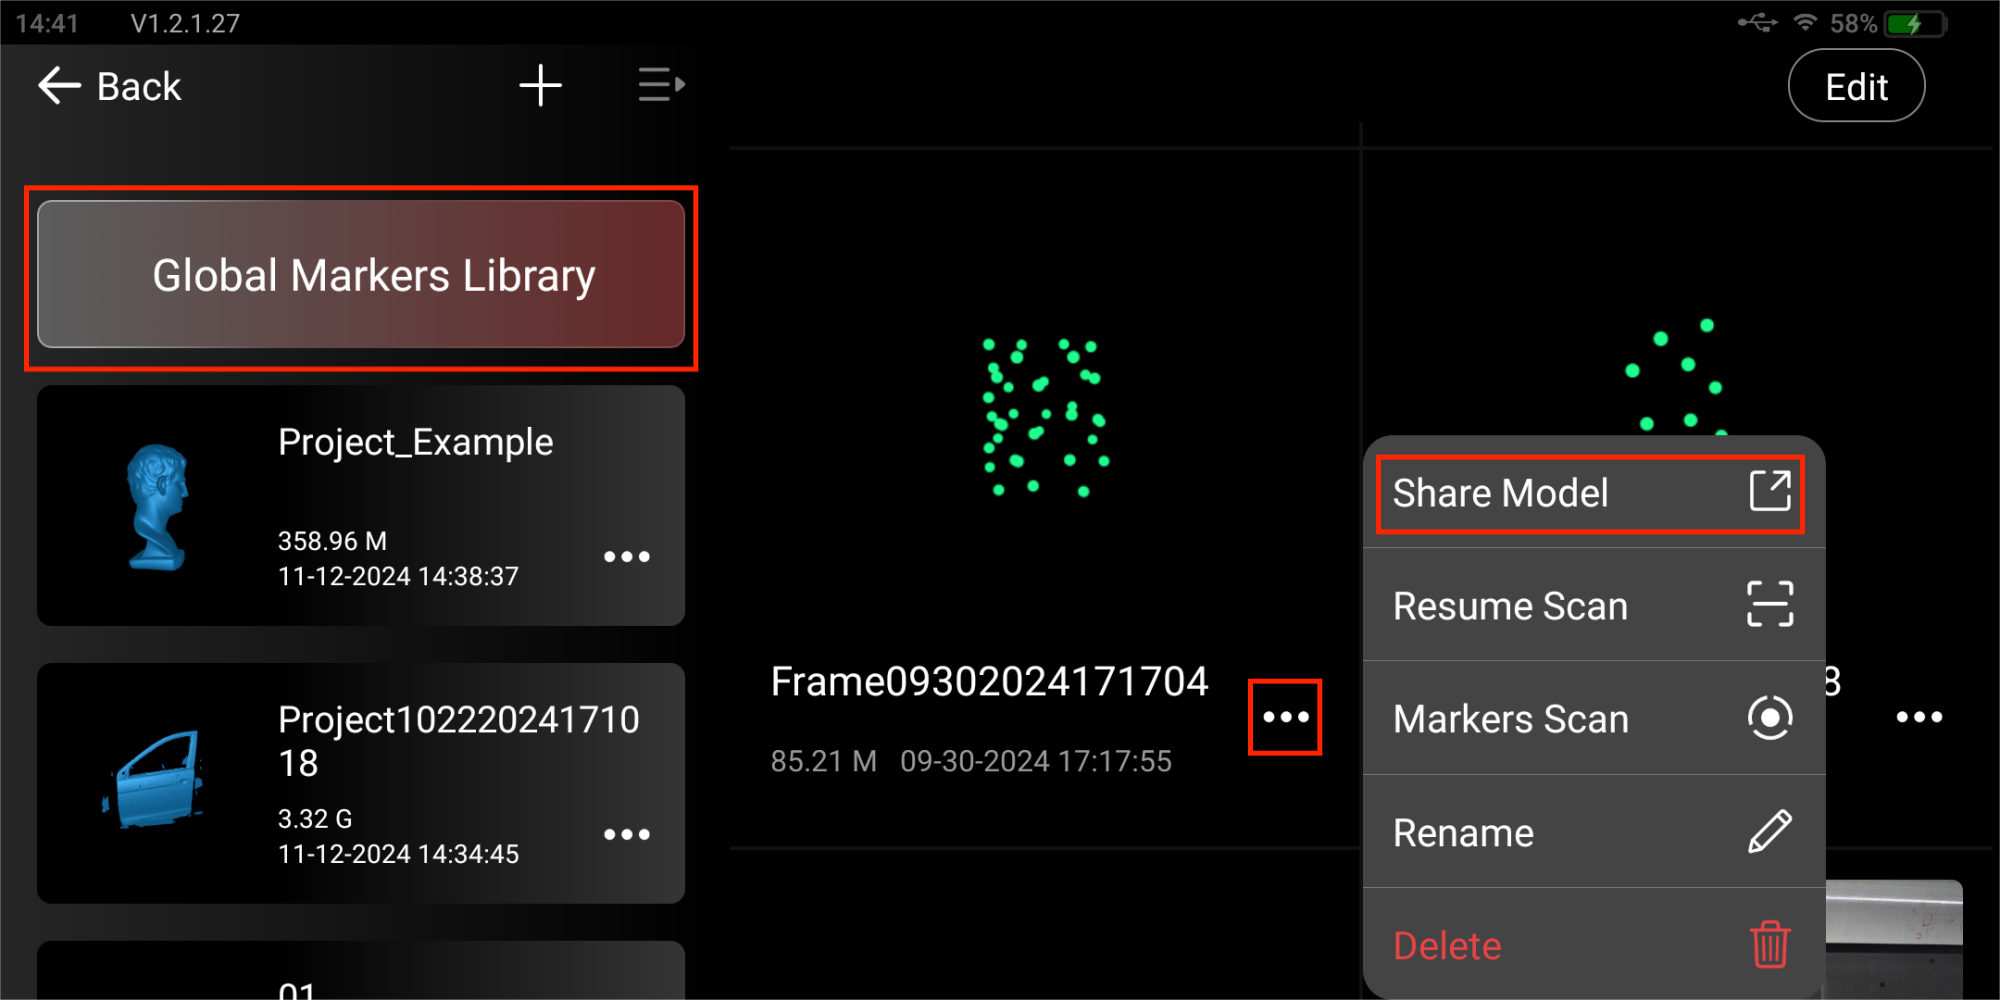
Step 1: Tap the [Model] in the lower right corner on MIRACO after turning it on.

Step 2: Enter the [Global Markers Library] and choose the global markers coordinates you want to transfer. Tap the More button and choose [Share Model].
Step 3: Ensure your PC and the scanner are connected to the same LAN.
Step 4: Open Revo Scan on your PC and click the New Project button.
Step 5: Choose [File] > [Import from MIRACO] > [Wi-Fi], Pick either the PIN code or the QR code transfer method.

Step 6: Enter the verification code on MIRACO or scan the QR code on your PC to transfer the file to your PC.
Note: It is recommended that you transfer via USB cable. After the global marker coordinates are transferred and the scanner is connected to your PC, you can begin a point cloud scan on the PC based on the global marker coordinates.
Method 3: External Storage
Step 1: Connect the USB Flash Drive to the MIRACO via the USB Type-C to C Adapter.
Step 2: Tap the [Model] in the lower right corner of MIRACO to access the global markers library. Then, select the desired global marker file.

Step 3: Tap the More button and choose [Share Model] > [External Storage] to export the global marker file.

¶ 11. Scanner Calibration
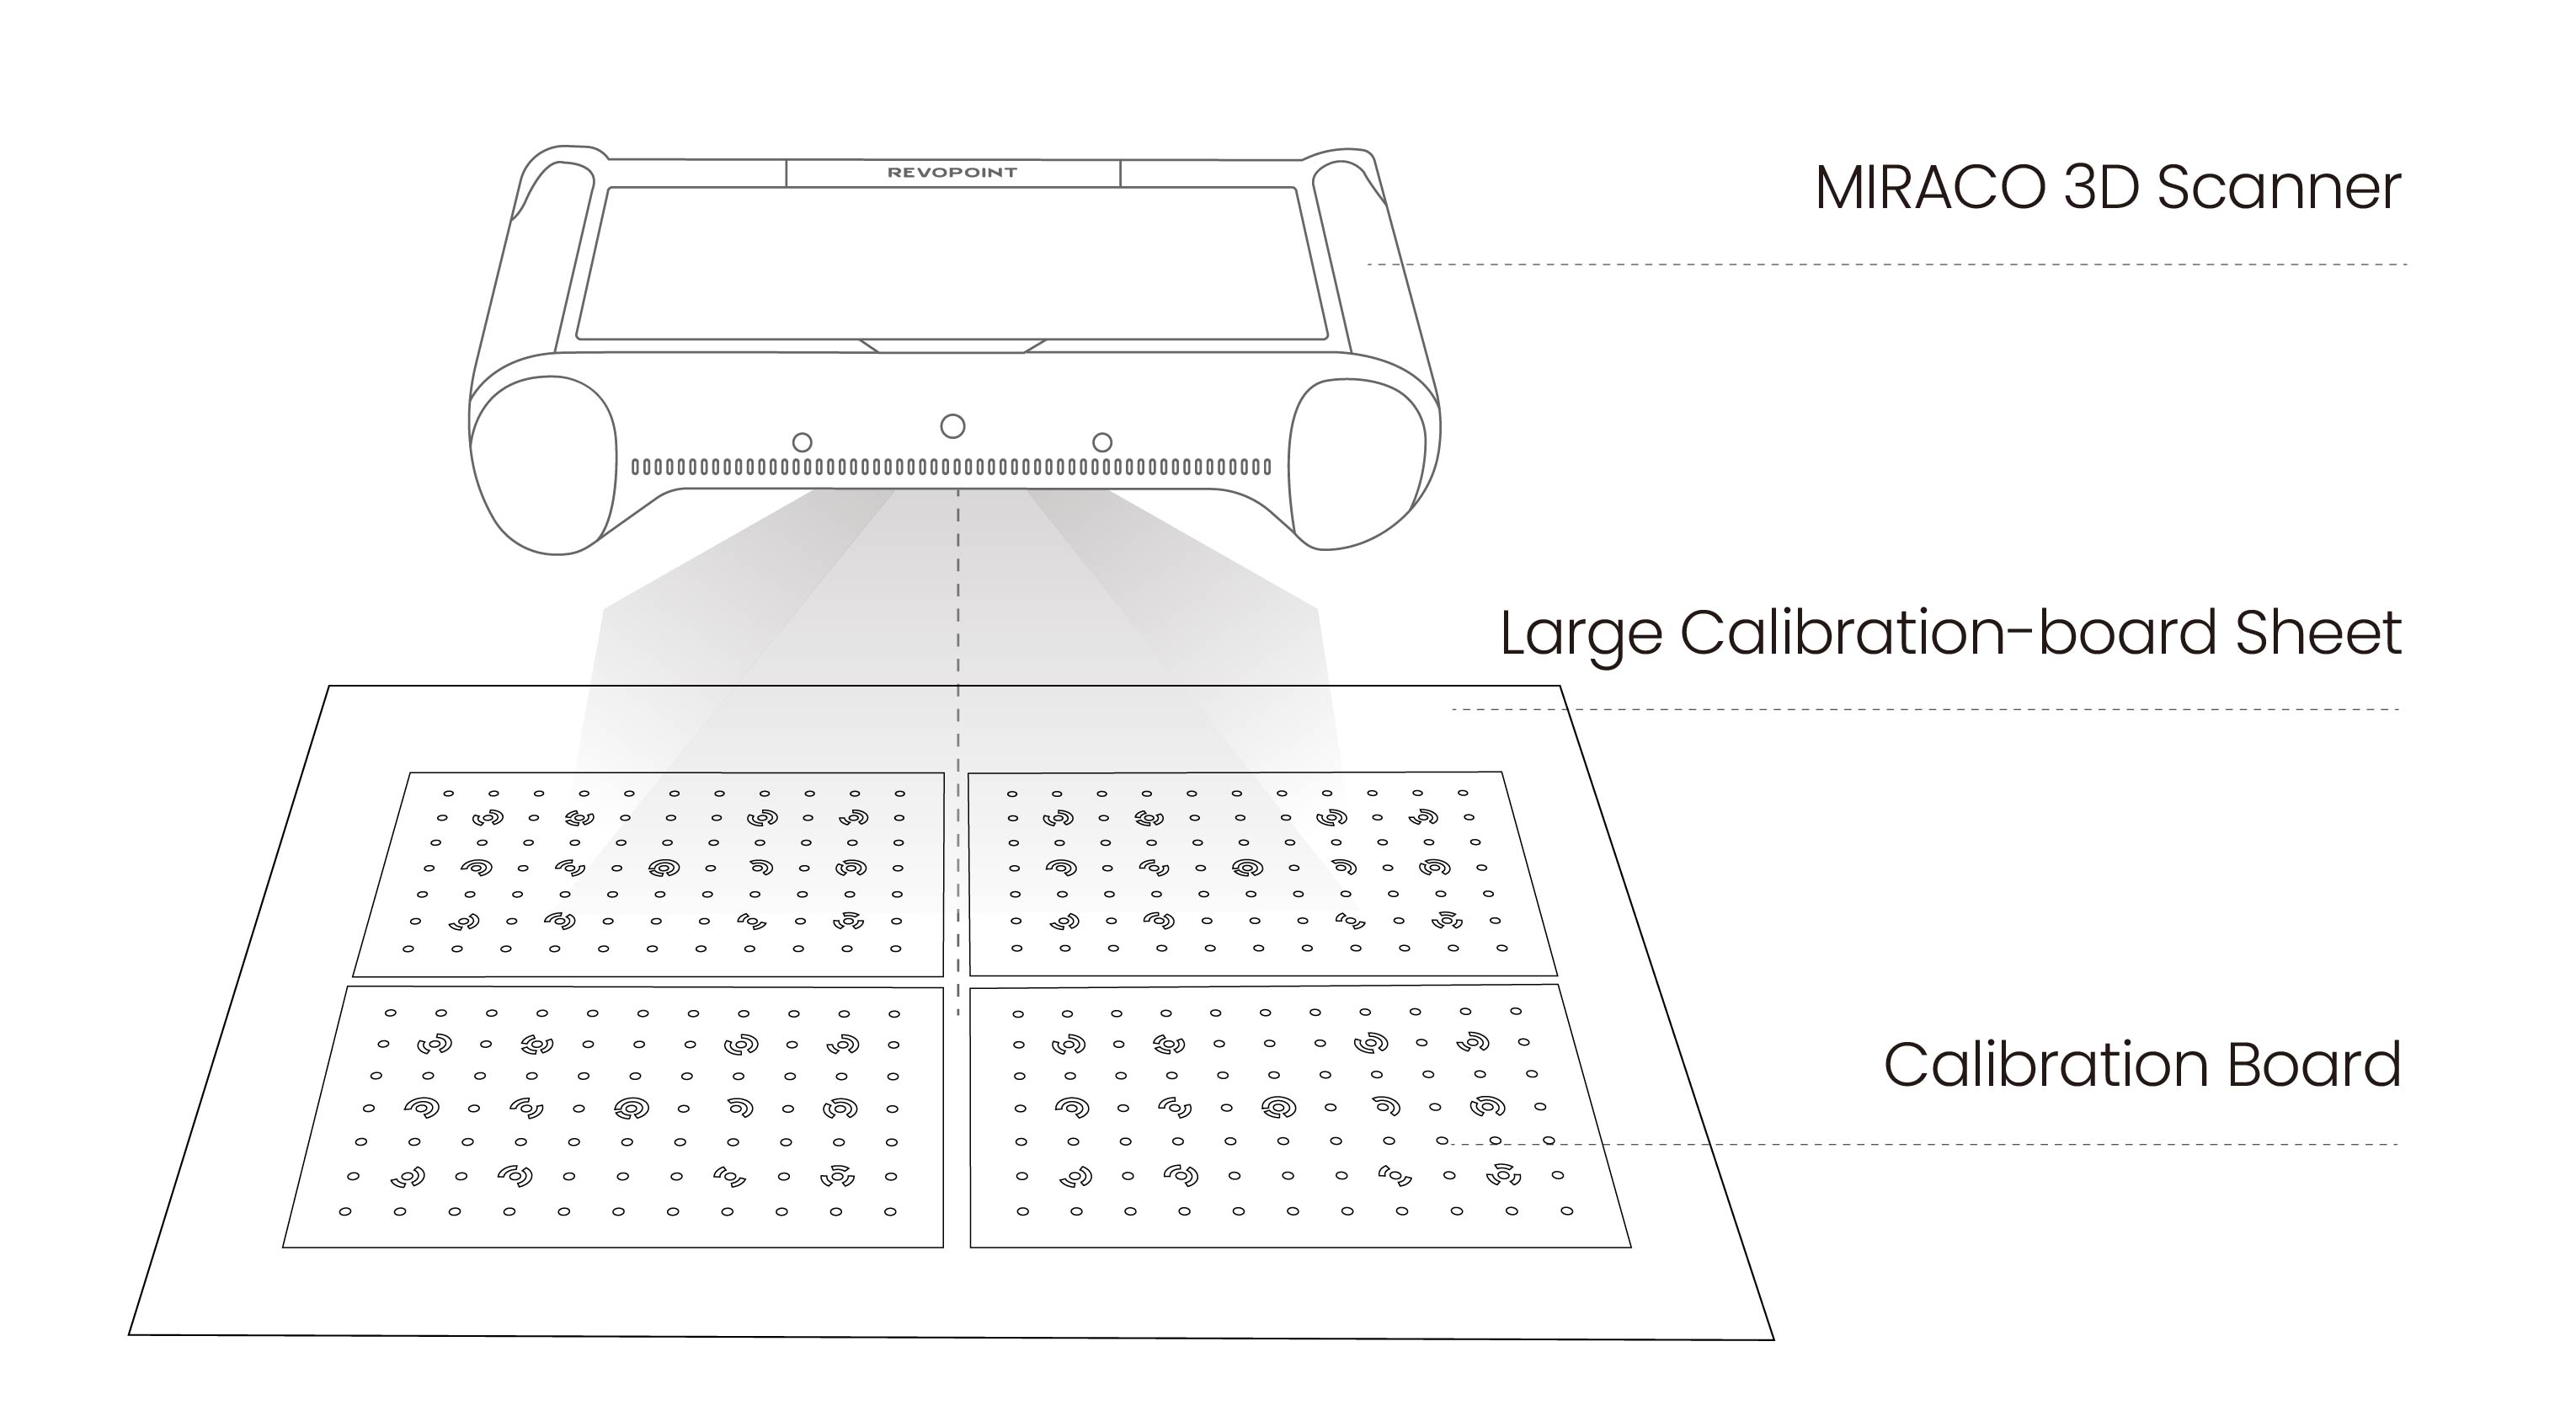
② Long press the MIRACO's Power Button (5s) to turn it on.
③ Swipe down from the top of the screen to access the Quick Settings Center. Tap the Settings button and scroll down to find Scanner Calibration.
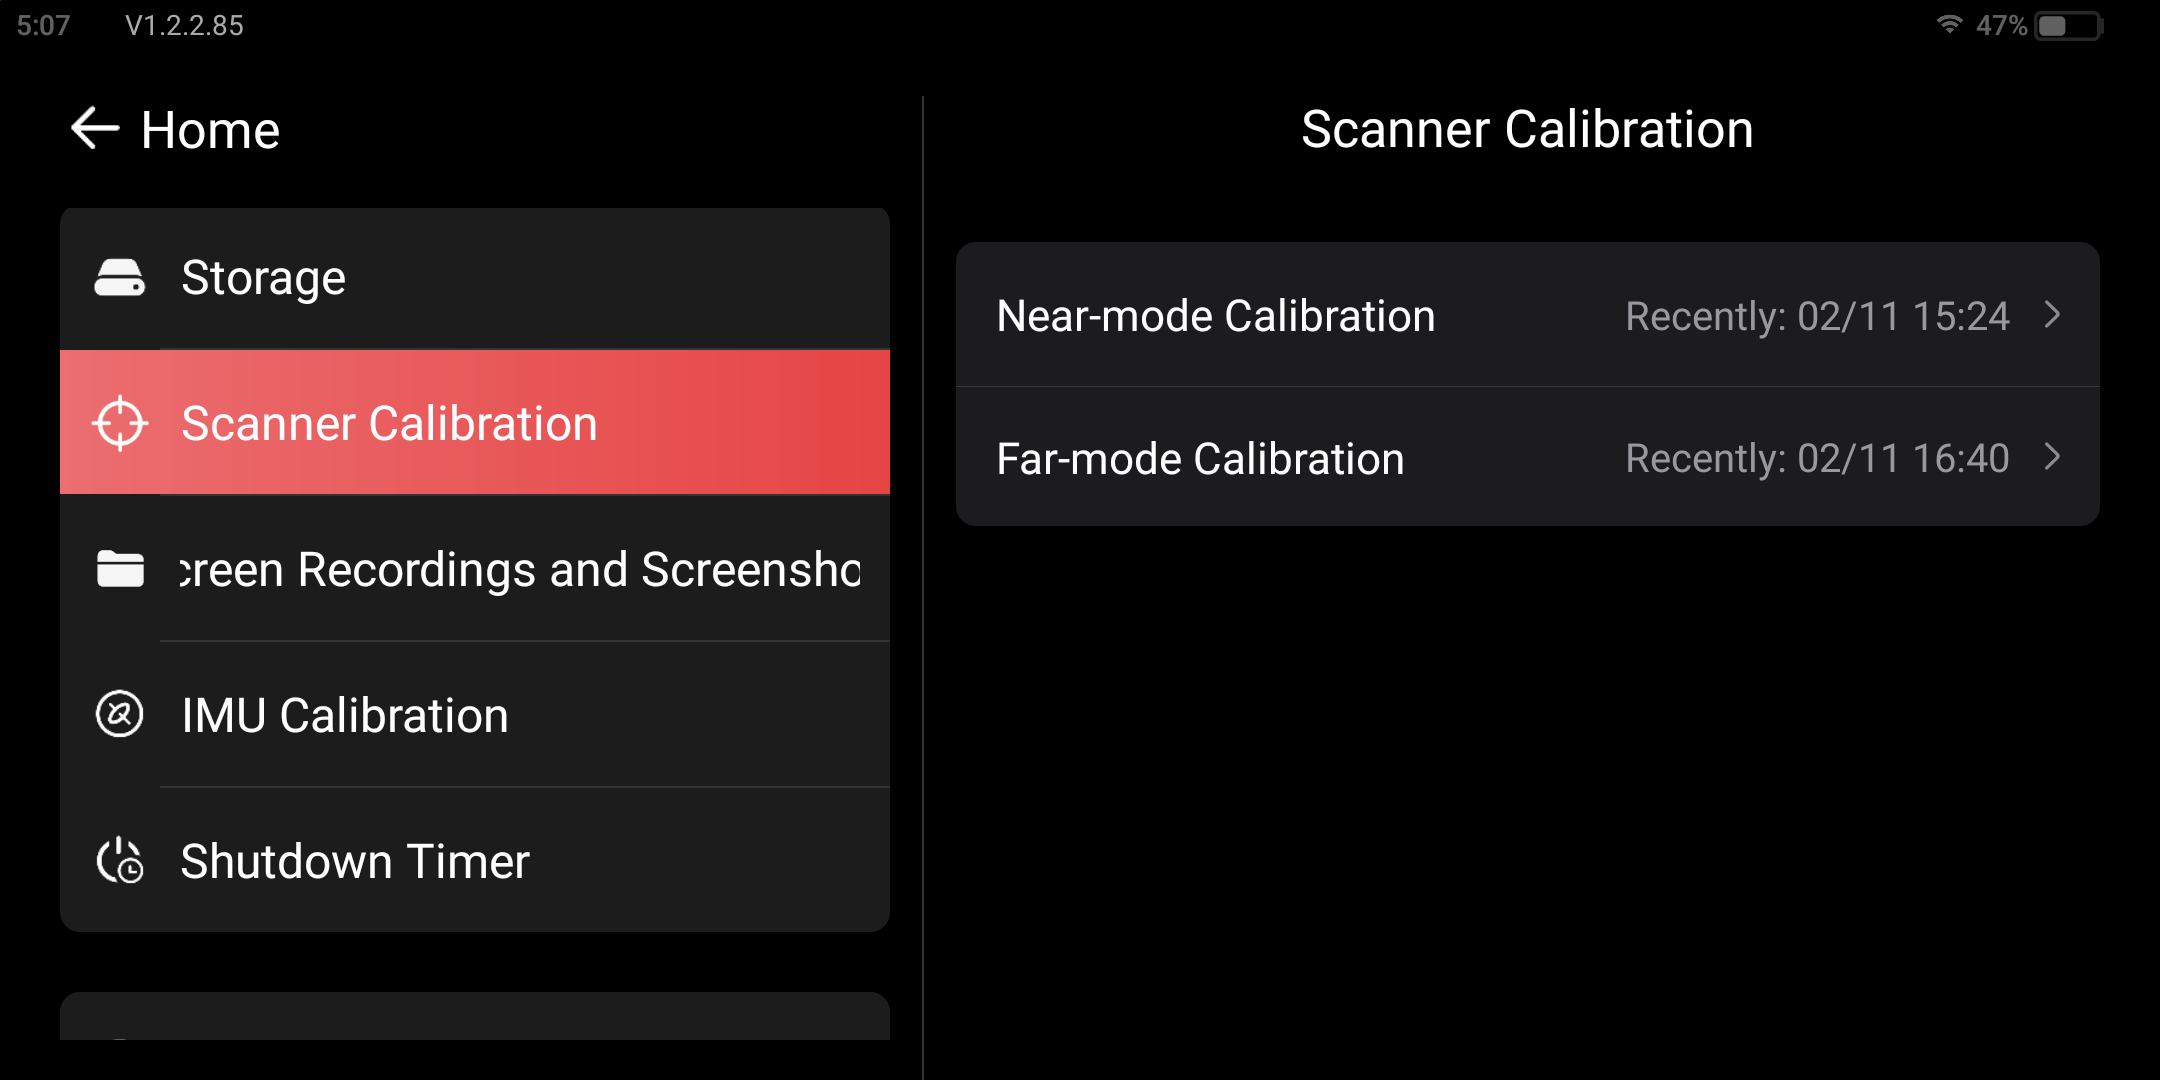
④ Complete the Near-mode and Far-mode cameras' accuracy check and calibration following the on-screen instructions.
Or you can calibrate your scanner on Revo Scan 5 (PC) according to the following steps:
① Download the latest version of Revo Scan from the Support - Download section on Revopoint's website: www.revopoint3d.com.
② Connect the scanner to a USB 3.0 port on a PC with the included USB Type-C to C cable (if using a USB Type-A to Type-C adaptor, ensure it supports USB 3.0).
③ Select [Use MIRACO in PC Mode] and tap [OK]. See Figure 1.

④ When Revo Scan 5 shows Scanner Connected, click [Scanner Calibration] at the bottom left of the Home page to start calibration (see Figure 2). The scanner's White Flash LEDs stay lit until calibration ends.
⑤ Complete the Near-mode and Far-mode cameras' accuracy check and calibration following the on-screen instructions.
¶ 12. Connect to PC for Scanning
If you want more settings for scanning or need a more powerful device to handle the scanning process. MIRACO also supports the use of its scanning probes only to scan objects in connection with Revo Scan on PC. Connection method is the same as "Scanner Calibration".
For more details about how to scan with MIRACO and Revo Scan (PC), please refer to this tutorial video: How to Use MIRACO in PC Mode.
¶ 13. Mirroring the Screen
¶ 13.1 Mirror to TV
MIRACO supports screen mirroring through a wired connection or wireless connection.
▶ Via Wired Connection
MIRACO supports the Display Port (DP) interface through its USB Type-C port.
Method 1: A monitor or TV can be connected to MIRACO's USB Type-C port with a DP to HDMI cable.

Method 2: Use the DP to HDMI Adapter (included with MIRACO) to connect MIRACO to an HDMI cable on a TV or monitor.

▶ Via Wireless Connection
Connect the scanner and TV to the same Wi-Fi network. Swipe down from the top of the screen and tap "Casting."
¶ 13.2 Mirror to PC
This function requires Revo Scan V5.5.4 at least.
▶ Via Wired Connection
Step 1: Connect the MIRACO to the USB 3.0 port on your PC using its USB Type-C to C Cable. If you need to use an USB Type-A to C adapter, ensure it supprts USB 3.0 port.
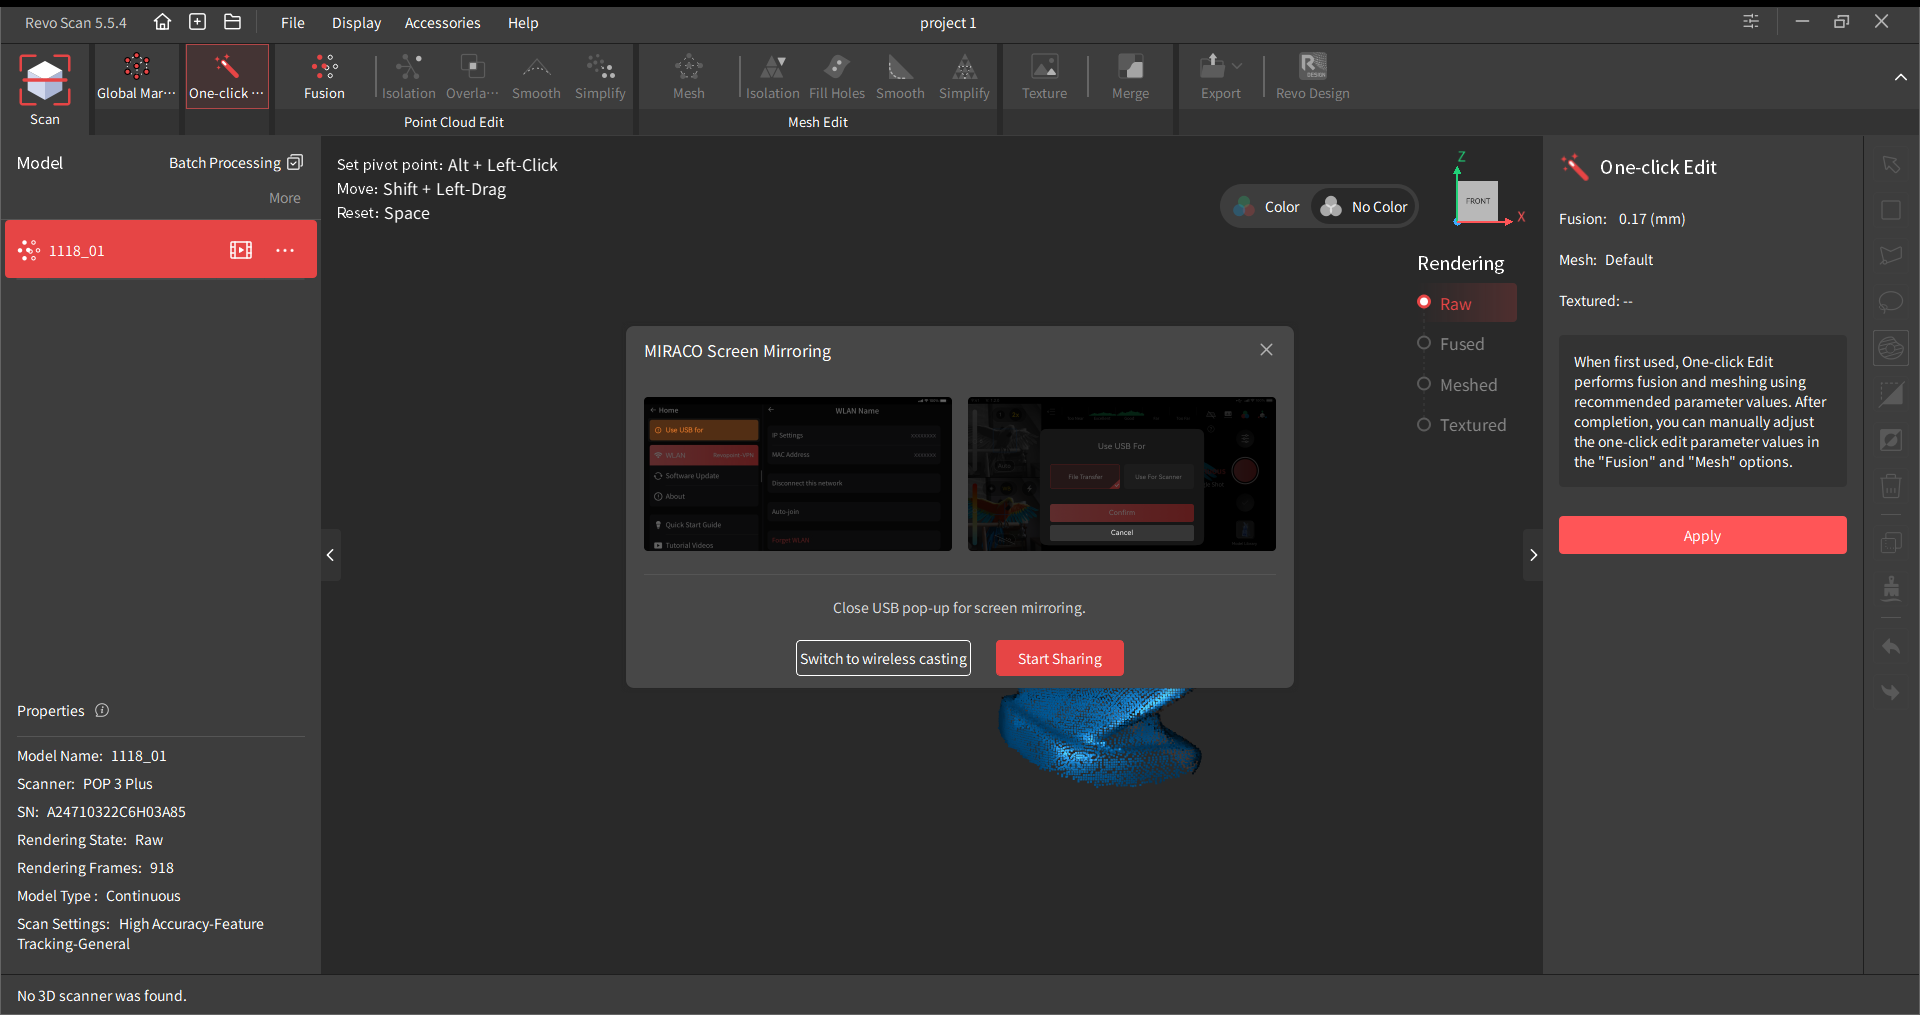
Step 2: After the scanner is connected to Revo Scan (PC), go to project interface, click "File > MIRACO Screen Mirroring > Wired Casting.

Step 3: Tap the Cancel button on the scanner's screen.
Step 4: Click the "Start sharing" button on the PC's pop-up window to share your screen.
▶ Via Wireless Connection
Step 1: Ensure the scanner and your PC are connected to the same Wi-Fi.
Step 2: After the scanner is connected to Revo Scan (PC), go to project interface, click "File > MIRACO Screen Mirroring > Wireless Casting.
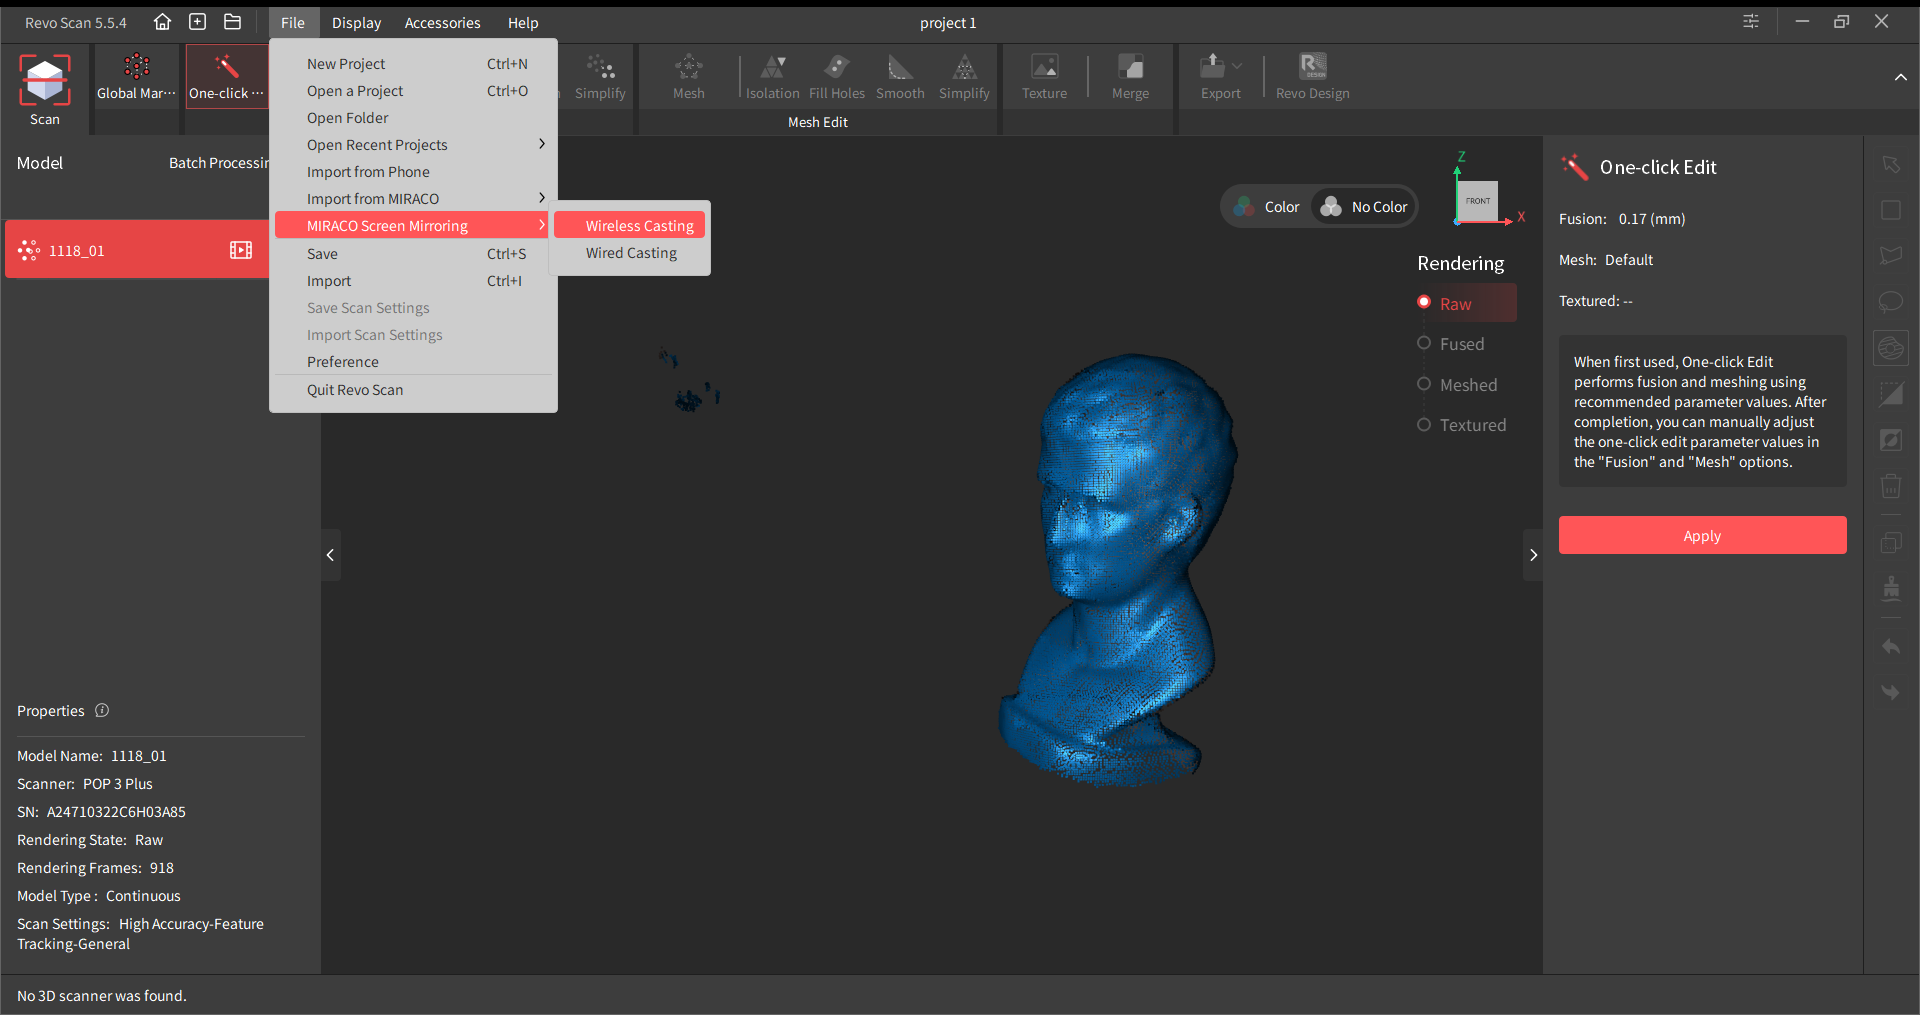
Step 3: Swipe down from the top of the screen, tap Settings > WLAN. tap the ⓘ button on the right of the selected WLAN to acquire the IP adress.

Step 4: Enter the IP address on the PC's screen. Click the "Start Sharing" button to share your screen.

¶ Appendix
¶ Specifications
| Name | MIRACO 3D Scanner |
| Scanning Type | Standalone Handheld and Desktop |
| Technology | Quad-camera Infrared Structured Light |
| Scannable Object Size | Small to Large |
| Single-frame Precision, up to | 0.02 mm |
| Single-frame Accuracy, up to | 0.05 mm |
| Fused Point Distance, up to | 0.05 mm |
| Working Distance | 100 ~ 1000 mm |
| Single Capture Area at Nearest Distance | 28 × 53 mm at 100 mm |
| Single Capture Area at Furthest Distance | 975 × 775 mm at 1000 mm |
| Angular Field of View (H x V) | Near 40 × 30°, Far 56 × 42° |
| Minimum Scan Volume | 10 × 10 × 10 mm |
| Maximum Scan Volume | 4 × 4 × 4 m |
| Scanning Speed, up to | 15 fps |
| Depth Camera Resolution, up to | 2 Megapixels |
| RGB Camera Resolution | 48 Megapixels |
| Color Scanning | Yes |
| Tracking Methods | Feature, Marker, Global Marker |
| Outdoor Scanning | Yes |
| 3D Light Source | Class 1 Infrared Light |
| Fill Lights | 8 Infrared LEDs |
| White Flash LEDs | 2 White Flash LEDs |
| Position Sensors | 9-axis IMU |
| CPU | 8 core ARM A76, 2.4 GHz, Mali G52 GPU |
| Built in Chip Computing |
Depth Map Computing, 3D Scanning, Photogrammetric Computing, Point Cloud Processing and Editing |
| Internal Storage | 256 GB |
| Memory (RAM) | 16GB or 32 GB |
| Touchscreen Display | 6 inch |
| Buttons | 2 |
| Minimum PC Requirements |
macOS CPU: M1 Pro or better; RAM ≥ 8GB Windows CPU: Intel i7 12th Gen or better; RAM ≥ 16GB |
| Recommended PC Requirements |
macOS CPU: M3 or better; RAM ≥ 8GB Windows CPU: Intel i9 11th Gen or better; RAM ≥ 32GB |
| Compatible Operating Systems | Windows 10/11 (64-bit), macOS 11.0 or better |
| Native system | Android |
| Output File Formats | PLY, OBJ, STL, ASC, 3MF, GLTF, FBX |
| Ready to Print 3D Models | ✔ |
| Wi-Fi | 6 |
| Bluetooth | 4.1 |
| Connector Type | USB Type-C |
| Power Requirements | DC 7-11V, 5A, Support 65-watt Fast Charging |
| Battery | Internal 5000 mAH |
| Scanner Weight | 750 g |
| Dimensions (L x W x H) | 200 × 50 × 110 mm |
| Special Object Scanning | Use scanning spray for transparent, dark, or highly reflective objects. |
| User Recalibration | Yes |
| Supported Accessories |
Large Turntable, Dual-axis Turntable, Large Calibration Board for MIRACO, Power Bank |
|
1. Precision is how close repeated measurements of the same object are to each other. Accuracy is how close a measured value is to the actual (true) value. They were both acquired in a controlled lab environment. Actual results might vary, subject to the operation environment. 2. Outdoor scans should avoid direct sunlight. 3. Class 1 Laser: Avoid direct eye exposure for extended periods! Refer to Standards for Class 1 Lasers for details. 4. Some products have flashing lights, which may not be suitable for people with photosensitive epilepsy. 5. The MIRACO 3D scanners require no PC when scanning. But the PC requirements above should be followed if you connect the MIRACO to Revo Scan (PC) for more operations. |
|


