¶ 1. About This Manual
Welcome to your Revopoint 3D scanner user manual! This manual provides MetroX's operation guide and instructions. Please read the manual before your first use to ensure you use this scanner correctly and safely. If needed, you can click on any topic in the navigation bar to quickly jump to that section.
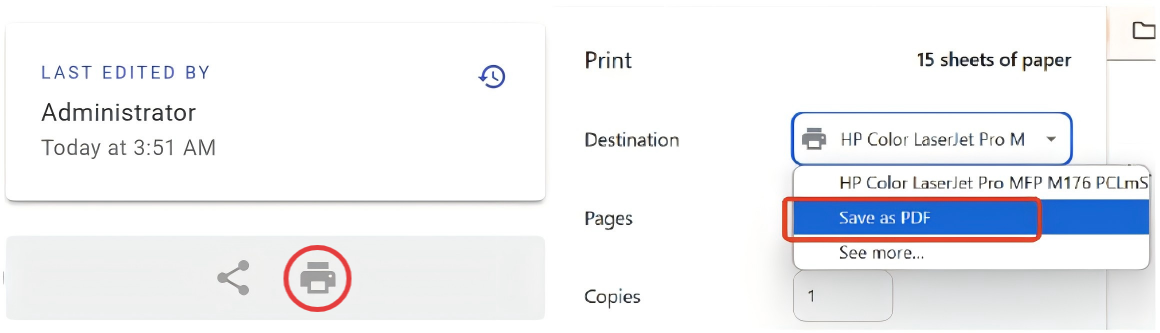
Manual Download
If you need a PDF manual, click the Print Format button at the bottom of the navigation bar on the left side of the manual, and select "Save as PDF" from the options.
¶ 1.1 Read Before Using
- This manual is specifically for the MetroX 3D scanner. Some operations may differ depending on the scanner's model.
- This manual is frequently updated to cover the product's latest features and improvements.
- Verify that all components in your box are complete and undamaged before first use.
¶ 1.2 Safety Instructions
- This product has a Class 2M laser projector. Avoid looking directly at the laser up close, and do not use magnifying tools like telescopes or cameras to view the beam, as it can damage your retina. Keep reflective surfaces such as mirrors and glass away from the laser beam's path.
- Please keep the scanner away from water and any other liquids, as they can damage the components.
- Store the scanner and all accessories in a cool, dry place away from direct sunlight.
- Do not bash or drop the scanner.
- Do not disassemble the scanner, as this may cause equipment failure.
- Do not use unauthorized software or plug-ins, as they may cause system instability or data loss.
- Keep all components out of reach of children and animals to avoid serious injury.
¶ 1.3 Online Resources


¶ 2. About MetroX
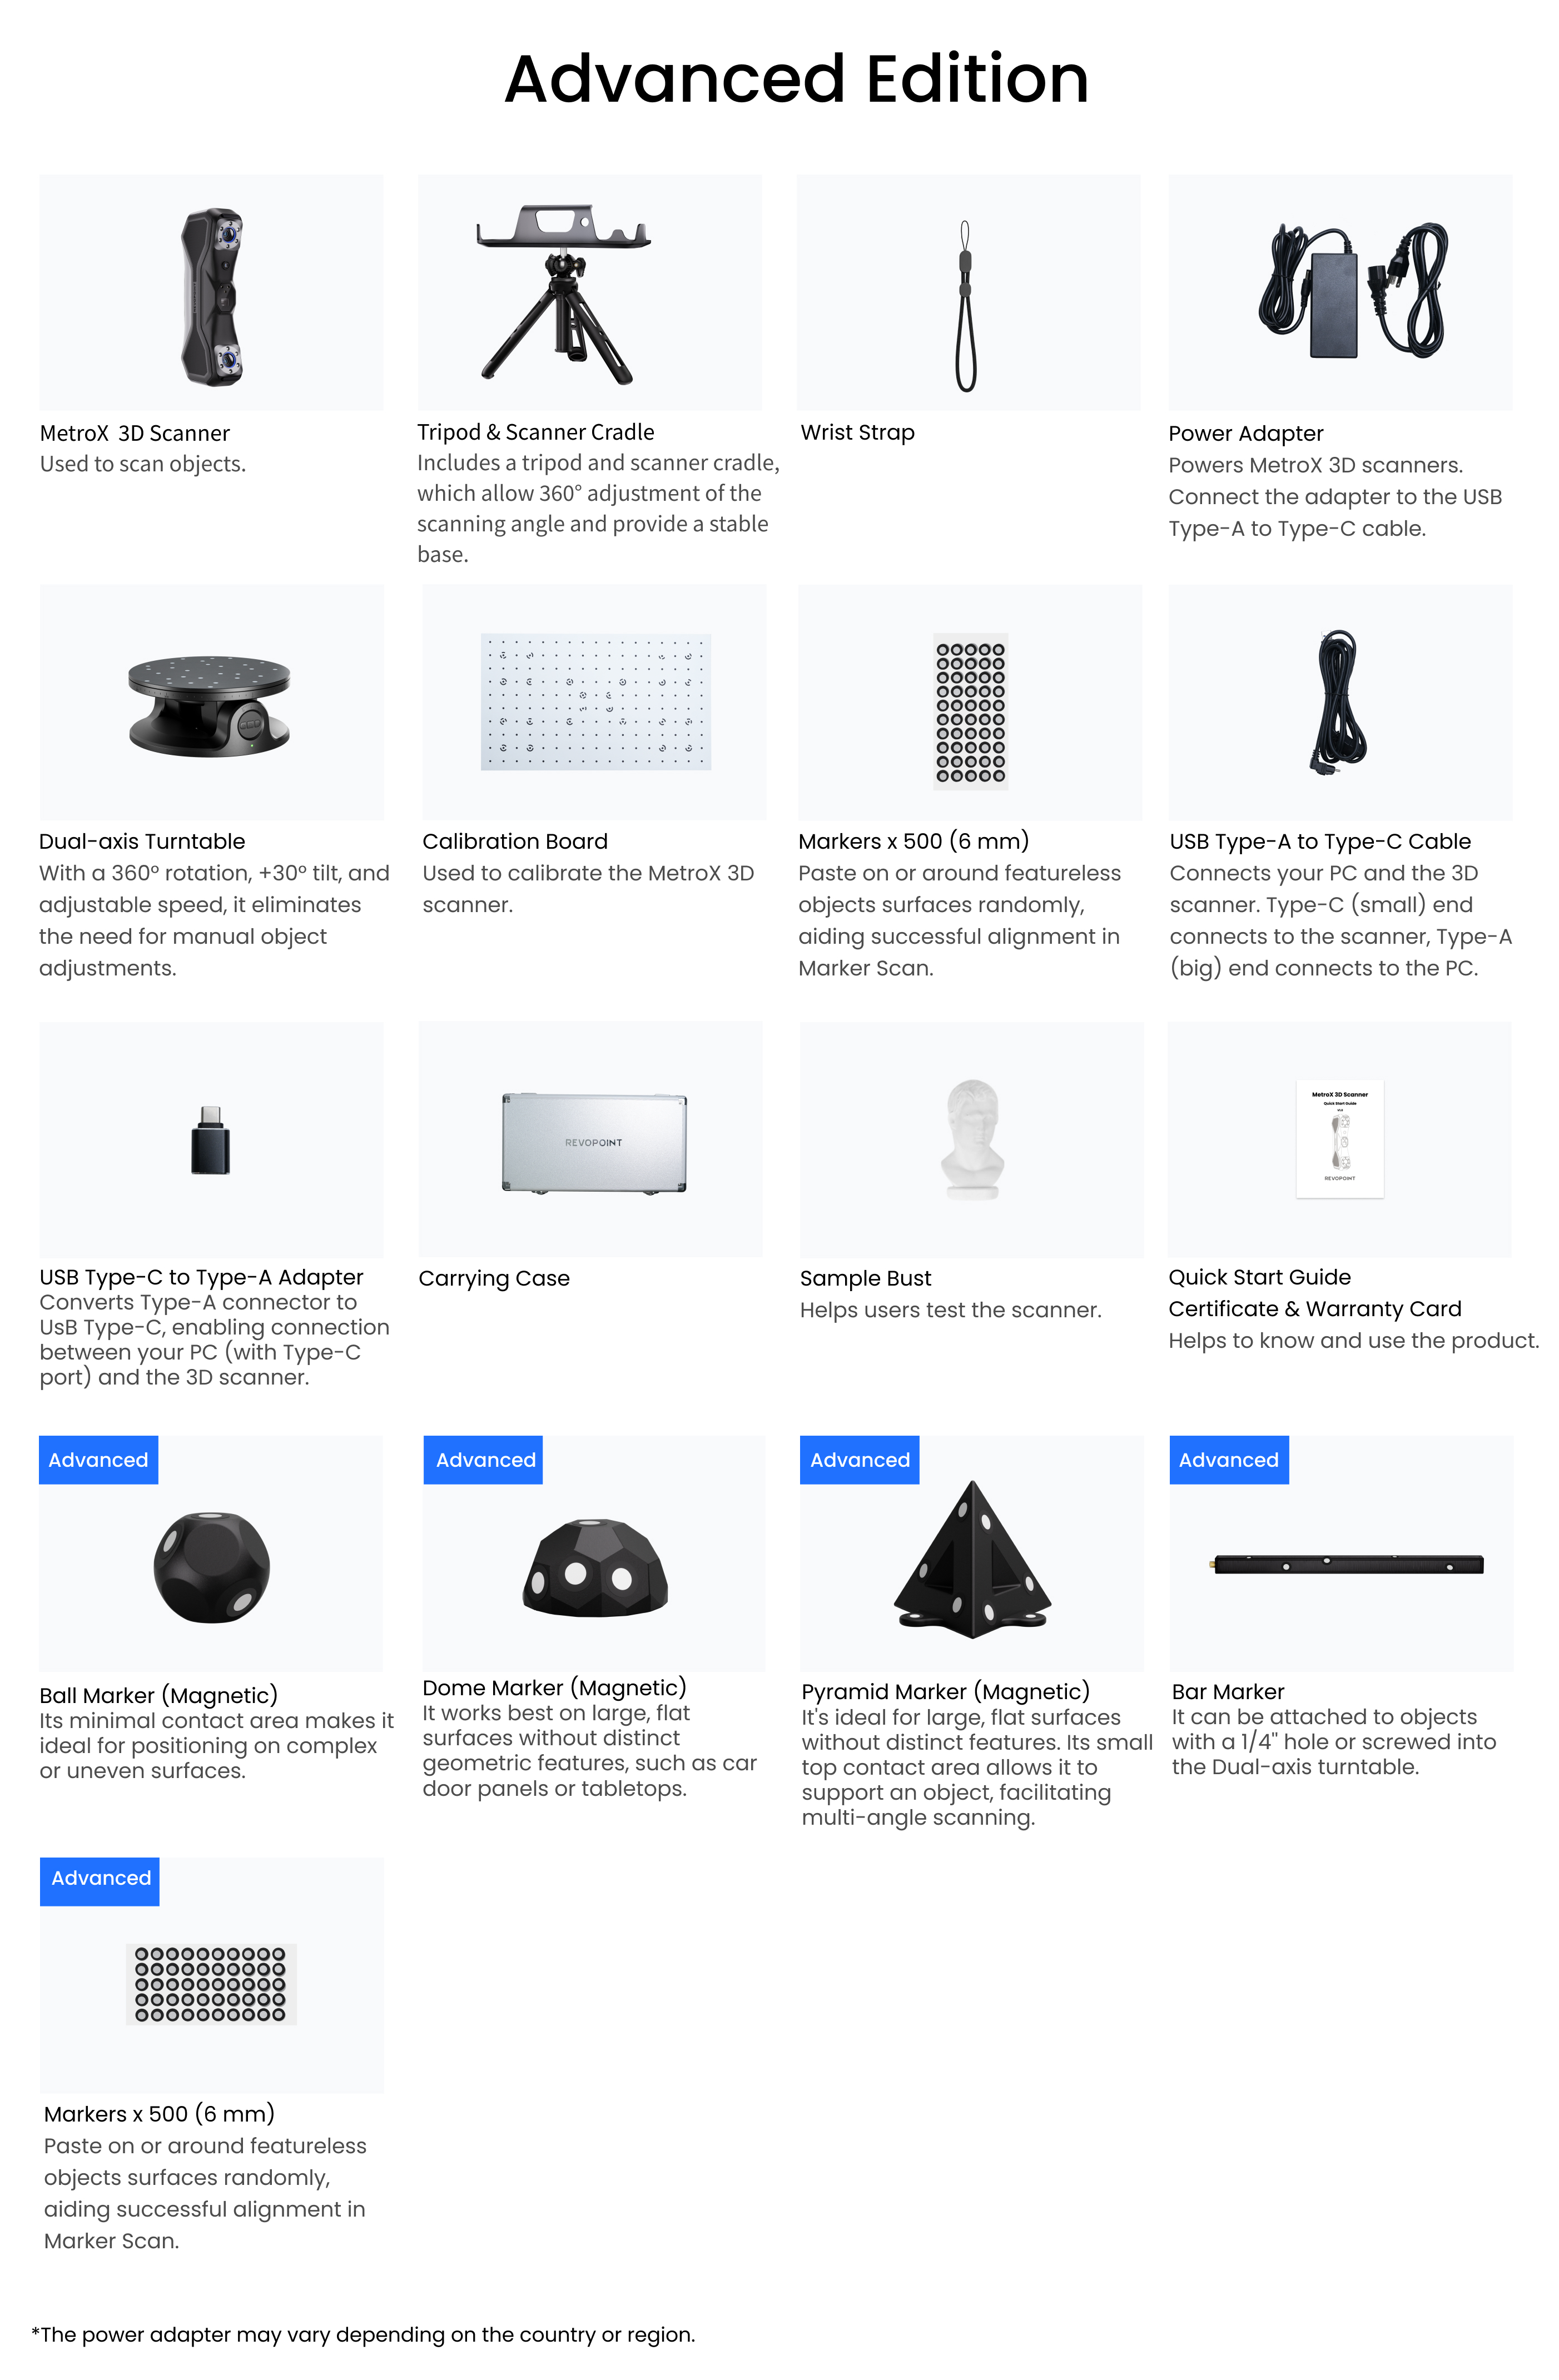
¶ 2.1 What's in the Box?
.jpg)
Standard Edition First Use Tutorial
Advanced Edition First Use Tutorial
¶ 2.2 Product Profile
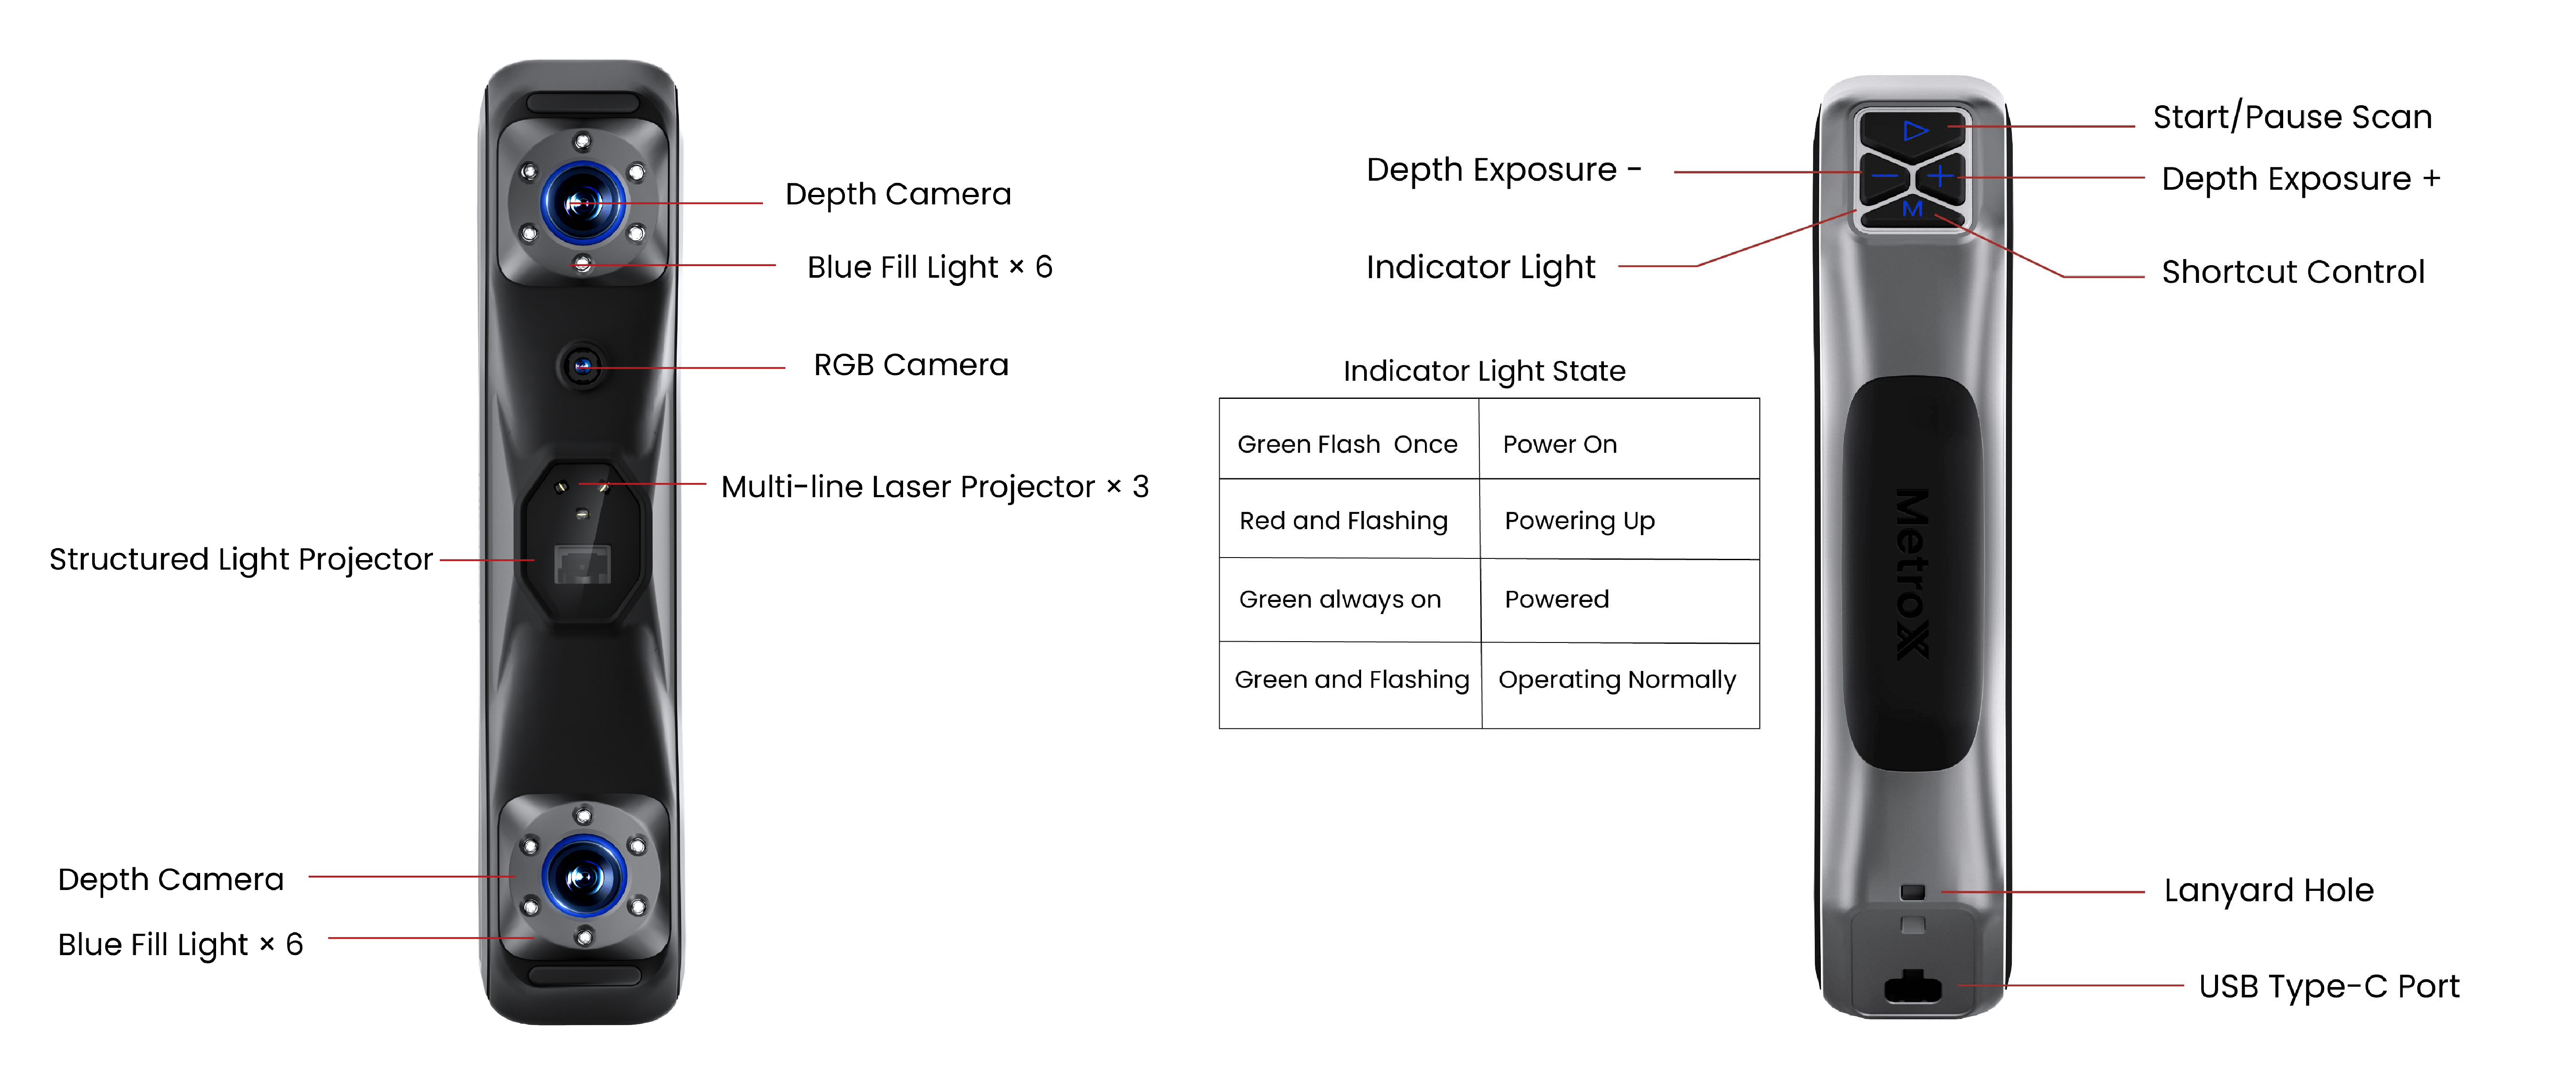
Note: The + and - buttons can be used with M key to switch between the following functions: ① Zoom in/Zoom out Central Preview Window ② lase line modes ③ the Depth Camera exposure ④ the laser brightness. Refer to the settings section in the software user manual for details.
¶ 3. About Revo Metro
The scanner is used together with the Revo Metro software. For detailed information on the software’s features and operations, please refer to the Revo Metro Software User Manual .

¶ 4. Preparation Before a Scan
¶ 4.1 Connect MetroX
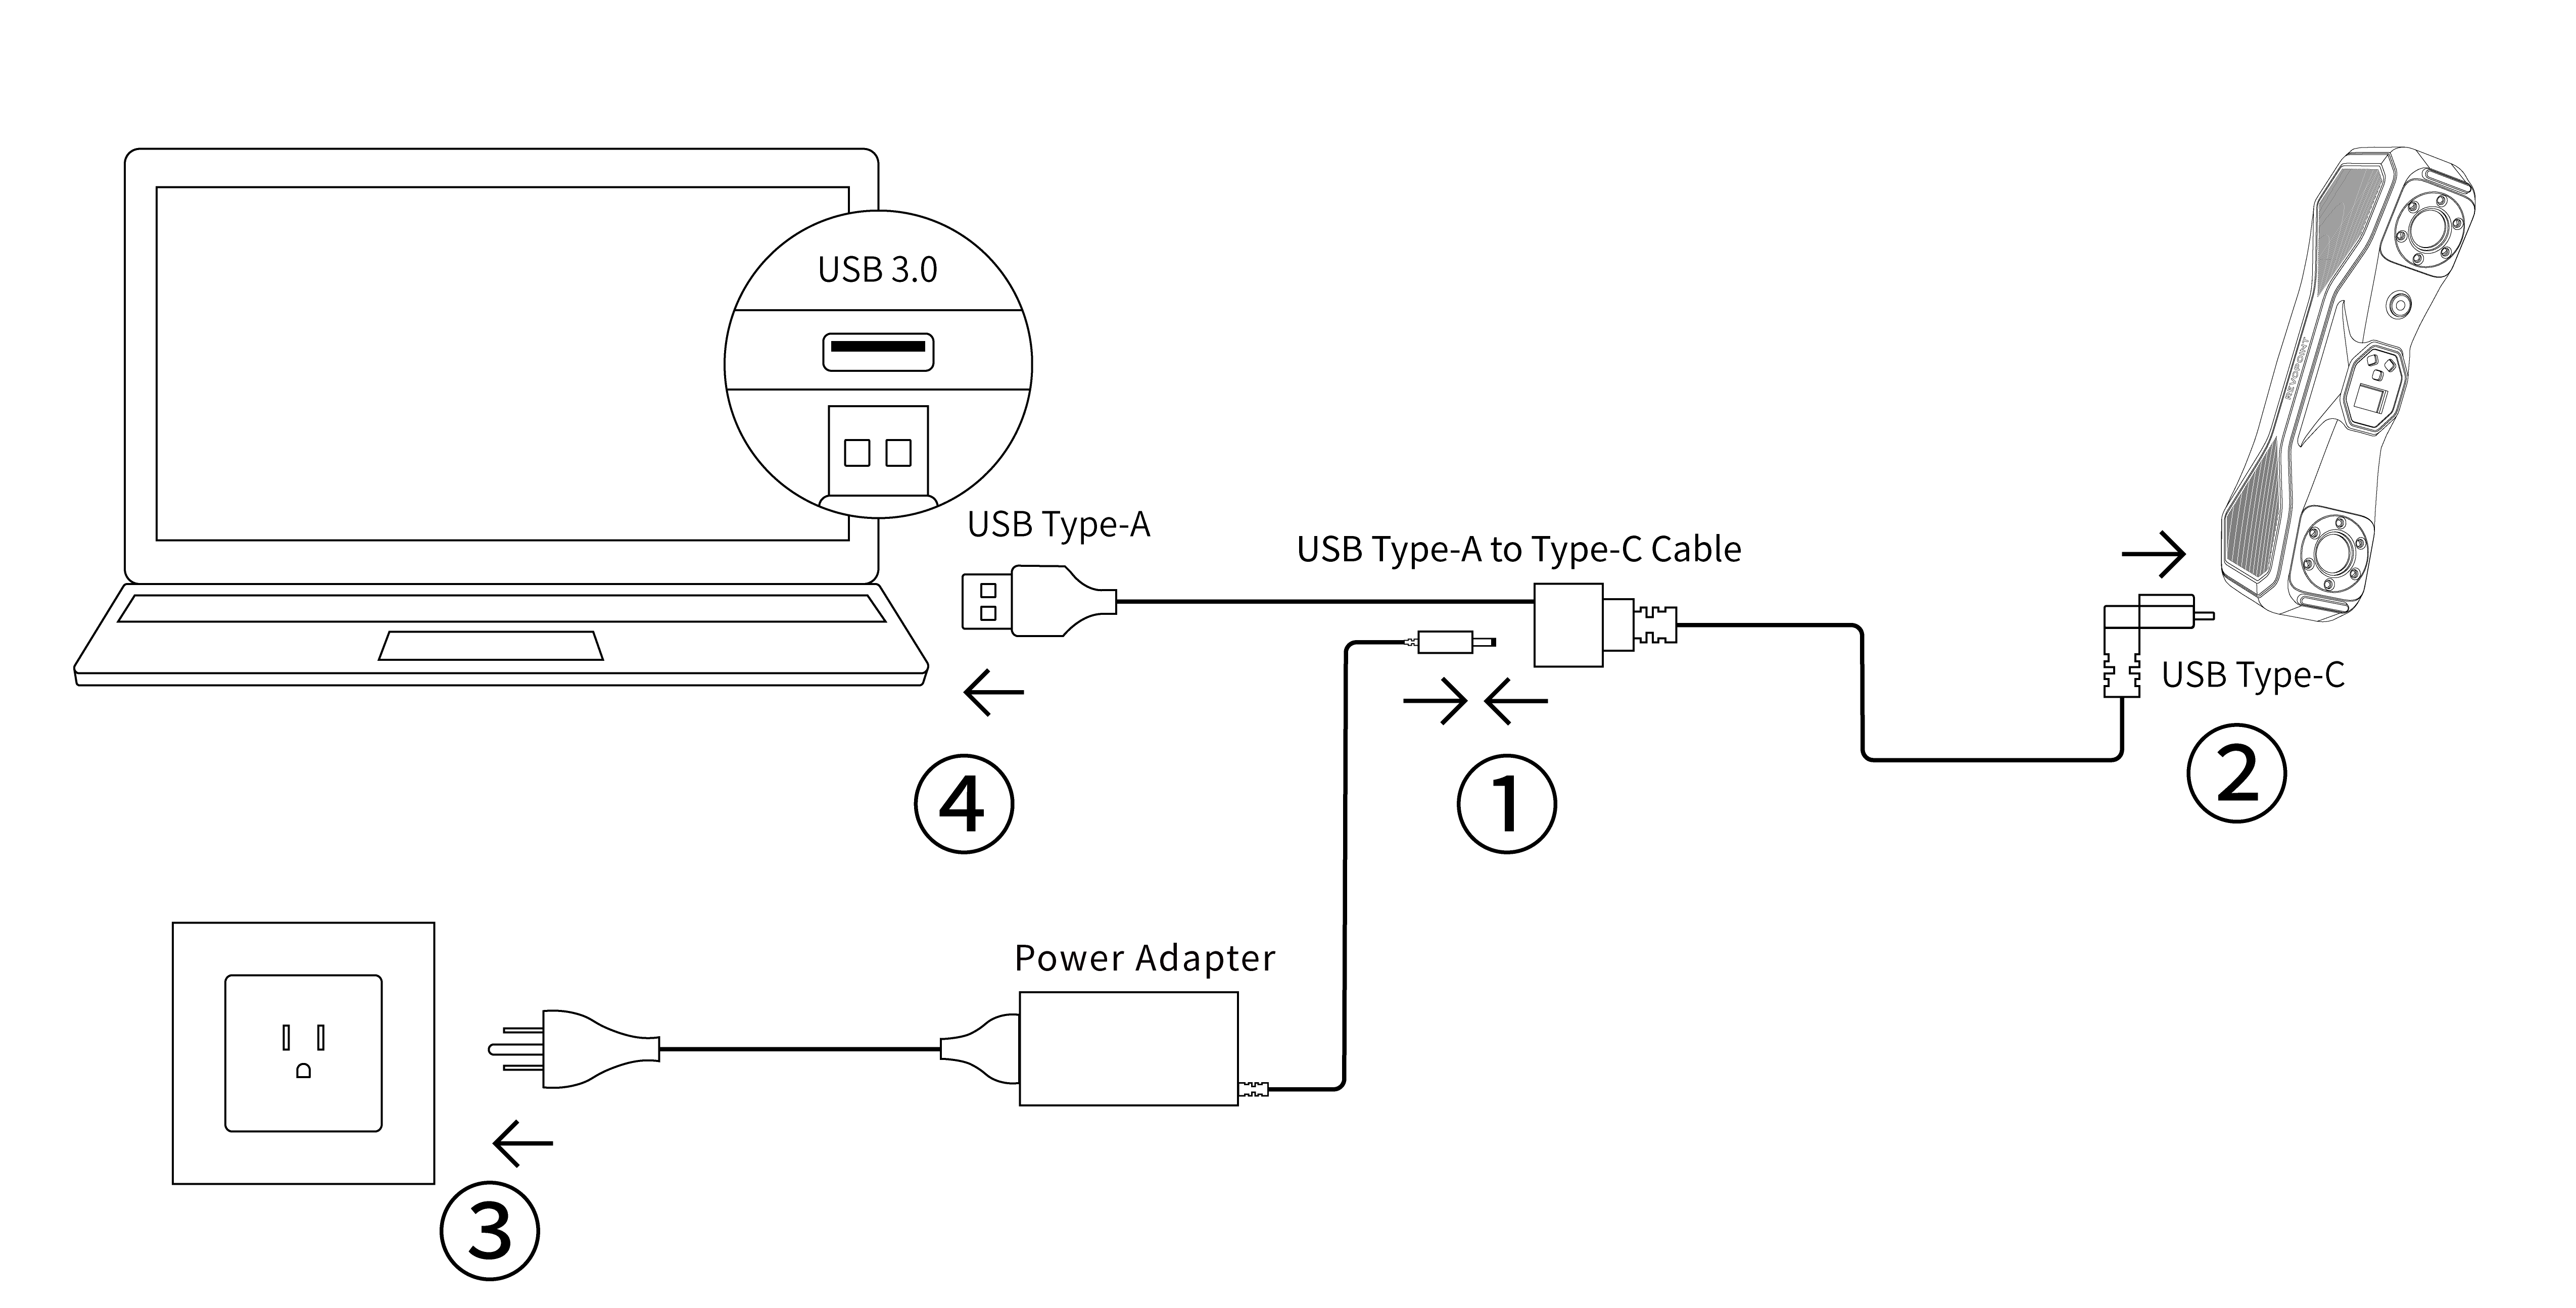
1) Follow steps ① to ③ to power the scanner.
2) To connect to a PC, follow step ④ and plug it into a USB 3.0 Type-A port on your PC. If your PC doesn't have one, use the USB Type-C to Type-A Adapter.
3) After powering on MetroX, wait 10 minutes for it to warm up for better scanning results.
Notes:
.png)
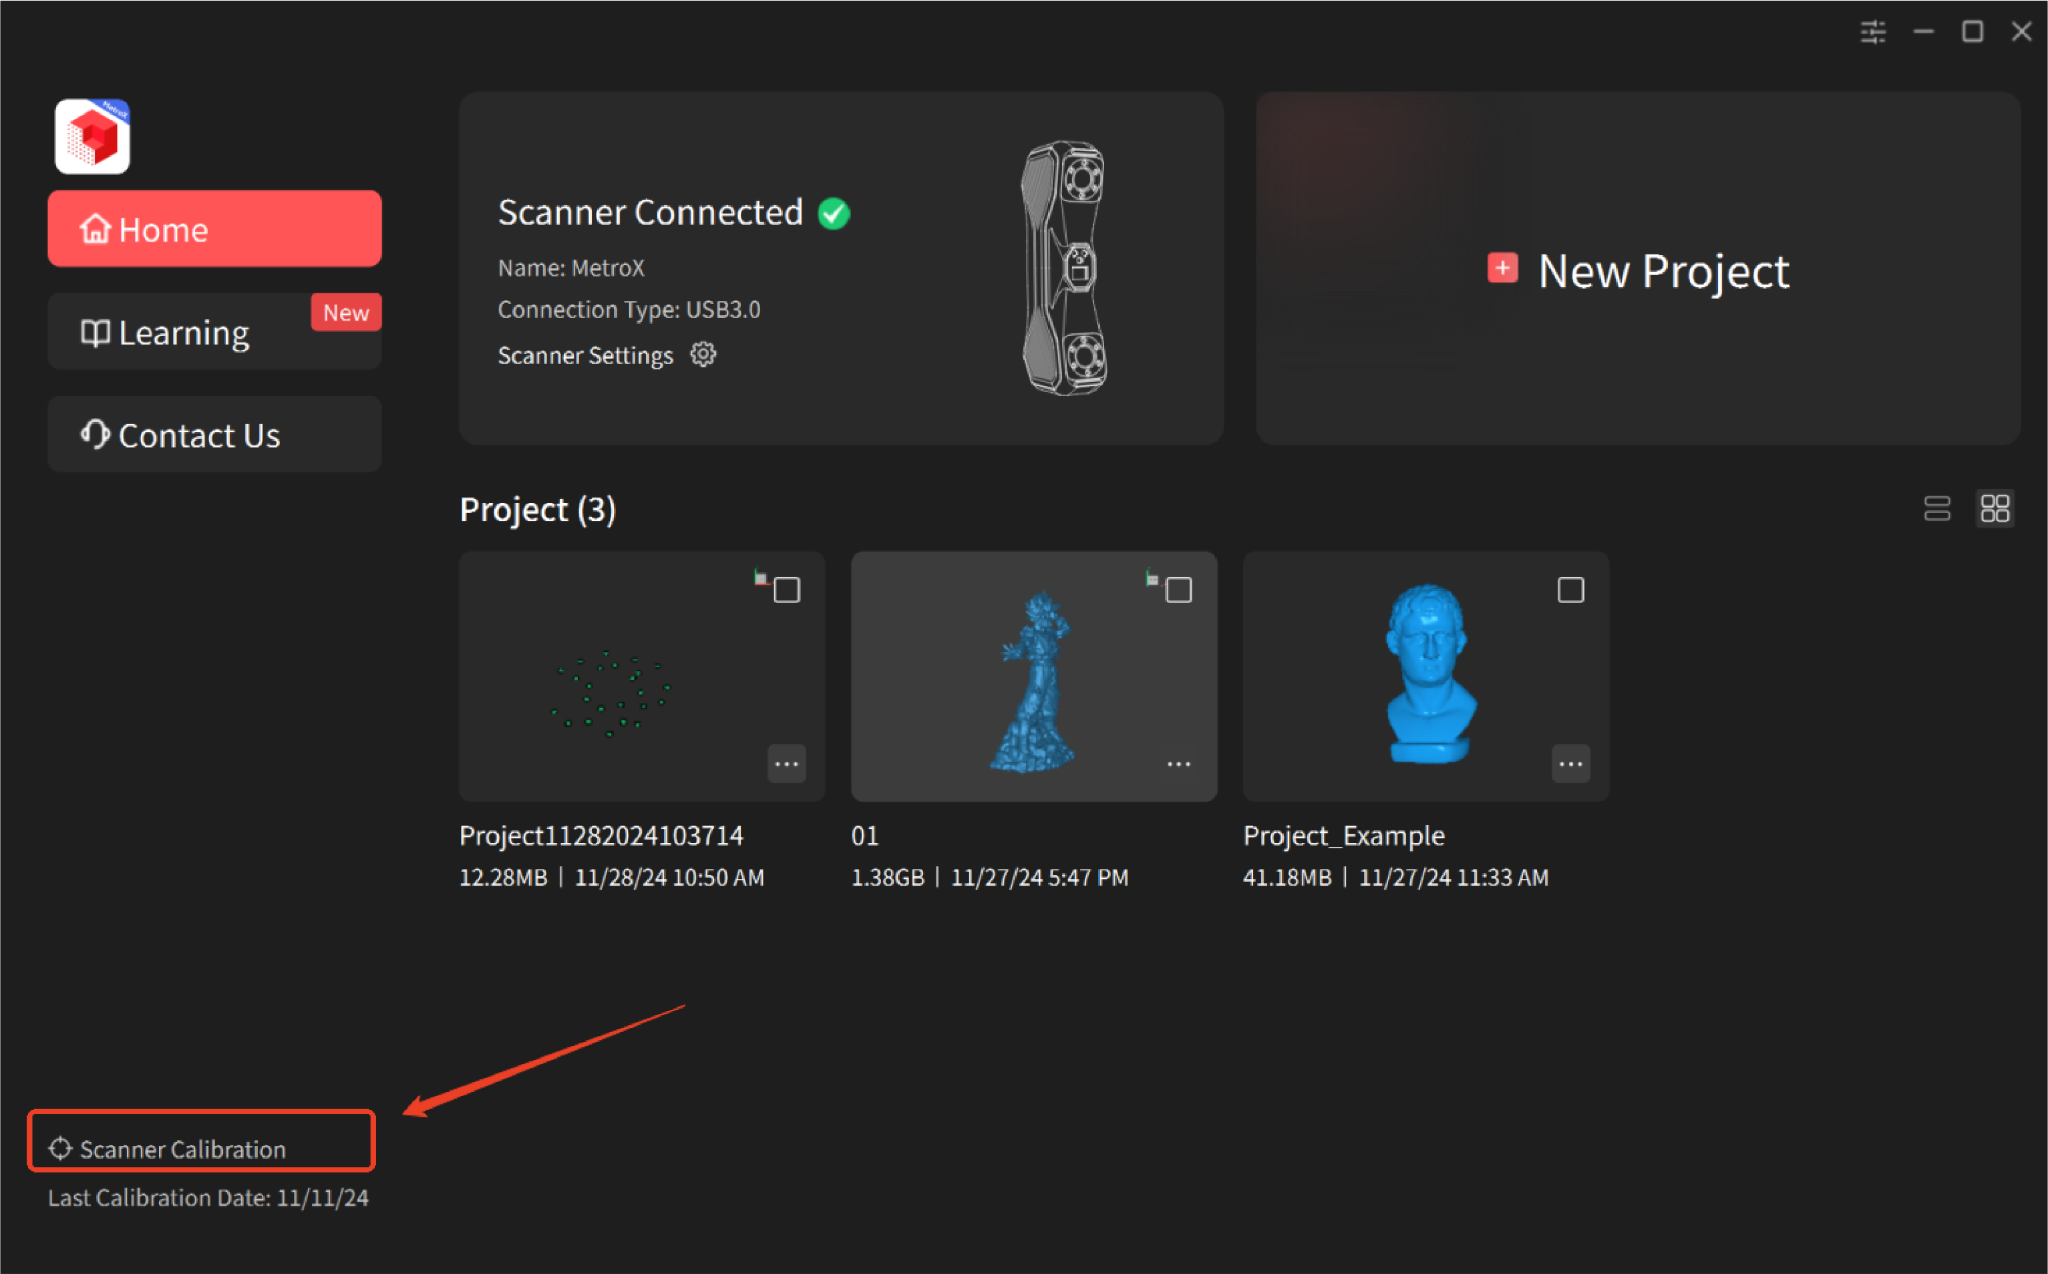
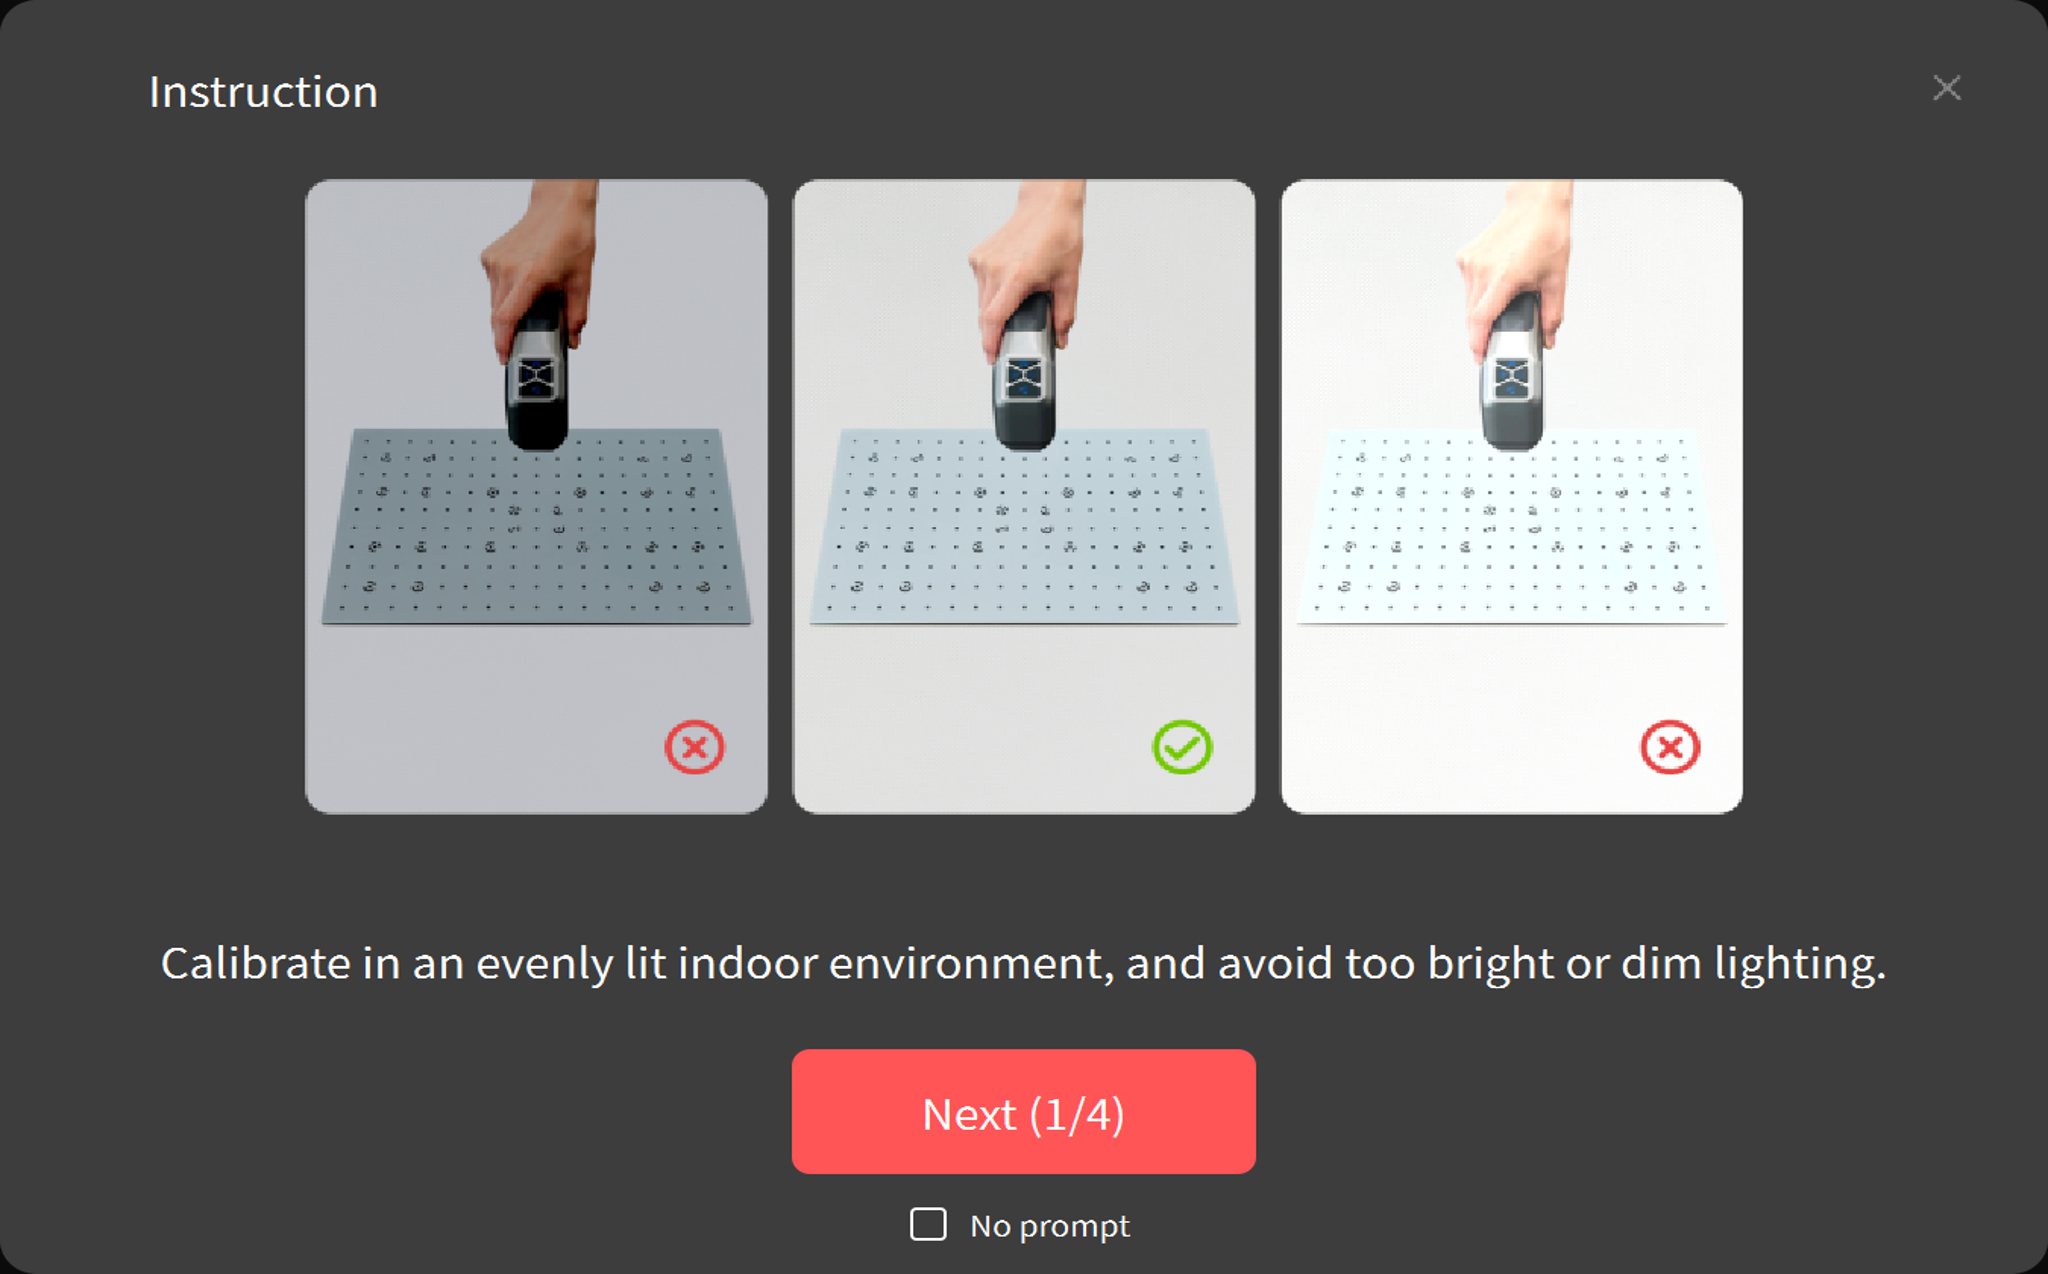
¶ 4.2 Accuracy Test & Calibration
Before each scan, please check the scanner's accuracy first using the Scanner Calibration program on Revo Metro's Home page to ensure accuracy.
① Scan the QR Code on the back of the calibration board to import its accuracy information.
② Check the scanner's accuracy.
③ Calibrate the scanner according to the on-screen instructions if needed. Before calibrating the scanner or scanning in laser line mode, it is necessary to warm up the device for 10 minutes to ensure optimal accuracy.
Note: Please ensure the computer is connected to a power supply during calibration.
 |
 |
¶ 4.3 Prepare the Objects
- Using Markers
Markers are required for tracking if you choose Marker Scan when entering project interface.
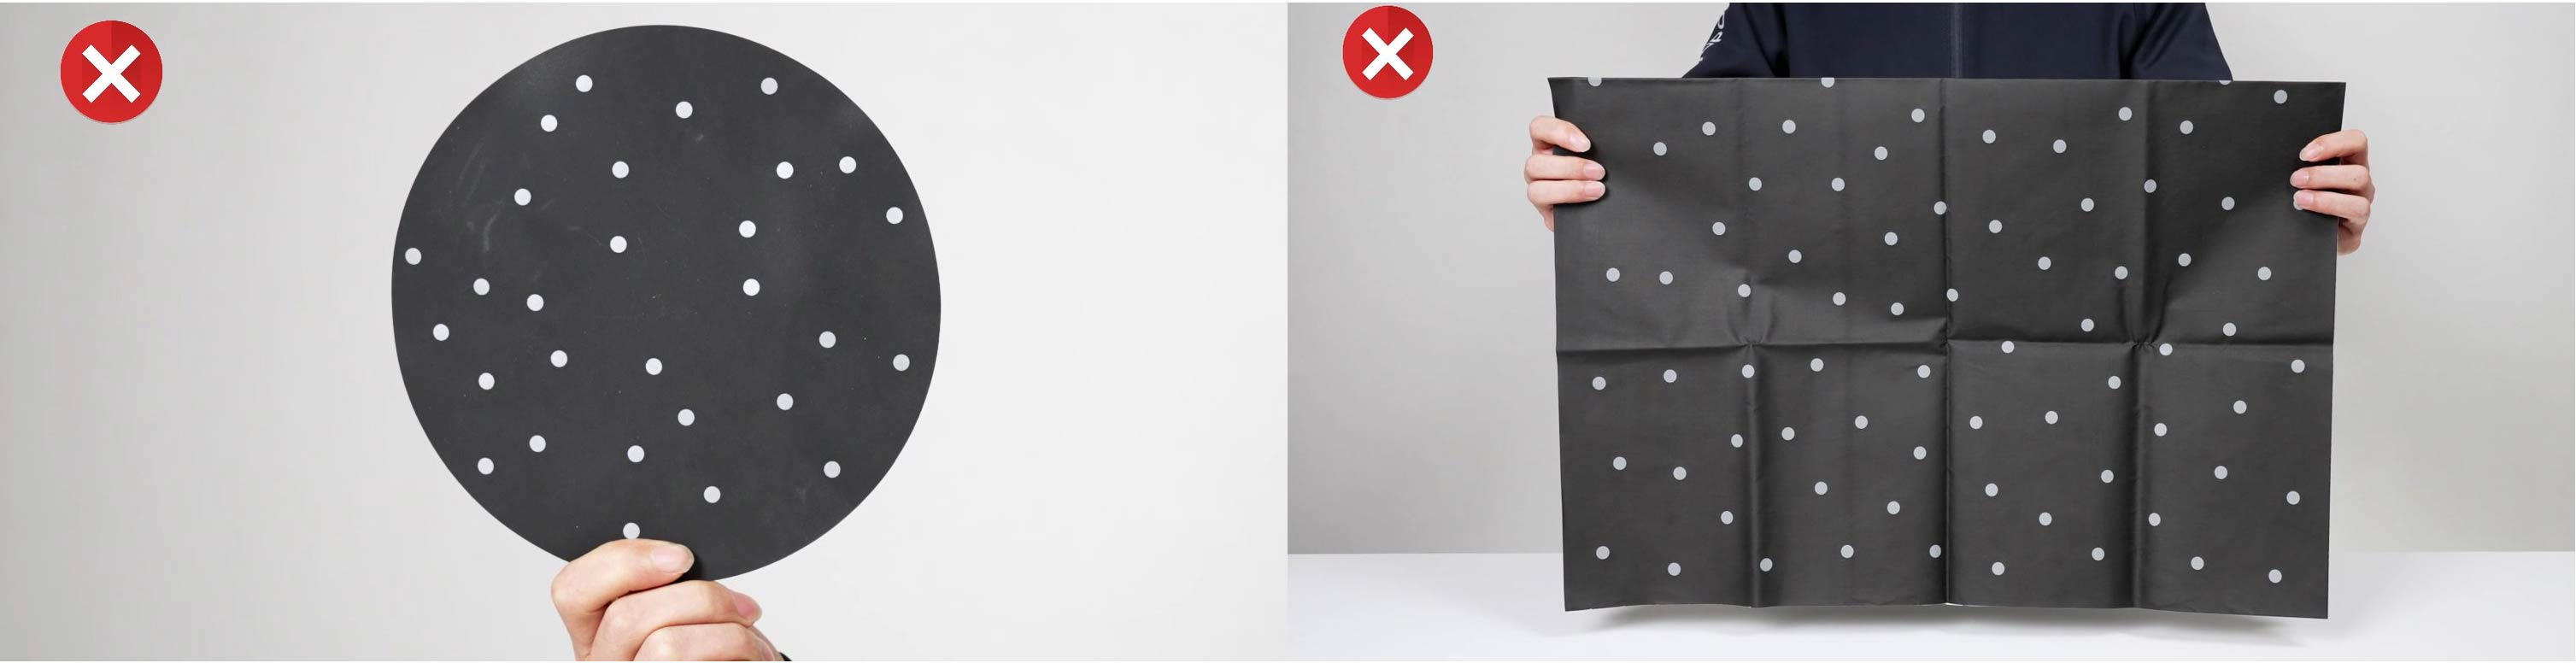
Place markers 6 - 7 cm apart.
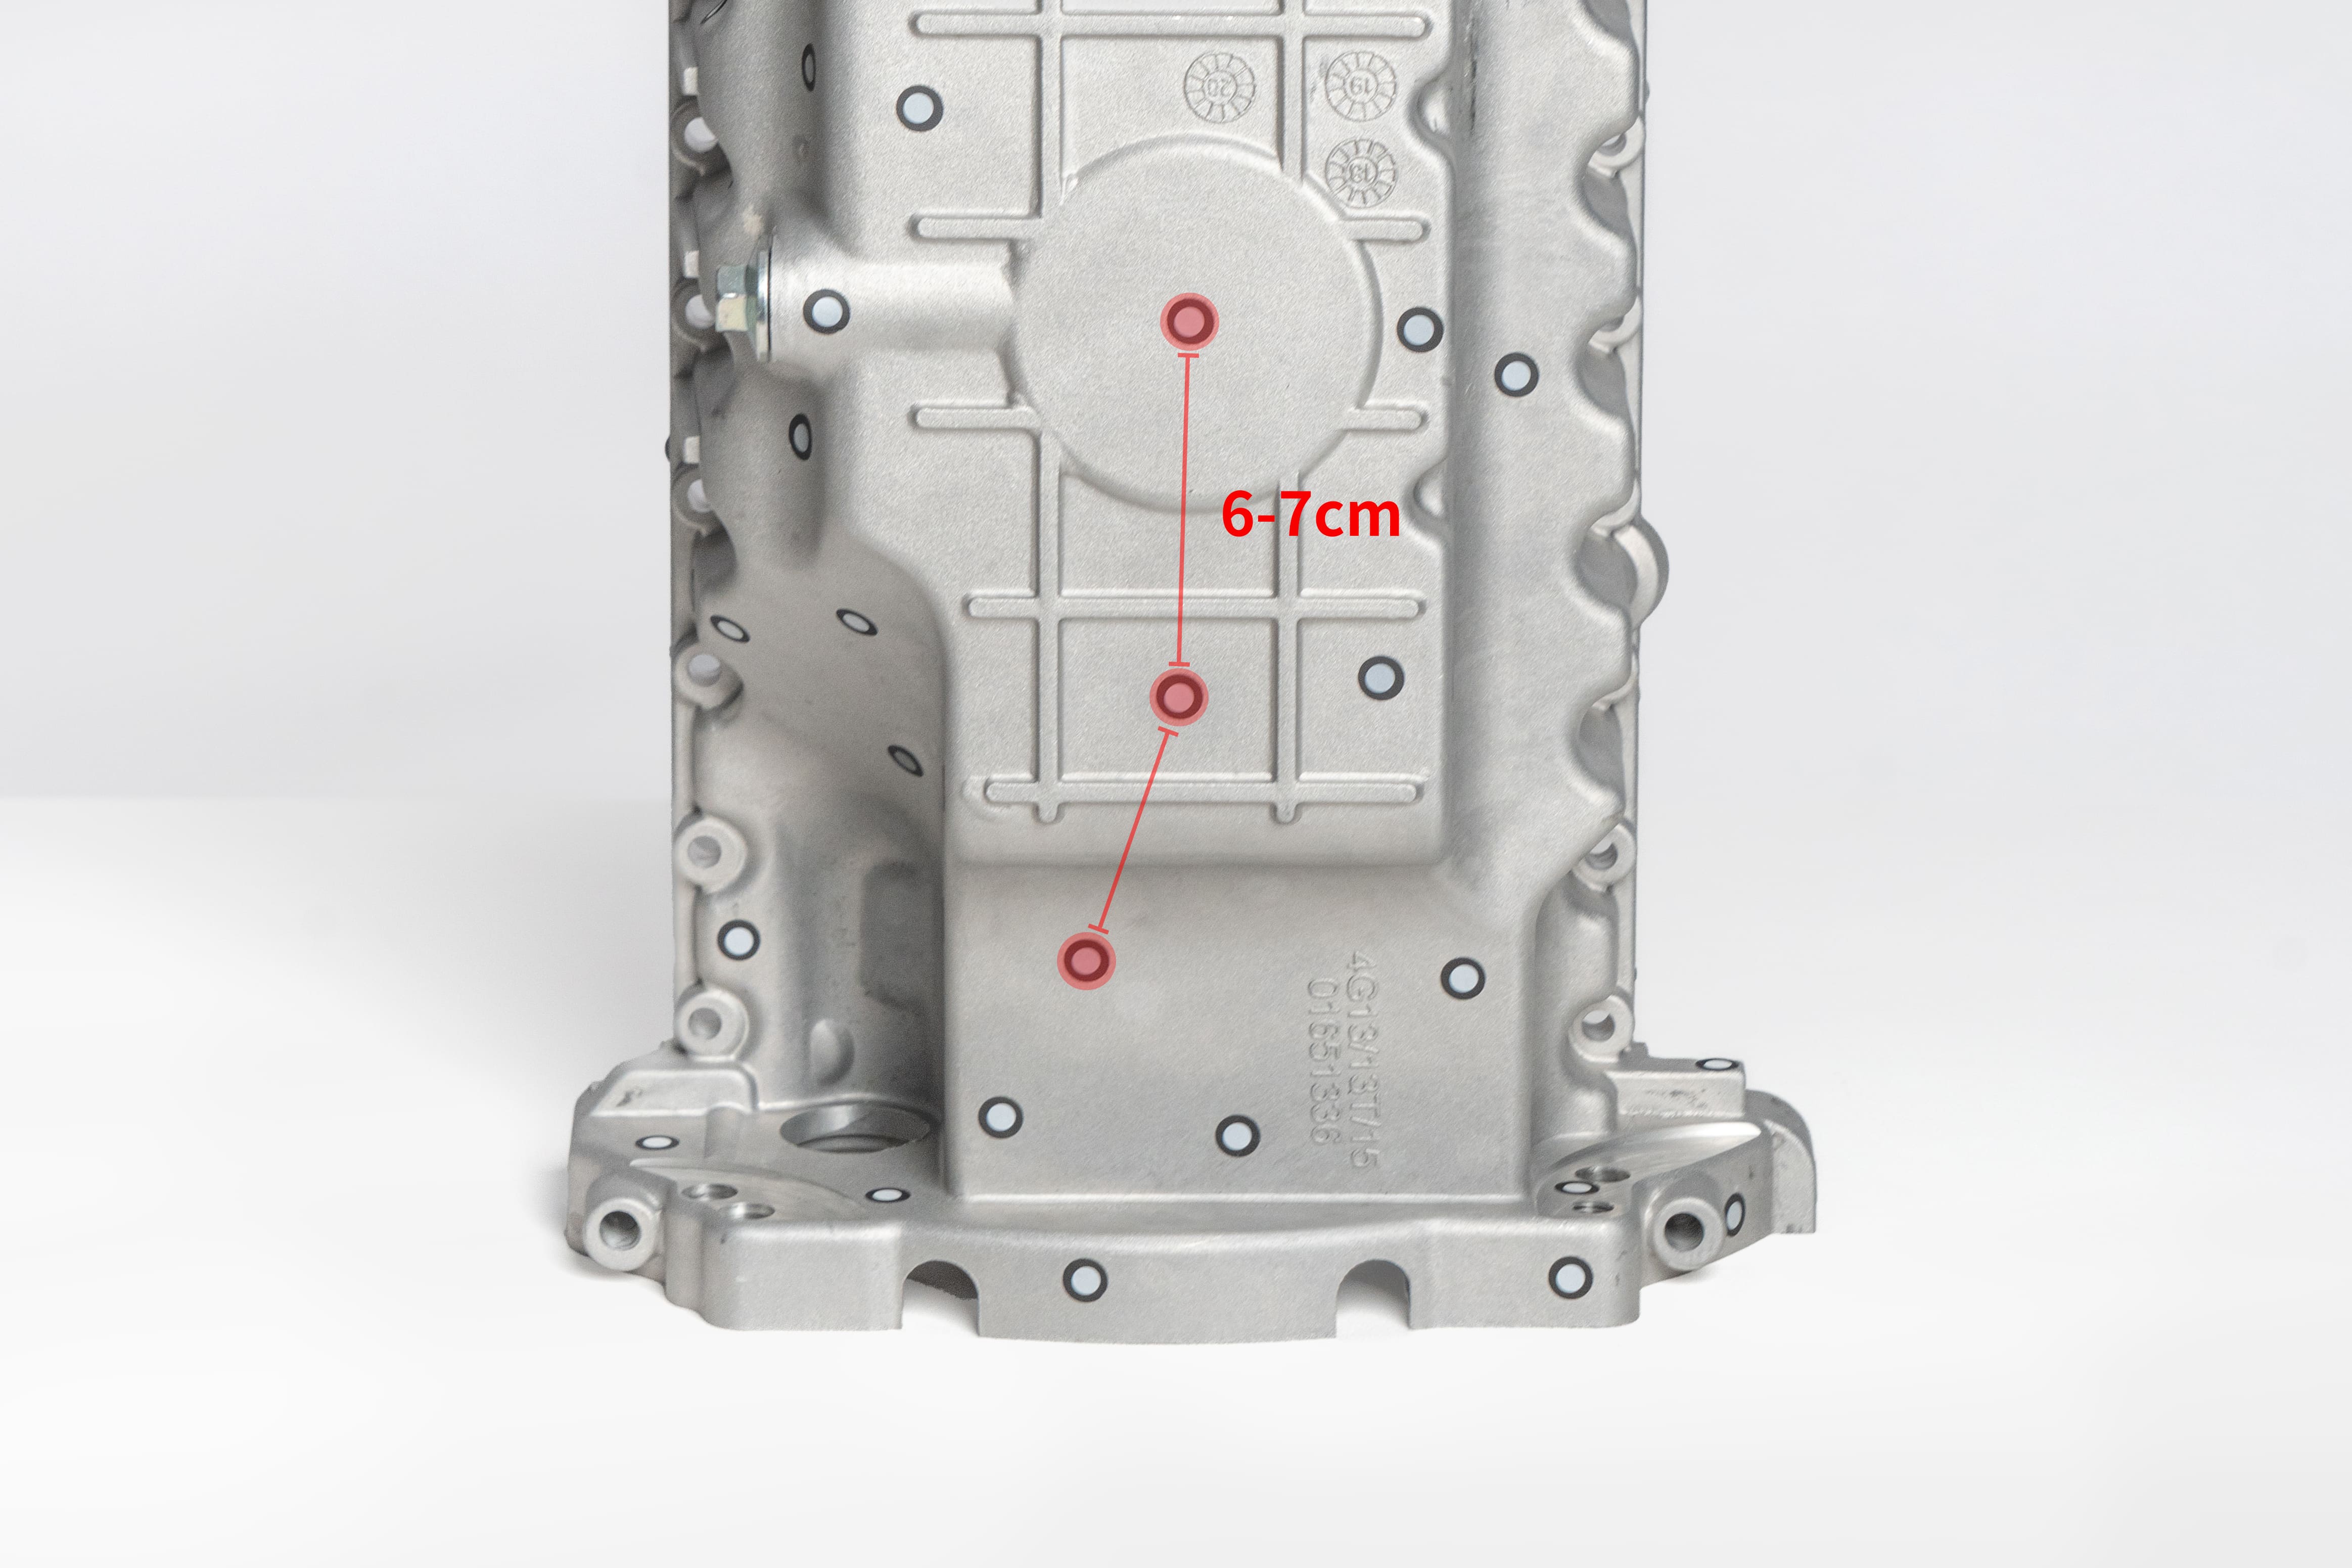
Don't use too many markers, but ensure that at least 5 markers are placed irregularly per scanned frame.
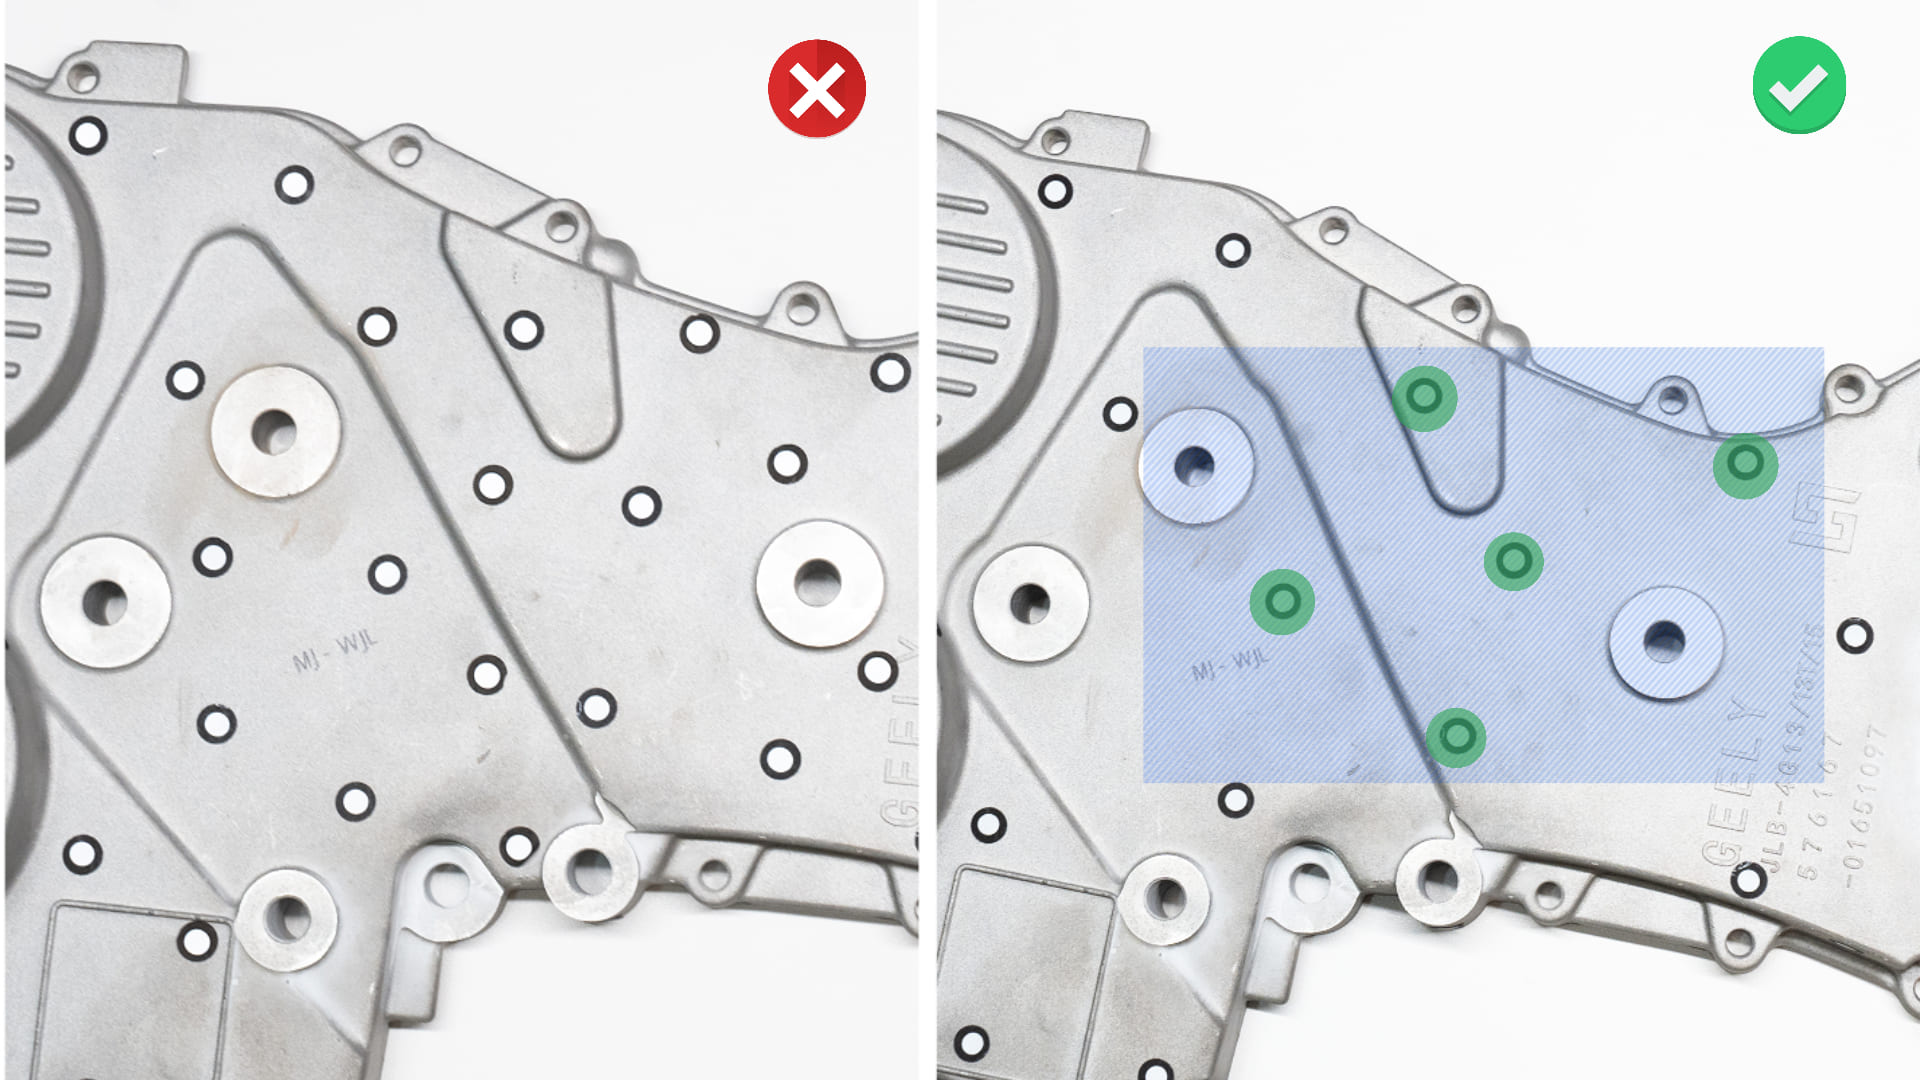
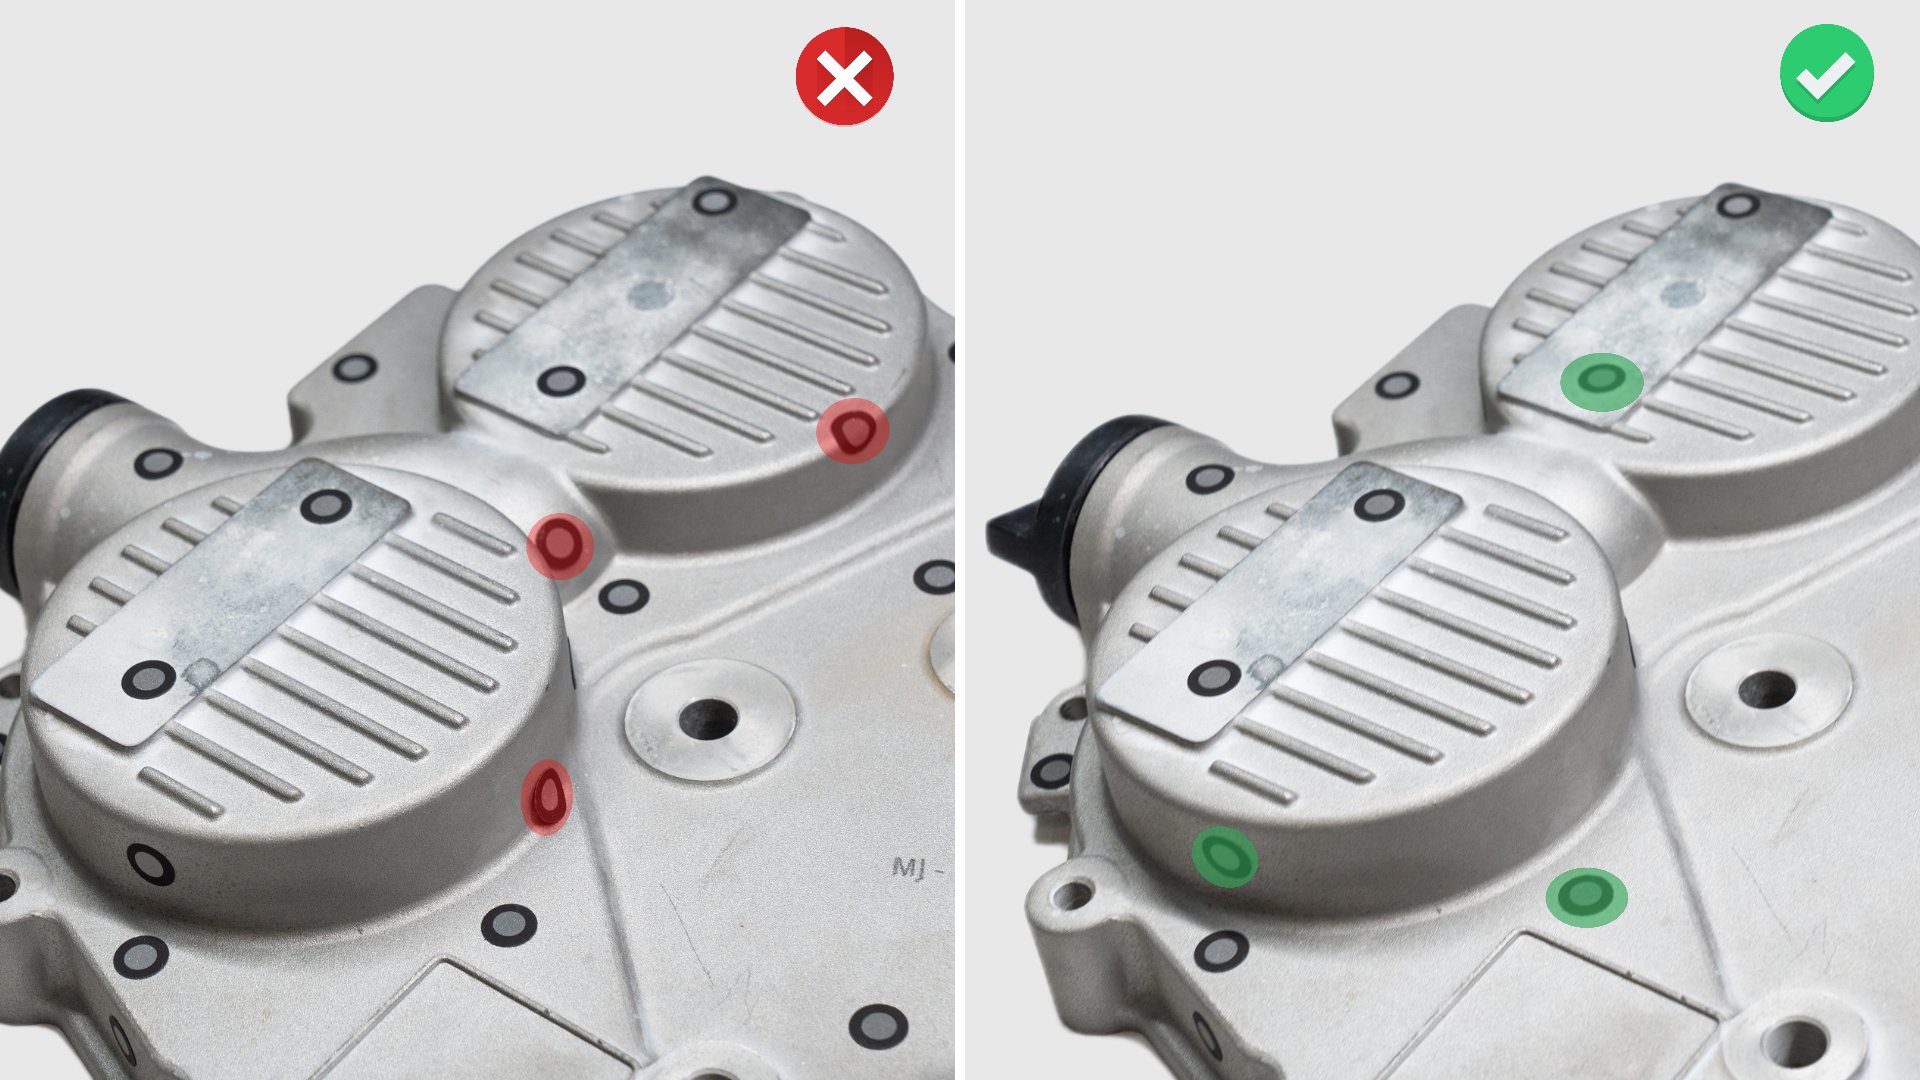
For best accuracy, attach the markers to flat surfaces rather than curved ones. Also, please avoid using soft pads or cloths with markers.
For more detailed marker tips, please refer to the Markers Use Tips Tutorial Video.
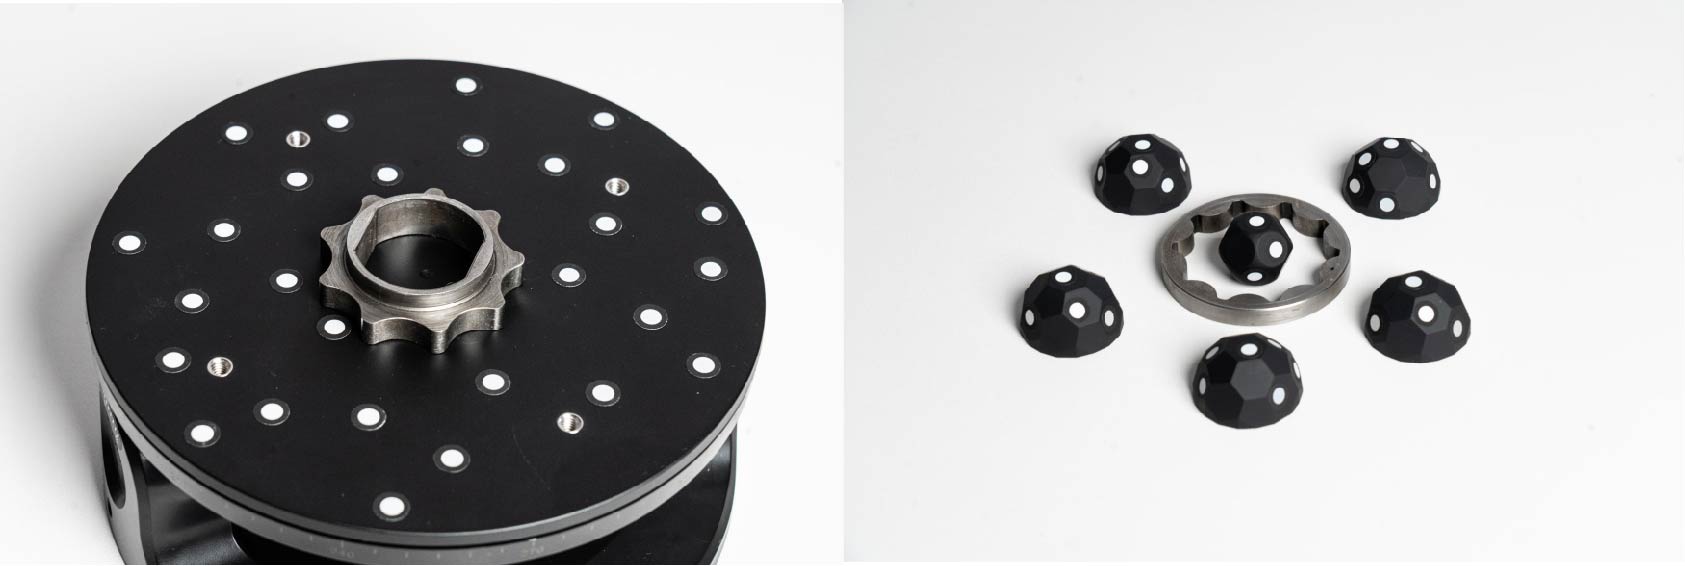
You can also use the Marker Block Kit to create a more ideal and complete scanning environment.
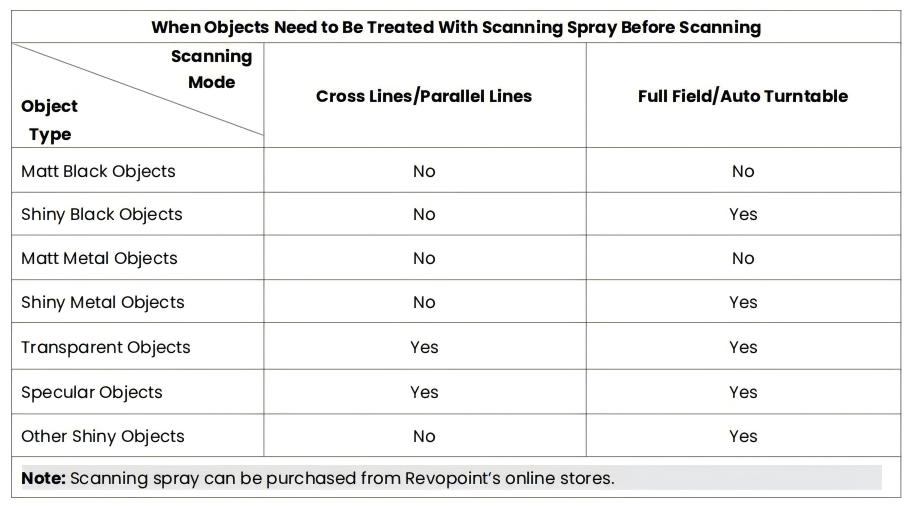
- Using Scanning Spray
When scanning metal, reflective, or transparent surfaces, refer to the table below to determine if scanning spray is required:
¶ 4.4 Set Up the Environment
Ensure the scanning environment is free from clutter and that the only things visible to the scanner are the object being scanned and any required supporting accessories.
If using the Auto Turntable mode, follow the steps below to set up the environment.
① Attach the scanner cradle to the tripod and place it on a stable surface. Put the scanner in the cradle.
② It is strongly recommended that you affix the object to the turntable. Then, adjust the tripod to a suitable height. Use the power cable to power the turntable.
¶ 5. Scanning Steps
For detailed scanning instructions for each scan mode, please refer to Sections 7.1–7.3 of the Revo Metro Software User Manual: Cross Lines/Parallel Lines Mode, Full Field Mode, and Auto Turntable Mode.